How to fix the FaceTime camera on the iPhone 5
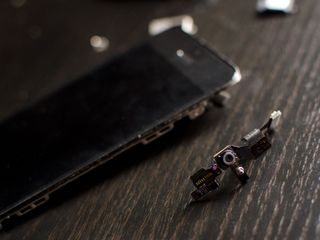
If you're experiencing issues with the front-facing FaceTime camera on your iPhone 5, it may be time for a DIY repair. Symptoms with the FaceTime camera typically include a blacked out screen when the front-facing camera is activated or pixelated areas and lines through the screen. In some cases the front-facing FaceTime camera may not launch or trigger at all. That cable also contains the proximity sensor and ambient light sensor. If auto brightness isn't working or your display doesn't turn off when you're on a call, those are signs the sensor portion is failing. If you're experiencing any of these issues, follow along and we can walk you through a DIY repair from start to finish!
What you need to DIY replace a bad FaceTime camera or sensor cable
You'll need some tools and parts in order to repair your iPhone 5, including the replacement assembly. iMore recommends using only quality and genuine parts from a reputable supplier like iFixYouri. They have quality parts, tools, and much more for all your repair needs.
- Replacement iPhone 5 FaceTime camera and sensor cable
- Suction cup
- 5-point security screwdriver
- Standard #000 Phillips screwdriver
- Spudger tool
- Razor blade
- iSesamo Opening tool (not necessary but awesome for prying up cables and getting under adhesive)
Step 1: Power off your iPhone 5

Before beginning any repair, always power your iPhone down completely using the Slide to power off option. Easy enough right?
Step 2: Remove the front screen assembly
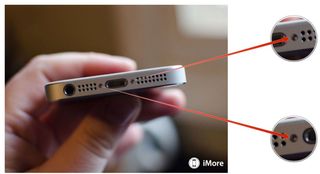
- To begin, use your security screwdriver to remove the two screws in the bottom of your iPhone 5 that sit on either side of the dock.
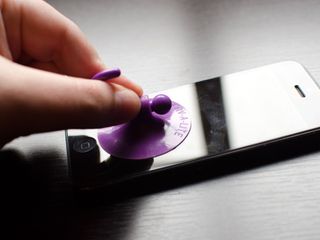
- Now place your suction cup above the Home button and gently pry up from the bottom. Take care not to pull the entire screen off as the top of the screen is still attached by several cables. You only want to release the bottom portion.
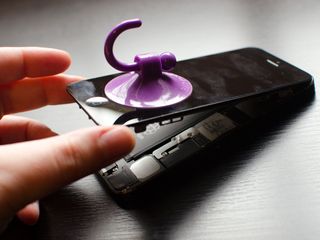
- Once the screen is free, swing up the display assembly so you can get to the shield that is holding the cables in place.
- Using your ##000 screwdriver to remove the three screws holding the display shield down. Set the shield aside and remember not to mix up the screws.
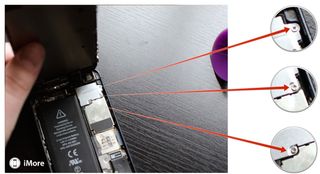
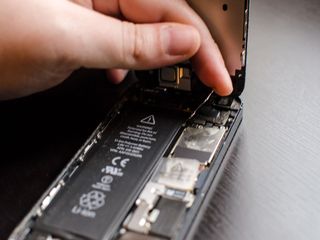
- Now use your spudger tool to pry up the three cables that attach the display to the board. After you do so, the display should be free from the device. As a side note, you can only see two of the cables (as marked in the photo below) as the third is underneath. Most of the time the third one simply pops up on its own when you remove the first two. You may need to free it but most likely, it'll come up on its own. The second photo below shows its location on the board for reference.
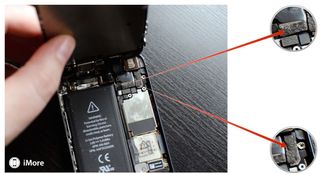
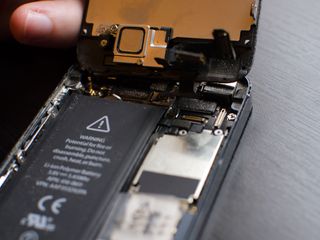
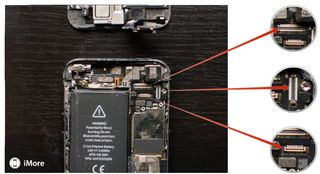
- Set the device aside once the display is free.
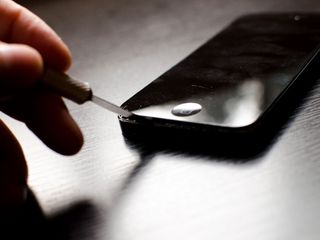
Alternate method: If you're having issues pulling the screen up with a suction cup, you may insert a razor blade on the outer edge of either screw hold and pry upwards slightly. This method gives you enough clearance to stick your spudger tool underneath and release the screen. I recommend this method if your hands aren't as steady or you're afraid you may pull too hard and damage a cable.
Step 3: Remove the earpiece assembly
- Place your display assembly face down on a clean cloth as to not scratch the screen.
- Remove the two screws holding the earpiece speaker and shield in place using your #000 screwdriver.
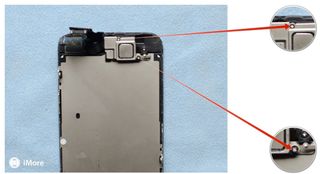
- Gently lift the earpiece and shield off the display assembly.
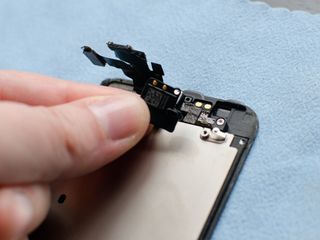
Step 4: Swap out the FaceTime camera and sensor cable assembly
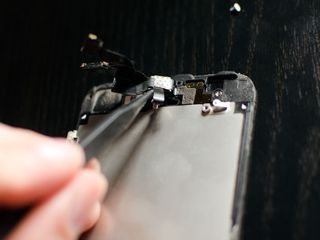
- Start in the middle of the cable by gently pulling up where the gasket is tucked into the display, as shown in the image below.
- Next use your iSesamo opening tool or a razor blade to pry up the right side of the sensor cable. It's only held down with a small amount of adhesive. Just take care not to damage any of the brackets on the back of the display assembly.
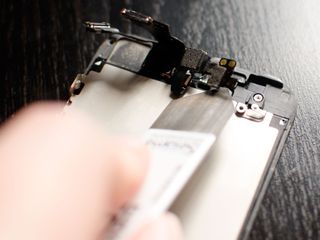
- Gently lift the FaceTime camera and sensor cable out of the iPhone 5's display assembly.
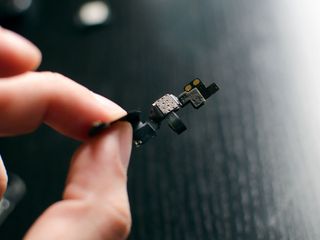
- Peel off any adhesive backing on the new assembly and start by securing the gasket to the back of the display assembly and then folding the cable upwards like the one we are replacing was.
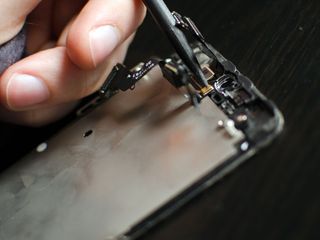
- Next line up the right side of the cable and make sure the adhesive on the back is secure.
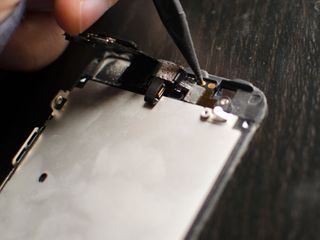
- Finally, flip over your iPhone 5 display assembly carefully and make sure the camera itself is centered inside of the recess. Make any adjustments left and right if needed. You may want to check this again after replacing the earpiece as well.
Step 5: Replace the earpiece assembly and shield
- Place the earpiece assembly on the back of the display. Be sure to line up the contacts on the back of the earpiece with the contacts on the cable assembly on the back of your iPhone display. An easy way to know the earpiece is positioned correctly is if the screw holes are lining up correctly. If they are, you're in good shape!
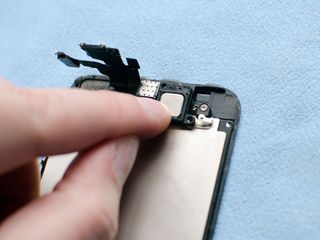
- Replace the earpiece shield on top of the actual earpiece. Make sure it also lines up with the screw holes correctly.
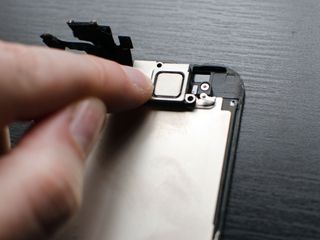
- Replace the two screws that hold the earpiece and shield in place using your #000 screwdriver.

Step 6: Reconnect the display assembly
- Re-attach the three cables for the display back to the board of your iPhone 5.


- Carefully re-position the display shield over the cables once you're sure they are secure.
- Replace the three screws you removed previously using your ##000 screwdriver. Sometimes the top right screw is not magnetized and may be a little tricky to get back in. I normally guide it in with my finger and then use the screwdriver. Makes for an easier job.

- Now snap the display back down and into place. Be sure to line up the grooves in the top of the screen inside the frame. If you are facing resistance, do not force the display down. Make sure everything is lined up properly and that the clips in the top are aligned properly. Then try gently pressing down again.
- Replace the two screws that sit on either side of the Lightning dock using your security screwdriver.

Step 7: Test the FaceTime camera and all your sensors

Once you've got your iPhone 5 all put back together, go ahead and turn it on. In order to test the cable assembly you just replaced you should do the following:
- Place a test call and place your finger over the sensors at the top. Be sure the display turns off when you do so as this indicated the proximity sensor is functioning properly.
- Go into a dark or very bright room with auto-brightness turned On. Make sure the display corrects itself to an appropriate brightness level.
- Lastly, test the front-facing FaceTime camera and make sure it's functioning properly.
If all is well, you're good to go! If you're still experiencing issues, check out our iMore forums and do a quick search.
○ Fix a broken iPhone 7 or 7 Plus
○ Fix a broken iPhone 6s or 6s Plus
○ Fix a broken iPhone SE
○ Fix a broken iPhone 6 or 6 Plus
○ Fix a broken iPhone 5c
○ Fix a broken iPhone 5s
○ Fix a broken iPhone 5
○ Fix a broken iPhone 4s
○ Fix a broken iPhone 4 (GSM)
○ Fix a broken iPhone 4 (CDMA)
○ Fix a broken iPhone 3GS or 3G
Master your iPhone in minutes
iMore offers spot-on advice and guidance from our team of experts, with decades of Apple device experience to lean on. Learn more with iMore!
iMore senior editor from 2011 to 2015.

All-screen iPhone SE 4 tipped for a 2025 launch, but those hoping for a low-budget powerhouse are set to be disappointed

Apple's iPhone 16 could finally get the capacitive buttons that the iPhone 15 missed out on with a supplier now lined up

An Apple Vision Pro headset helped this Brazilian surgeon repair an injured shoulder like never before
Most Popular


