How to enable restrictions on the Apple TV

The Apple TV, thanks to iTunes, Netflix, YouTube, and other services, has an amazing amount of content for viewers of all ages. If you kids in your home, however, you may not want them watching the more adult, more R-rated or NC17 content. Luckily, Apple lets you enable parental restrictions. Not only can that prevent young eyes and ears from seeing and hearing things they shouldn't, they can also prevent you from racking up charges on your iTunes account for rentals or purchases they shouldn't be making. Think of it as an extra parental helper for your Apple TV!
How to turn on parental restrictions and password protect content on your Apple TV
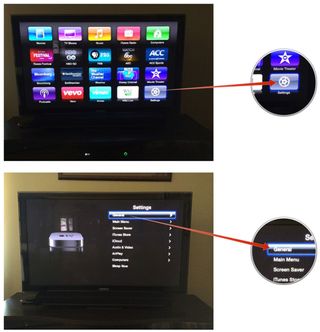
- From the main menu of your Apple TV, click on the Settings icon.
- Select General.
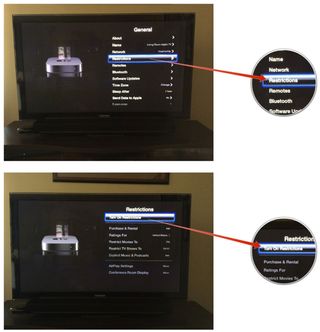
- Scroll down and click on Restrictions.
- Select Enable Restrictions.
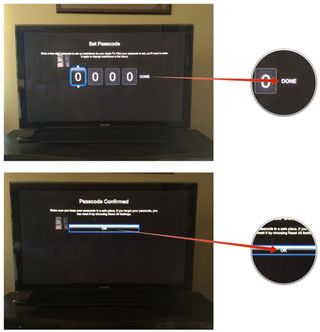
- Enter a passcode. You'll be asked to enter it twice in order to confirm it.
- Select the options you'd like to enable in the restrictions menu. Simply go through and toggle settings on or off as you wish. You can always change these later as well.


Aside from needing a passcode on rentals and purchases, you can also restrict certain content types based on rating. If you really want to, you can also disable AirPlay from so no one can stream around your restrictions. This is a useful feature if you have an Apple TV on an open Wi-Fi network.
If you use the restrictions feature on your Apple TV, is it due to having chidden in the house, or some other reason? Let me know in the comments!
Master your iPhone in minutes
iMore offers spot-on advice and guidance from our team of experts, with decades of Apple device experience to lean on. Learn more with iMore!
iMore senior editor from 2011 to 2015.
Most Popular


