How to manage your account in Fitbit for iPhone and iPad
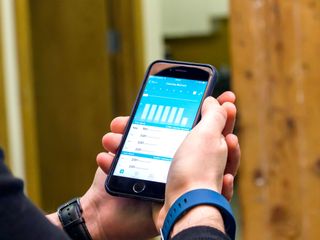
Your Fitbit account is the linchpin of your entire Fitbit experience. Your personal profile info — height, weight, gender, and age — is what uses Fitbit to determine all of it's calories burned data and weight loss rate predictions.
Meanwhile, your personal goals like steps per day, distance traveled, active minutes, and floors climbed keep you working towards tangible numbers that show you the progress you are making over time. It's important to know how to customize these options in order to get the best results from your Fitbit.
How to edit your profile in the Fitbit app for iPhone and iPad
Editing your personal info will become very important when you start losing weight. Updating your weight and height will significantly increase the accuracy of your tracker.
- Launch Fitbit from your Home screen.
- Tap on the Account tab. It's in the bottom right corner of your screen.
- Tap on your name.
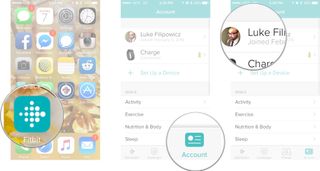
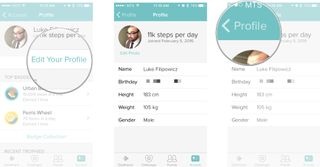
- Tap on the Edit Your Profile button.
- You will see a list of all your profile information here, and it can all be edited. You can edit any of the above-listed options by tapping on the option you want to change and entering the new information. The list of customizable information is as follows:
- Name
- Birthday
- Height
- Weight
- Gender
- Tap on the back button when you are done changing all your information. It's the < with the word "Profile" in the top left corner.
We're not sure why your birthday would change (it doesn't help you to lie about your age), but if it does at least Fitbit will know and that's what really matters.
How to customize your activity goals in the Fitbit app for iPhone and iPad
Activity goals are the main activities your specific Fitbit monitors everyday. Steps, distance, active minutes, and calories burned are the basic activities that every Fitbit should monitor. It's important to make sure these goals push you to reach them but also are attainable. You don't want to be discouraged by setting goals you can't possibly reach.
- Launch Fitbit from your Home screen.
- Tap on the Account tab. It's in the bottom right corner of your screen.
- Tap on the Activity button.
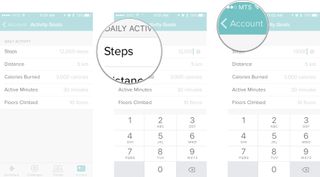
Here you will see a list of all of your activity goals. What options you see here will vary a little between models but your list should look something like the following:
- Steps
- Distance
- Calories Burned
- Active Minutes
- Floors Climbed
To edit any of these goals, simply tap on the goal you wish to change and enter the your new goal. The example below shows you how to change a goal.
Master your iPhone in minutes
iMore offers spot-on advice and guidance from our team of experts, with decades of Apple device experience to lean on. Learn more with iMore!

How to change your exercise goal in the Fitbit app for iPhone and iPad
Choose how many days you want to exercise each week. Whether you workout everyday already, or want to start exercising a few days a week, you can change this goal at any time to best fit your lifestyle.
- Launch Fitbit from your Home screen.
- Tap on the Account tab. It's in the bottom right corner of your screen.
- Tap on the exercise button.
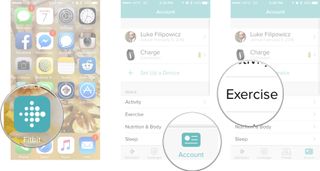
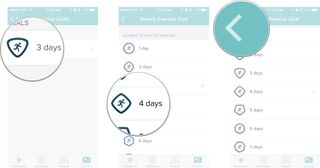
- Tap on the goals button. It's the little running stick figure.
- Tap on the amount of days you would like to workout in a week.
- Tap on the back button. It's the < in the top left corner of your screen.
How to change your sleep goal in the Fitbit app for iPhone and iPad
If your Fitbit model supports sleep tracking, you can modify how much sleep you want to get every night. We're not sure anyone actually gets as much sleep as they want, but hey, you can try.
- Launch Fitbit from your Home screen.
- Tap on the Account tab. It's in the bottom right corner of your screen.
- Tap on the Sleep button.
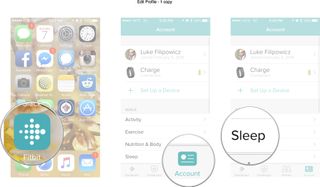
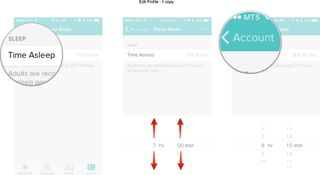
- Tap on the Time Asleep button.
- Adjust the scroll wheels to your desired sleep time in hours and minutes.
- Tap on the back button when you are done changing all your information. It's the < with the word "Account" in the top left corner.
○ Fitbit Buyers Guide
○ Fitbit Users Guide
○ The Best Fitbit to Buy
○ Fitbit News
○ Fitbit Forums
○ Buy on Amazon

Luke Filipowicz has been a writer at iMore, covering Apple for nearly a decade now. He writes a lot about Apple Watch and iPad but covers the iPhone and Mac as well. He often describes himself as an "Apple user on a budget" and firmly believes that great technology can be affordable if you know where to look. Luke also heads up the iMore Show — a weekly podcast focusing on Apple news, rumors, and products but likes to have some fun along the way.
Luke knows he spends more time on Twitter than he probably should, so feel free to follow him or give him a shout on social media @LukeFilipowicz.

Waiting for an M3 Mac mini or Mac Pro? You're probably wasting your time, Apple's all about those M4 chips instead

Does your iPhone really get recycled when you give it back to Apple? This report says it might not

Apple's on-device AI plans might have been confirmed as the tech giant acquires another AI startup
Most Popular


