How I made an arcade cabinet with my Mac mini and M.A.M.E.

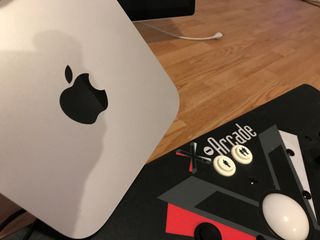
If you were lucky enough to upgrade your existing Mac line up this holiday season to a new iMac Pro, you may be wondering what to do with some of your older less powerful hardware. Rather than give my Mac mini away or recycle it, I decided to revamp and update my home built arcade cabinet running the multiple arcade machine emulator (M.A.M.E. for short) and use the Mac mini as the engine.
What is M.A.M.E.
For simplicity's sake, I'll define M.A.M.E. as an archive of the vintage software that ran arcade systems from yesteryear. The developers try their best to recreate the software systems that ran/run on arcade based computers and do so strictly via CPU emulation for that purpose. The developers avoid using GPU acceleration for the emulation because actually running of the software is simply an aside to the purpose of their mission. As a result, if you want to run some older arcade games, the best recreation aside from having an authentic arcade CPU board, would be the M.A.M.E. project.
Completely Apple-based M.A.M.E
I previously had the traditional M.A.M.E. setup running a Windows-based PC. It worked very well but it was unwieldy, loud, overly wired, and frankly just old. I had built up so much software cruft over the years that the system started to become quirky rather than useful in it's function. Since I was already using an old Apple Cinema Display as the monitor, I figured I'd make the cabinet a complete Apple affair with with my LED Cinema Display, my 2014 Mac mini, and my full sized Apple keyboard (a third-party trackball doubles as a mouse so that was not needed).
The extra bits
When building a M.A.M.E arcade cabinet you can be as authentic to a true arcade cabinet as you desire. You can just run the emulator on your current Mac and use a keyboard and trackpad as your input devices and be done with it. Or, you can go for a more traditional experience and build a real arcade cabinet to house the computer and attach custom arcade quality joysticks and buttons for your inputs.
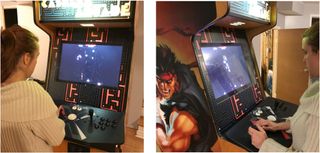
I went the more traditional route but I didn't build my own arcade cabinet. I found a old bowling game that was non-functional from a local ad and picked that up for $100.
I also didn't add custom joysticks or buttons. Instead I opted for a pre-built joystick from X-Arcade called the Tankstick + trackball for $150.

The nice thing about the Tankstick is that it uses real arcade quality joysticks and buttons built into a solid casing that when plugged into your computer, is detected as a regular keyboard. The "up" button is effectively a "1" on your keyboard for example. This means that when you are mapping user inputs on a game for your emulator, you won't run into any compatibility issues as all the emulator will see is a normal keyboard being used to map your buttons to.
Master your iPhone in minutes
iMore offers spot-on advice and guidance from our team of experts, with decades of Apple device experience to lean on. Learn more with iMore!
On top of that, when I bought my Tankstick, it came with a CD-ROM of classic arcade games that you can legally play on your M.A.M.E. cabinet.
OpenEmu, a M.A.M.E. frontend
Anyone who has used M.A.M.E. knows that all of the options that are available to you in the default user interface can be a bit daunting. I decided to use OpenEmu as my M.A.M.E. front end. Although OpenEmu is not strictly a M.A.M.E. emulator front-end, it does provide a experimental build that allows for you to run M.A.M.E. binaries through it's GUI.
To get the M.A.M.E. enabled OpenEmu build simply do the following:
- Head to OpenEmu.org.
- Click the dropdown button next to the Download Now button.
- Select OpenEmu Experimental.
- Done.
Once downloaded, you can simply double click the downloaded file to run the application. It's already in an uncompressed form so if you like the program, you can place it somewhere more permanent on your hard drive like you applications folder
Connecting the computer components
Assembly of the computer components was the easiest aspect of this project. The Mac mini was upgraded to macOS High Sierra. The LED cinema display simply plugged into the mini display port on the back of the Mac mini. USB ports on the back of the Mac mini. You need to use up 2 port for the Tankstick with trackball. The trackball of the Tankstick also doubles as a mouse pointer for your Mac. So you needn't have an extra mouse connected to your system.
Prepping the arcade cabinet
I completely removed the joystick deck from the arcade cabinet. This was done so that I can simply place the X-Arcade Tankstick right onto the cabinets side walls and secure it with screws. The Tankstick with trackball is roughly the width of a standard arcade cabinet so the fit was perfect.

I also removed the deck bezel that hides the area underneath the joystick deck. This was done so that I can place my keyboard onto the maintenance platform and keep it there for easy access when needed to perform non-arcade functions. I made the platform have the ability to also slide out a bit for easier keyboard access but then be able to "hide away" when not in use.

The LED cinema display is also 22 inches wide so it neatly rests on the wooden back plain within the width of the cabinet. All I needed was to add small 3-inch wooden block under the stand of the LED cinema display to raise it's profile to sit in the middle of the viewing area.

Once installed, I fed the wires underneath the bezel and placed the Mac mini on the base of the cabinet. The back end has a space for the power outlet.
I already had custom made bezels and marquees built for the cabinet for a personal flare.
Set up for gaming
Once the system is up and running, you'll need to configure the various aspects of the system for gaming. You'll need to change the controller mapping for your M.A.M.E. software through OpenEmu. And you'll need add your legally owned games to the emulator. I'll be following up with a subsequent article about the specifics needed to get you started on configuration, key mapping and game setup.

Final thoughts
There is definitely nostalgia involved in enjoying some of the older games that can be run on your M.A.M.E. system. Being able to have a more complete experience running that software on a genuine arcade cabinet makes that experience just that much better. However, the jewel of this M.A.M.E. system is the Mac mini.
Its small form factor makes with it's ability to tie into my Apple ecosystem makes it the perfect choice for my needs since I also run macOS Server on the Mac mini as well so it serves as my VPN server, caching server and file sharing server. My LED Cinema Display was sitting in a closet for a number of years ever since I got my 5K iMac. Pairing it the the Mac mini was a no-brainer as it simply just works. So before you decommission your older hardware, get in touch with your nostalgic side and give M.A.M.E. a go. That older hardware will run it beautifully. Have you used M.A.M.E. on your Mac? Let us know how you fared!
Most Popular


