How to edit RAW files in the Photos app for iPhone and iPad

Photographers rejoice: As of iOS 10, iCloud Photo Library will sync your RAW files. That means the full image data is pulled right off the camera sensor. Any RAW images you snap in a third-party camera app on your iPhone will show up as RAW on your iPad and Mac, but better yet — you can now import RAW images from your DSLR or other pro camera to your iPhone or iPad and have them sync properly to your Mac.
You can also process and edit those RAW files directly on your iPhone or iPad using an external editor like Lightroom, and even through the Photos app. But be aware: If you want to edit a RAW file with Photos for iPhone, you're going to want to create a duplicate of it first.
How RAW processing works on iPhone and iPad
When you process a RAW file, you're never editing the raw data — instead, you're essentially working with a small sidecar file that tells the RAW file how to process light, saturation, and the like. RAW files are huge compared to web-friendly-but-highly-compressed formats like JPG — 11MB or more — and as such, when you go to save your edits, you'll want to export it into something more manageable.
In Photos for iPhone and iPad, when you press the Edit button on one of your RAW files, you're editing that sidecar data. But when you finish editing, Photos automatically presents you with a converted, compressed file to use elsewhere.
This isn't unusual for image editing programs to do — after all, you can't really export an edited RAW file. The issue, however, is with formatting: Most apps let you choose between exporting a small format like JPG, which uses "lossy" compression, and a much larger format like TIFF or PSD, which uses "lossless" compression. ("Lossy" because it saves space by throwing away data science says our eyes can't easily notice.) Photos for iPhone and iPad, however, automatically exports to JPG without asking the end-user what they'd like to do.
This is largely because Photos assumes that, after editing, you're going to share this photo online — and thus, want a nicely-formatted image to use. The original RAW file is still there thanks to iOS's non-destructive editing, however, and you can restore it by going back into the editing screen and reverting changes to the original file.
Unfortunately, even with non-destructive editing, iOS can't differentiate as to which file it should send a third-party app: It treats a sharing app (like Twitter) identically to a photo editing app (like Lightroom).
Master your iPhone in minutes
iMore offers spot-on advice and guidance from our team of experts, with decades of Apple device experience to lean on. Learn more with iMore!
So, if you used the Crop tool in Photos before bringing an image into Lightroom, you'd only see the cropped JPG when you went to import and not the original RAW file.
As such, if you plan on editing a file in Photos but also want the original RAW file available for third-party apps, there's a simple way to avoid this stress — duplicate your original file.
How to duplicate a RAW file in Photos for iPhone and iPad
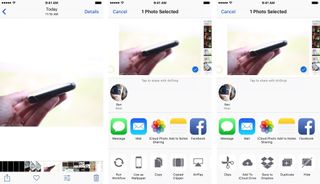
- Choose the RAW image you wish to duplicate in the Photos app.
- Tap the Share button.
- Scroll along the bottom section of the Share Sheet until you find the Duplicate button, then tap it.

Once you've duplicated your file, you can leave one in Photos as the original RAW file, and feel free to edit the other in-app.
Questions?
Any questions about RAW, editing on iPhone and iPad, and the like? Let us know below.
Serenity was formerly the Managing Editor at iMore, and now works for Apple. She's been talking, writing about, and tinkering with Apple products since she was old enough to double-click. In her spare time, she sketches, sings, and in her secret superhero life, plays roller derby. Follow her on Twitter @settern.

For All Mankind has been renewed for another season on Apple TV+, and there's more big news for fans of the show

iPhone 17 will reportedly offer a new display size for those who want to sit between the regular and Pro models

Alt Store, a popular third-party app store, is now available to download on iPhones in the EU
Most Popular


