
Of course, Apple would prefer if you used a Mac alongside your iPhone or iPad, but it isn't silly enough to assume that folks would give up their Windows PCs and go all-in on its hardware. As such, some of the core services you'll be using on those mobile devices are also available for Windows.
One specific service is iCloud Photos. It's a relatively easy way to share your iPhone or iPad photos with your Windows 10 PC, once you've got it set up. Here's what you need to know.
How to download, install and set up iCloud for Windows
Before you do anything you need to have iCloud for Windows installed and set up. The good news is that it's an easy process. The even better news is we have a complete guide to walk you through it, step by step.
How to set up iCloud on Windows 10
How to enable iCloud Photos on your iPhone or iPad

It goes without saying, but before you can share anything to your Windows 10 PC you need to make sure you've enabled everything on your iOS device. If you need help with that, check out the guide linked below courtesy of our pals over at iMore.
How to enable iCloud Photo Library on your iPhone and iPad
How to enable sync on Windows 10

If you didn't take care of it already in the first step, the next thing you need to do is to enable iCloud Photos in iCloud for Windows.
- Open the Start Menu and navigate to the iCloud folder.
- In there, you need to open the iCloud application.
- In the box that pops up, check the box next to Photos.
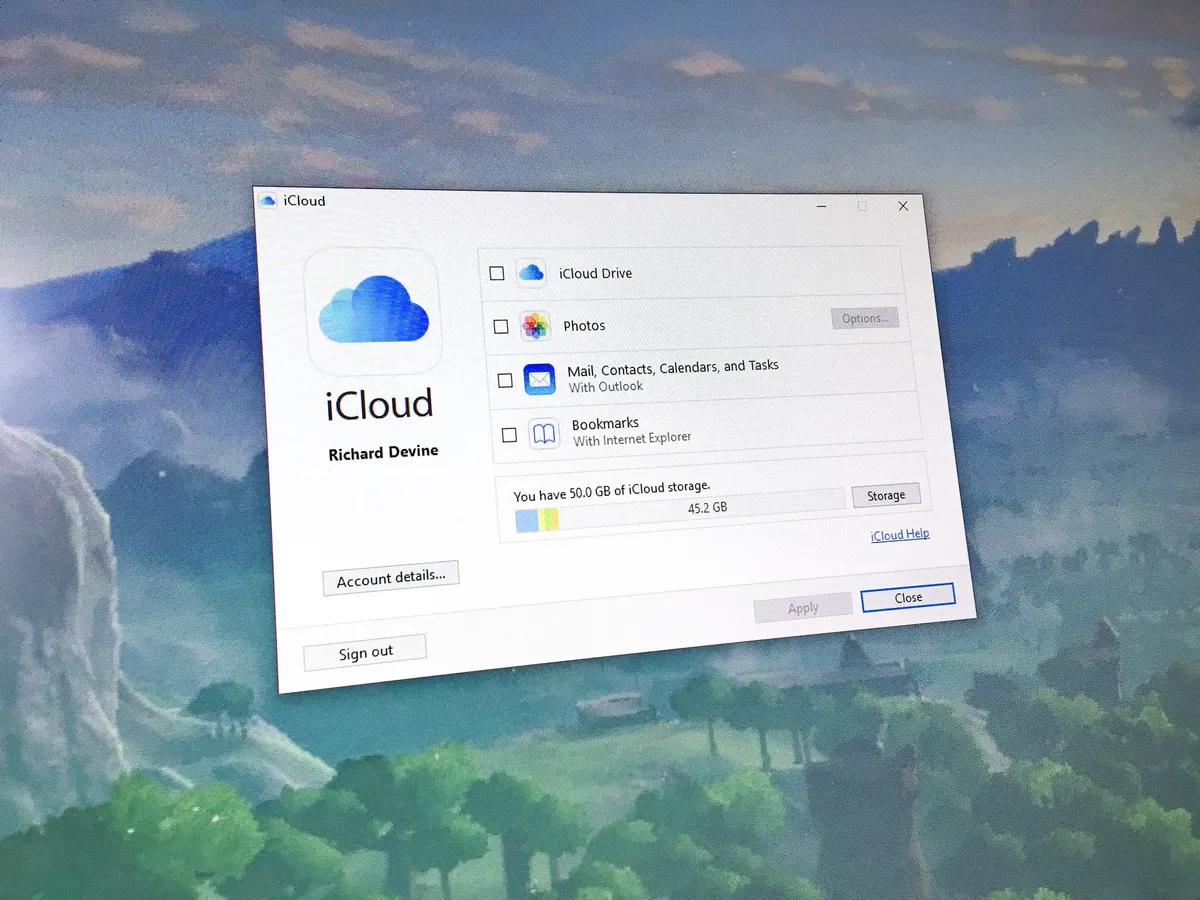
Choose what to sync

In the box you enable Photos in during the previous step, you'll also see a button labeled Options next to Photos. This is where you choose what it is you wish to sync to your PC.
Click on Options and you'll be presented with what you see in the image above. Here's what you can do:
- iCloud Photo Library: Upload your PC photo library to your iCloud storage.
- Photostream: This is a pretty simple way to share your iPhone and iPad photos with all of your iCloud enabled devices. It'll share everything you take and sync it to your Windows 10 PC, but it'll also work in reverse and allow you to add photos from your computer that will then sync to iCloud and any iPhone, iPad, Mac or Apple TV that's set up for it.
- iCloud Photo Sharing: Choose the people you want to share photos with and allow them to add photos, videos, and comments. Comments will show up right in the folder when you open it in Windows 10.
- Download and Upload new photos and videos to and from your PC.
You can also change the folder that synced photos go into. By default, it'll be set to go into Pictures or iCloud Photos, but you can change that to any other that you wish.
How to add iCloud Photos to Quick Access

The steps above will leave you in a position where iCloud will sync your photos to your computer. The photos themselves will reside in the folder specified in the previous step, but iCloud for Windows installs a 'desktop app' for quicker, easier management.
Only it's not a desktop app as you might imagine. To locate it you can either go into the "iCloud" folder in the Start menu and find iCloud Photos, or just open File Explorer. iCloud Photos will be added there, under Devices and drives in This PC.
- To add to Quick Access in File Explorer, right-click on iCloud Photos and select Pin to Quick Access.
- To pin to the Start menu, right-click on iCloud Photos and select Pin to Start.
How to add Photos to a folder or Photostream

Once you open up iCloud Photos and you're viewing either your folders or Photostream you can add new photos right from your computer. Follow these steps:
- Open the location to which you wish to share new photos.
- Above the main window look for Add photos or videos. (See the image above.)
- Choose the photos from your computer.
- Once you're ready, hit done.
The photos you just selected will soon be available on the devices and to the other people to whom you allow access.
How to create a new shared album

If you want to share a specific set of photos with friends or family who also use iCloud, there's a really easy way to do it. Do this:
- Open the location to which you wish to share new photos.
- Above the main window look for New shared album.
- Add the email addresses of the people you want to share with.
- Give the album a name.
- Click Next.
- Select all the photos you want to add from your computer.
- Click Done.
Now, all the photos you added to the folder will be synced to the devices of everyone you shared with. It's important to remember that you need to add their iCloud email addresses, which may well be different than their regular email addresses, so always make sure to check if in doubt.
How to unsubscribe from shared folders

If someone has shared a folder with you through iCloud but you're done with it and want to unsubscribe, you can do that too from iCloud for Windows. Follow these quick steps:
- Select the folder you want to unsubscribe from.
- Right-click on it
- Click Unsubscribe in the bottom left corner.
You'll now no longer see any photos from these folders.
You may not get as wide a range of features as on macOS, but Apple at least provides a comprehensive, if a little rudimentary, way to keep your iCloud Photo Library in order on Windows 10. And you can now move photos both ways, as well as view and edit photos on Windows 10.
For more on iCloud Photo Library, be sure to visit our pals at iMore and check out their ultimate guide.
Updated June 28, 2018: We thoroughly checked through this guide to make sure it contains all the info you need to get the most out of iCloud Photos on Windows.

