How to use Spotlight on the Mac
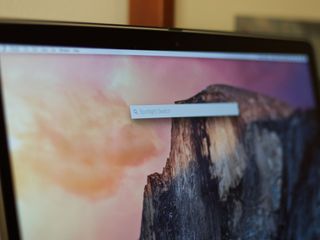
If you use your Mac every day for work and your personal life, chances are you have a lot of files, photos, folders, documents, and other data all over your Mac. It can make finding one specific file a pain. Luckily, Spotlight lets you search your Mac for pretty much anything, making it easy to find whatever you need. Here's how to use Spotlight on Mac with macOS Big Sur.
What Spotlight can help you find
Spotlight helps you find pretty much anything on your Mac. It indexes the contents of your Mac's hard drive to make it easier to find documents, emails, apps, music, contacts, and other information. It can also help you find information on the web, perform equations, and now in High Sierra, it can even find your flight information.
How to access and use Spotlight in macOS
- Click on the Spotlight button in the menu bar; it looks like a magnifying glass. Or, use the Command + Space keyboard shortcut. The Spotlight search field will appear in the middle of your screen.
- Type in your search query. Spotlight will return results as you type.

If Spotlight isn't finding what you're looking for, you can adjust its search results to optimize what you need. You can also exclude your hard disk's specific locations to prevent Spotlight from searching information you'd prefer to keep private.
How to customize Spotlight search results
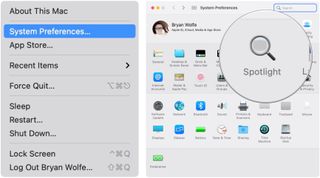
- Choose the Apple menu button on the top left of your screen.
- Select System Preferences.
- Click on Spotlight.
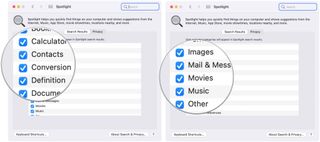
- Click the Checkbox beside the category to change what Spotlight will show you. If it has a checkmark, those results will be displayed; if it doesn't, those results will not be displayed.
How to hide content from Spotlight search
If you have sensitive documents in a certain location that you never want to be searched, you can tell Spotlight to not look in those locations.
- Choose on the Apple menu button on the top left of your screen.
- Select System Preferences.
- Click on Spotlight.

- Click on the Privacy tab.
- Choose the add button. It's the + sign at the bottom left of the window.
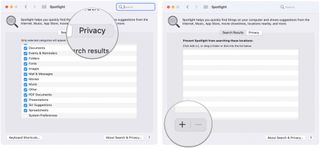
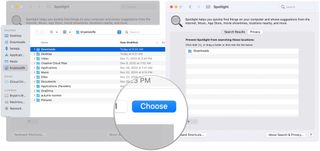
- Click the item you don't want Spotlight to search for.
- SelectChoose.
- Repeat Steps 5 through 7 to add more items to the list.
Looking for something new?
Are you considering buying a new computer? Check out our favorite MacBooks of the year.
Questions?
Need any more help with Spotlight? Let us know in the comments below.
Master your iPhone in minutes
iMore offers spot-on advice and guidance from our team of experts, with decades of Apple device experience to lean on. Learn more with iMore!

Luke Filipowicz has been a writer at iMore, covering Apple for nearly a decade now. He writes a lot about Apple Watch and iPad but covers the iPhone and Mac as well. He often describes himself as an "Apple user on a budget" and firmly believes that great technology can be affordable if you know where to look. Luke also heads up the iMore Show — a weekly podcast focusing on Apple news, rumors, and products but likes to have some fun along the way.
Luke knows he spends more time on Twitter than he probably should, so feel free to follow him or give him a shout on social media @LukeFilipowicz.
Most Popular


