How to create Activity Zones with HomeKit Secure Video cameras in the Home app
Filter out unwanted HomeKit camera and doorbell notifications with the Home app and Activity Zones. Here's how!
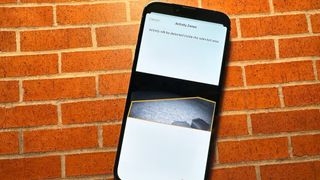
If you have a security camera or doorbell with HomeKit Secure Video support, then you need to know how to create HomeKit Activity Zones in the Home app. Activity Zones allow you to end nuisance HomeKit notifications by establishing active boundaries on your camera's view. All it takes is a few taps in the Home app to set up, and you can even create more than one zone per camera. Here's how to create HomeKit Activity Zones in the Home app.
How to create an Activity Zone in the Home app
For this example, we will create a four-point Activity Zone, such as a rectangle or square, on a camera view in the Home app. You can create more complex designs to better suit your needs; it just involves additional steps for adding zone points.
- Launch the Home app.
- Tap the Ellipses icon (on iPad or Mac, skip to the next step).
- Tap the Room that includes your camera.
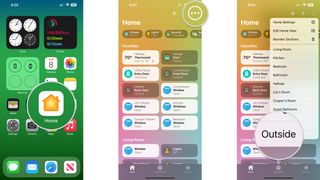
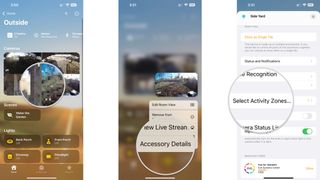
- Tap and hold on the Thumbnail image of your camera.
- Tap Accessory Details.
- Tap Select Activity Zones....
- Tap anywhere on the Camera view to set your first Activity Zone point.
- Tap in another spot on the Camera view to set a second zone point.
- After setting your second point, a line will appear connecting your points.
- Tap the Camera view to establish a third point.
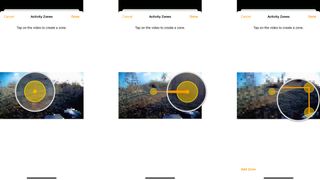
- Tap the Camera view to set up the fourth point.
- If you are making a more complex zone, continue adding points before moving to the next step.
- Tap the first Activity Zone Point to finish your zone.
- All points should now connect in the shape you created.
- To create another zone before saving, tap Add Zone, then repeat this process to make additional zones as needed.
- To establish a zone for the entire area outside of the zone, tap Invert Zone.
- Tap Done to save your Activity Zone.

How to edit an Activity Zone in the Home app
If you move your camera or find that your Activity Zone is missing critical areas, you can always edit it in the Home app.
- Launch the Home app.
- Tap the Ellipses icon (on iPad or Mac, skip to the next step).
- Tap the Room that includes your camera.
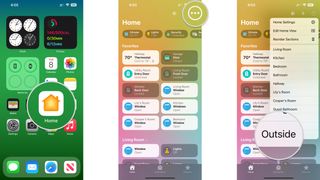
- Tap and hold on the Thumbnail image of your camera.
- Tap Accessory Details.
- Tap Select Activity Zones....
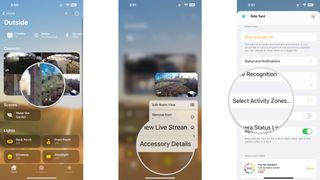
- Tap your existing Activity zone.
- Tap and hold an existing Activity Zone Point, then drag it to a new position.
- Repeat this process to move other points in your Activity Zone as needed.
- Tap Done to save your changes.

How to delete an Activity Zone in the Home app
If you decide that you no longer want to use an Activity Zone, you can delete it at any time with a few taps over in the Home app.
- Launch the Home app.
- Tap the Ellipses icon (on iPad or Mac, skip to the next step).
- Tap the Room that includes your camera.
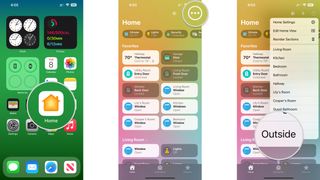
- Tap and hold on the Thumbnail image of your camera.
- Tap Accessory Details.
- Tap Select Activity Zones....
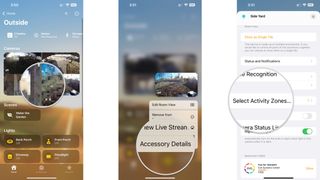
- Tap your existing Activity zone.
- Tap Clear to delete the zone.
- You are now free to create a new Activity Zone before proceeding.
- Tap Done to save your changes.
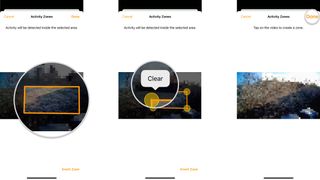
No more noisy notifications with Activity Zones in the Home app
Now that you know how to create an Activity Zone with your security camera with HomeKit Secure Video, you can say goodbye to noisy notifications for events outside your most critical areas. If you want to take things even further, check out our guide on how to use Face Recognition with HomeKit Secure Video cameras. With Face Recognition, you can add additional filters for your HomeKit camera to prevent notifications for friends and family.
Master your iPhone in minutes
iMore offers spot-on advice and guidance from our team of experts, with decades of Apple device experience to lean on. Learn more with iMore!
Christopher spends most of his time writing and dreaming about all things HomeKit and the Home app. Whether it is installing smart light switches, testing the latest door locks, or automating his households daily routines, Christopher has done it all.
Most Popular


