Getting Started with Shortcuts on iPhone and iPad
Get some shortcuts in your life
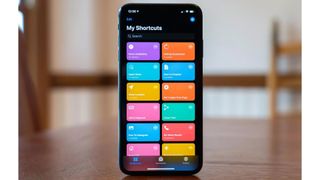
First introduced as an official Apple app with iOS, Shortcuts has gone from strength to strength ever since. It's now a built-in part of the system and offers powerful tools for connecting first and third-party apps so you can get more done with less hassle. Set it up correctly and you can tap one button to perform a series of complicated actions all at once.
However, with power comes potential confusion. It can be intimidating to dive into the app even if it does provide plenty of benefits for your shiny new iPhone 14 Pro or one of the best iPads. With so many options, it's hard to know where to begin, even with the gallery there to help you with some pre-built examples.
Fortunately, dip under the surface and you'll discover it's actually a lot easier than it might seem. Let's take a look at everything you need to know.
Intro to Shortcuts
Shortcuts allows you to perform one or more tasks using both first- and third-party apps. By using it, you can effortlessly control all your HomeKit accessories. Alternatively, it's possible to set up unique workflows with multiple apps that are essential to you, or you can even just get Siri to read out results of a particular action.
iOS 13 and iPadOS 13 led to Shortcuts becoming far more powerful than before thanks to its integration directly into the system, making it a fantastic resource for those that prefer to automate various regular activities.
The neat thing about Shortcuts is it can be as simple or as complicated as you need it to be. A few easy steps can be implemented or you can set up a string of variables and even some math. Such shortcuts can be activated either via a button or by using Siri.
Shortcuts and Siri
Siri can be a core part of your Shortcuts experience if you prefer to speak commands. In the past, specific phrases needed to be uttered to activate a shortcut but now there's no need to create an activation phrase specially for the purpose.
Master your iPhone in minutes
iMore offers spot-on advice and guidance from our team of experts, with decades of Apple device experience to lean on. Learn more with iMore!
For example, I have a shortcut called End of Day. All I need to do is say "End of Day" to Siri for that shortcut to run. There's no need to record the name of the shortcut beforehand as it simply became a part of the system.
It's also possible to use conversational interactions with Siri in Shortcuts. For instance, you can tell Siri to create a to-do in your task manager of choice, and if the third-party app shortcuts support it, Siri can follow up with questions about things like a due date or title.
Shortcuts Basics
Shortcuts are particularly useful because they can adapt to fit what you need. If you need something simple, you can easily create one or two-step actions while more complicated plans can add multiple conditional parameters. It's all down to what you need it to do.
For instance, maybe you want to take advantage of the updated Shortcuts integration in Things to create a straightforward button that allows you just to start building a new to-do. You simply go into Shortcuts, tap the + button in the corner, then start adding and customizing actions.
For anyone new to shortcuts and feeling intimidated, it's a good idea to start in the gallery. It's the tab on the bottom right hand side of the Shortcuts app. It's filled with plenty of ready made shortcuts and suggestions, from tooth brushing timers to music shortcuts. Each shortcut can be modified too so it suits your needs perfectly, while also giving you the perfect starting block to your Shortcuts journey.
Anatomy of a shortcut
After creating an initial shortcut or adding one from the gallery, you might find that it doesn't do exactly what you're looking for. Maybe you want your to-do shortcut always to add an item to a specific list, or you want your "Play music" action to shuffle a particular playlist.
At all times, Shortcuts allows you to customize different parts of several of your available actions, all depending on what action you're looking to modify. Anything in blue text in Shortcuts is a parameter, and a parameter can be changed, either to a pre-defined option or a customized option you enter yourself.
If you're not sure what that looks like, here's an example of how to customize adding a new to-do item to Things.
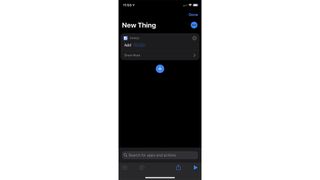
This shortcut may seem simple at first as it only consists of one shortcut action. However, that action has been heavily modified to meet my particular specifications. It starts with the primary focus of the action -- adding a task. By default, this specific action says "Add to-do," which I have changed by tapping the blue "to-do" text and substitution with the "Ask Each Time" option, resulting in what you see here.
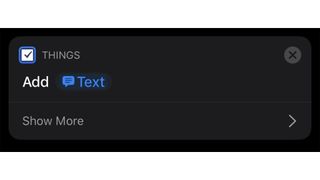
Many actions have the same Show More button. It's your key to fine-tuning just what an action does.
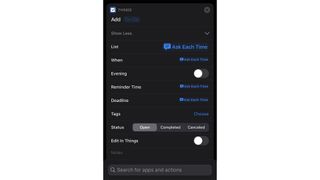
There are several parameters for such a simple action. This includes choosing which list you want your to-do to go, when you want it, and its deadline. It also includes when you should be reminded, and more. Tap each piece of blue text to edit it, either with any offered pre-made options or your own custom parameter. This applies to all shortcuts so it's a quick way to change things.
Instead of asking for a list each time, this shortcut could automatically place new tasks into my Shopping list in the Things app, or my Road Trip list. The same goes for things like a deadline and when you should be reminded about it.
These sorts of parameters can be found in actions across the Shortcuts app. The number will vary depending on which particular actions you choose with it adjusting accordingly.
Automations
Automations are shortcuts with a specific trigger. This could be the time of day, or something like a specific travel situation such as leaving a location or arriving at one. It can also be tied to something external, such as connecting to a particular pair of Bluetooth headphones or tapping on a specific NFC sticker or tag. You can even align it to something in settings, such as activating low-power mode when you open a certain app.
Automations are truly essential if you have repetitive tasks regularly or even every day. My favorite automation trigger is NFC because you just wave your iPhone in front of the right NFC tag, and it sets off a specific automation. For instance, as I work from home, I have two NFC tags set up for the beginning and end of my workday, one in my bedroom, one in my office.
When I'm ready to start working, I tap my iPhone to the tag in my room. This triggers my automation that not only turns off the lights in my room but turns on the desk light in my office, as well as the Apple TV I have in there.
In the strictest sense of the word, not all automations in Shortcuts are actually automations. They don't work on their own as they all need some kind of trigger. This is great for automations that run when you connect an accessory or tap an NFC tag, where you wouldn't expect them to run until you did something. However, for things like location-based automations, it can be a frustrating experience.
Thankfully, since iOS 14, we've seen see some of those restrictions lifted by Apple. Time-based automations can now trigger automatically at their assigned time. Apple has also added triggers for functions such as battery level that work automatically. While location-based automations still require you to start them manually, some significant steps continue to be taken in the right direction.
Certain automations will offer you a switch called "Ask Before Running." If you have that switched flipped to the green "on" position, you'll need to give explicit permission in the notification for the automation to run when its trigger is activated. If the switch is toggled to off then your automation will just run when the trigger is tripped. That could be like when tapping your phone against a specific NFC tag.
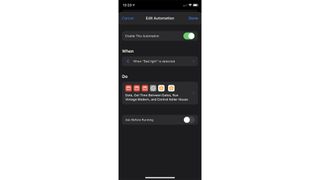
Many Automations with passive triggers, like entering or leaving a location, don't have this option. These require your permission to run. A notification will pop up when the automation is triggered, and you can press and hold on the notification, then press the "Run" button that pops up. This causes the shortcut to run. As previously mentioned, some "passive trigger" automations, such as those based on time or battery level, have this option.
Gallery
If you're entirely new to shortcuts, the gallery is where you should start to get the hang of things.
The gallery offers the ideal portal for finding new, pre-made shortcuts. Shortcuts can still be shared via other services, social media, or forums, but the built-in gallery is a good starting point for all, from newbies to veterans.
The gallery has a carousel at the top that changes periodically and showcases collections of shortcuts that work great with different features of iOS. You might find a collection that works particularly well with Siri, or one with shortcuts relevant to health and fitness. Others may focus on timers and ways of helping you work more productively. At all times, suggested automations give you somewhere to start.
In the gallery, you'll also find personalized suggestions that pull in shortcuts from apps that you use all of the time. Tapping the + button next to the suggestion will let you just enter a name and set up the shortcut in a matter of seconds.
There are also plenty of sections with ready-to-add shortcuts that you can add to your library before modifying to meet your needs. Think of it as an extra friendly way of figuring out the basics, while still mastering your needs such as opening a particular app on your Apple TV or adjusting the iPhone's audio output.
How to create a basic shortcut
One of the best things about shortcuts is that they can adapt to fit what you need. Do you need something simple? You can create easy one- and two-step actions within moments. It's also possible to create something more complex over time if you want to get more involved.
Now that you've learned about shortcuts and tried some via the gallery, here's how to make a shortcut of your own.
- Open Shortcuts on your iPhone or iPad.
- Tap the + button in the upper-right corner.
- Tap Add Action. You'll be presented with a variety of options for your shortcut action.
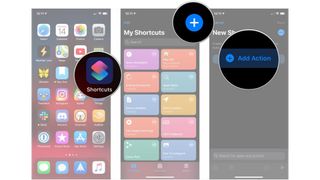
- Tap one of the options presented to you.
- Apps: This section features apps that work with Shortcuts. Tap it and choose an app if you have a specific one in mind for your shortcut.
- Favorites: If you have any actions that you've marked as favorite, they'll appear under here.
- Scripting: The actions under Scripting include commands to open particular apps, control over device functions, control flow, interacting with dictionaries, and a whole lot more.
- Media: Actions for all things media from recording audio to using the camera, playing music and videos, or other media-related activities.
- Location: Location-based actions that can start or be added to your shortcut.
- Documents: Actions for working with files, from adding to a file, creating folders, marking up documents, working with the Notes app, and editing text.
- Sharing: Sharing actions such as interacting with your device's clipboard, sending a message through email or Messages, AirDrop, social app actions, and more.
- Web: Get and expand URLs, perform a GIPHY search, get items from RSS feeds, add something to your Reading List, and more.
- Suggestions: Shortcuts will offer suggestions based on frequent actions, as well as options for modifying repeated actions to fit a specific parameter. Suggestions include both Apple and third-party apps.
- Tap the action you want to take from your available options. In this case, we'll use the Things app's new Shortcuts functionality to view a particular list.
- Tap on a blue parameter to change it.
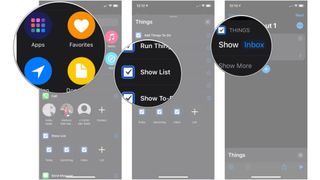
- Tap an option for your parameter.
- Tap Show More if it's available.
- Tap any blue parameters to change them.
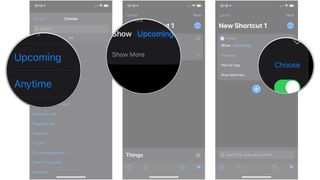
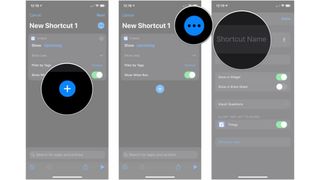
- Tap the + button if you wish to continue adding actions to your shortcut.
- Tap the … button in the top-right of the screen.
- Tap Shortcut Name to name your shortcut.
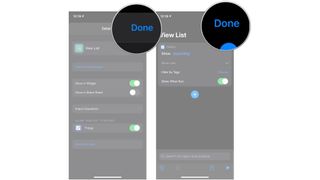
- Tap Done when you've finished entering your shortcut's name
- Tap Done when you've concluded editing your shortcut.
Examples
Below are some examples of shortcuts you can use. They vary in complexity but it's simple to take each of them and modify them according to your plans.
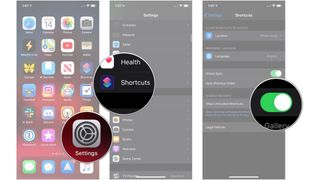
To add these shortcuts, you may need to turn on the Allow Untrusted Shortcuts option in the Shortcuts section of the Settings app. Run any shortcut in the Shortcuts app (such as one of those available in the gallery), then follow these steps.
- Open Settings on your iPhone or iPad.
- Tap Shortcuts.
- Tap the switch next to Allow Untrusted Shortcuts.
Now you should be able to add and use these examples easily.
New Thing - This shortcut works for the Things task manager app for iPhone, and is a simple one that just lets you add a new to-do to Things. In its current setup, it asks for every important detail when run, so it works well with Siri's conversational capabilities.
Seasonal Tunes - Part of working out shortcuts is learning, and this shortcut is a good way to experiment. A little more advanced than the last shortcut, this one will play different Apple Music playlists depending on whether or not it's the Christmas season. Most of the year, if you activate this shortcut, it will play my Apple Music Chill Mix. But between December 1 and December 25, it should play Apple's Essential Christmas playlist instead.
Apple TV On - This shortcut is fairly straightforward. It wakes up your Apple TV and opens one of its apps. By default, the shortcut will open the TV app, but it's possible to change which app opens by tapping the TV parameter and selecting one of the other available options.
Audio note - Apple's Voice Memos is excellent for making quick recordings, while the Notes app is great for taking down a quick thought or two. This shortcut essentially combines the two. Upon activation of the shortcut, your iPhone will start recording. When you're done, the recording will automatically be added to its own new note in the notes app. Save the note, and you're all done.
Start Pomodoro - The Pomodoro method is a popular way of helping one focus on their work. It involves setting a timer and then working rigidly to it before taking a similarly rigid break, and repeating until your working day is done. This shortcut implements all that in a simple way that can also be easily modified for certain other tasks. It places your devices into a specific Focus mode of your choice to help you get things done efficiently, alongside organizing the timer.
Joseph Keller is the former Editor in Chief of iMore. An Apple user for almost 20 years, he spends his time learning the ins and outs of iOS and macOS, always finding ways of getting the most out of his iPhone, iPad, Apple Watch, and Mac.
Most Popular


