
Has all the furor surrounding Dropbox lately made you wonder how you can better protect your private information? It's always a good rule of thumb to assume that any file you store using a service that has any internet connection at all is by its very nature not protected. (For a variety of reasons, legal or otherwise.) However, there's nothing to stop you from making your files as secure as possible, encrypting them before they ever hit Dropbox's servers. We'll show you how, after the break.

Part of Dropbox's own security document outlines the use of encryption before uploading files, and there are a variety of ways to do this. If you're on a Mac, one of the easiest is to simply use Disk Utility in the OS X Utilities folder to create a special mountable folder that you can lock up to your heart's content. In a few quick steps, you can be sure that your sensitive docs are protected long before they leave your LAN.
Note: iOS can't mount encrypted files so if you used this, you won't be able to open them on iPhone, iPad, or iPod touch. Security is always at war with convenience and this tip is for when you've got to let the security Wookie win.
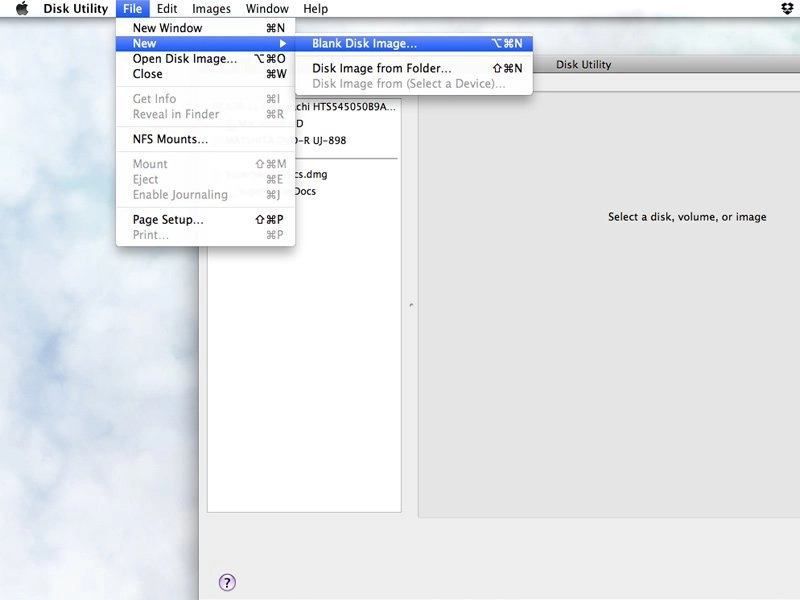
Step 1: Create A New Disk Image
Open Disk Utility (HD/Applications/Utilities/Disk Utility) and choose New > Blank Disk Image from the drop down menu. Now you'll need to choose a few parameters for your disk image.

Step 2: Choosing Features, Creating the Image
Here's where it gets only slightly tricky. There's a bunch of stuff you can pick here for your disk image, but it really depends on how much space you have in your Dropbox and how tight you want your security. First, give your new disk image a name (I usually use the same one for the "Save As" field and the "Name" field).

Now, you need to choose how much storage you want to use. Even if you aren't going to fill it, Dropbox will see the new disk image as a single file, so if you only need 100 MB of storage, don't choose the 500 MB disk image size, because it'll be a lot of wasted space. Conversely, you can also choose a custom size if you need a lot more space.

Now, for the important part. If you're doing this at all, there's probably no reason for you to use anything less than 256-bit encryption, so go ahead and just pick that and make it easy on yourself.

Once you're done, you can pretty much leave the other things as they are. Of course you can tweak as much as you like, but it'll work fine with just those two settings. Click "Create" and Disk Utility will ask you for a password. Make it a good one and if you really want to be safe, you can uncheck the "Remember password in my keychain" box. This will force you to enter the password every time you need to access the image - so if you're only concerned about storing it safely on Dropbox and you feel your machine is safe enough, it's up to you how hardcore you want to get. If you leave it checked, your keychain should auto-unlock the image for you each time you open it. But remember, if you uncheck that box, and lose or forget the password, it's really gone, along with anything in that disk image. So be careful.

Now that you've assigned a password, the image will be created. When it's ready, it will auto-mount on the desktop and you can open it and begin adding files.

You can see available space in the bottom of your finder window.

When you're done dropping your sensitive docs in, simply eject the disk image and it will begin uploading to Dropbox. That's pretty much it! If you look in your Dropbox folder, you'll see a disk image, and when you double-click to launch, it'll prompt you for your password. Now you can rest a little easier, knowing that your documents are locked up long before they hit the web.

