
Take better photos with the camera in your pocket. iMore's iPhone Photography Week 2024 is filled with great content that will take your iPhone camera-snapping ability to the next level.
- Check out more iPhone Photography Week 2024
#iMorePhotographyWeek
A panorama mode first debuted on the iPhone 4S, and it’s been an iPhone photography mainstay ever since. A panoramic photograph is a collection of images stitched seamlessly together to form an ultra-high-resolution composite with a wider angle of view than would otherwise be possible with the given lens.
Traditionally, a photographer would capture a panorama by setting up their camera on a tripod, panning the camera – keeping it perfectly level – while capturing images at evenly spaced intervals. For this to work seamlessly, each image would need to overlap slightly to ensure there are no gaps in the sequence. Editing software would then be used to stitch the images together.
In typical Apple fashion, the best iPhones and the latest iOS updates make capturing panoramas quick and incredibly simple. The entire process is performed within the Camera app, and the stitched image is rendered automatically. But you can do a few things to make sure your panoramas stand out from the rest. Here’s everything you need to know so you can't capture the best panoramas on iPhone.

I’m Deputy Editor of N-Photo: The Nikon Magazine, but moonlight as iMore’s go-to photography know-it-all. I’ve worked in the photo industry for over six years and have been an avid iPhone photographer since the iPhone 4. I’m a firm believer that iPhone photography is a great starting point for burgeoning photographers, which is why I’ve created a series of iPhone photography basics tutorials, so you can either firm up your existing iPhone Camera skills or embark on a whole new passion.
The best iPhone lens for panos?
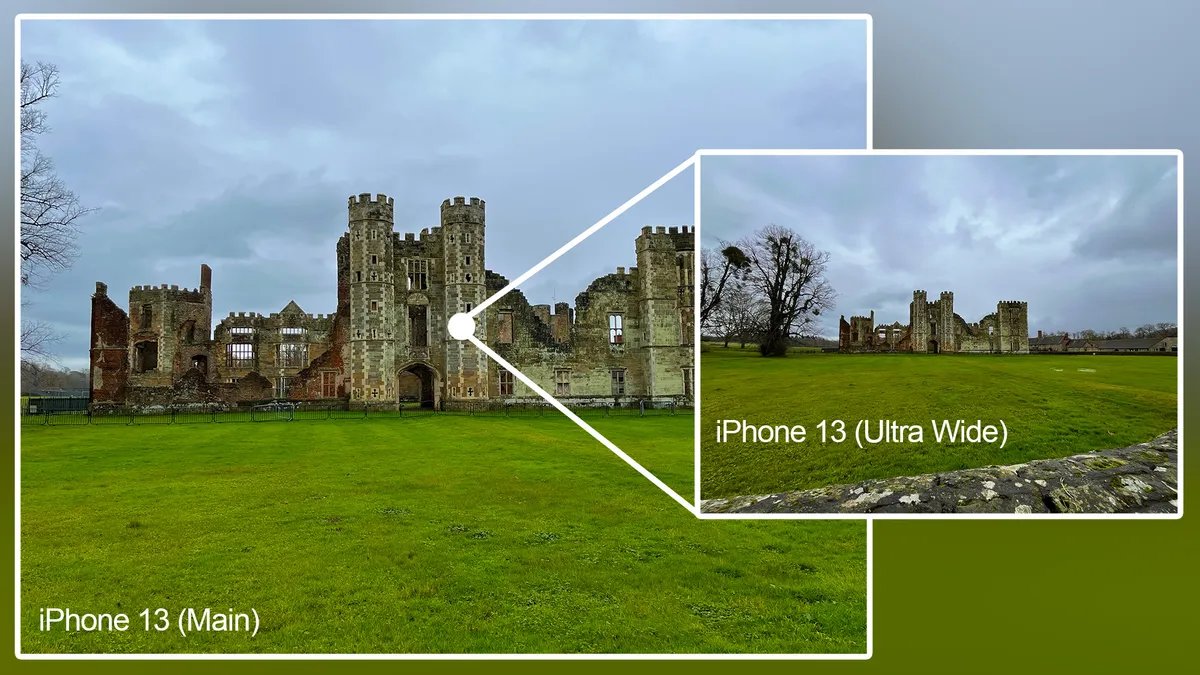
A big advantage when capturing a panorama is that you can use a tighter lens to capture a wide-angle field of view. Tighter means a lens with a higher magnification and a more restrictive field of view. Switch to your iPhone’s Ultra-Wide lens. Now switch to the Wide lens and (if you have it) Telephoto lens. You’ll notice that the field of view becomes more restrictive as the magnification increases.
If you switch back to the Ultra-Wide lens, you’ll notice that things look a bit distorted, particularly around the edges of the frame. This bowed effect is called barrel distortion. The wider the lens, the more pronounced it becomes. If you shoot a panorama with the Ultra-Wide lens, you may notice that areas of the frame look a bit wiggly as multiple images with barrel distortion are stitched together. Use a tighter lens, though, and this becomes less pronounced. This means a panorama allows you to capture sprawling, wide-angle fields of view with reduced barrel distortion. It also means that although you might traditionally use the Telephoto lens to capture frame-filling or distant subjects, it becomes a great tool for capturing landscapes and cityscapes.
- Open the Camera app
- If your iPhone only has two camera modules, select the Main lens
- If your iPhone has three camera modules, select the Telephoto lens
- You can now capture panoramas while minimizing distortion
When to avoid movement
It’s best to avoid moving subjects when shooting a panorama. As powerful as your iPhone’s computational photography is, it can only do so much and you’ll find that when a moving subject dominates the frame, your iPhone will struggle to stitch images together seamlessly. However, from my own observations, this does depend on the type of movement and its distance from the camera.
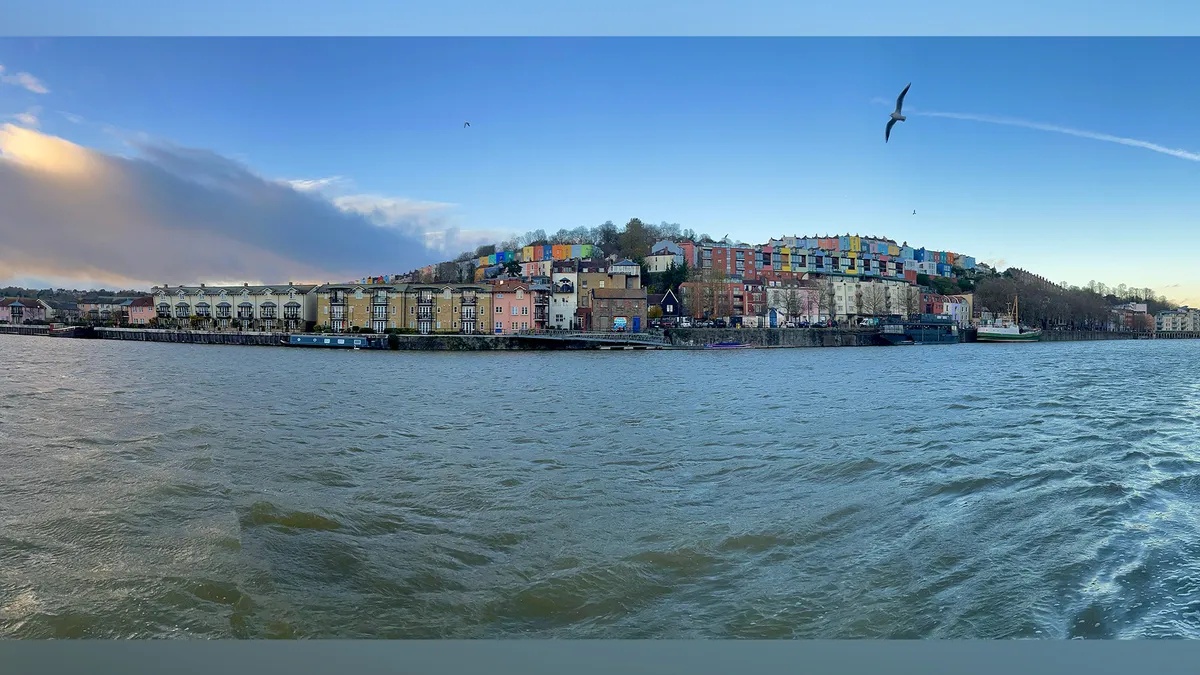
Your iPhone will fare much better if a few distant birds are flying through the scene or you’re framing faraway movement that’s relatively busy, like water or rustling leaves. Even then, you’ll find the odd anomaly. Shooting still subjects in still weather conditions will provide the best results much more consistently.
It’s not not just moving subjects you have to worry about, either. If you pan too quickly, you can end up blurring your panorama and your iPhone will struggle to stitch the images together seamlessly. Helpfully, a warning appears on the screen: “Slow down”. How fast you can pan depends on the available light. The less light there is, the slower you’ll be required to pan.
- Avoid moving subjects that dominate the frame
- Don’t be dissuaded from capturing distant movement such as water or birds in the sky
- If a “Slow down” warning appears on screen, you’re panning too fast
How to capture a panorama on your iPhone
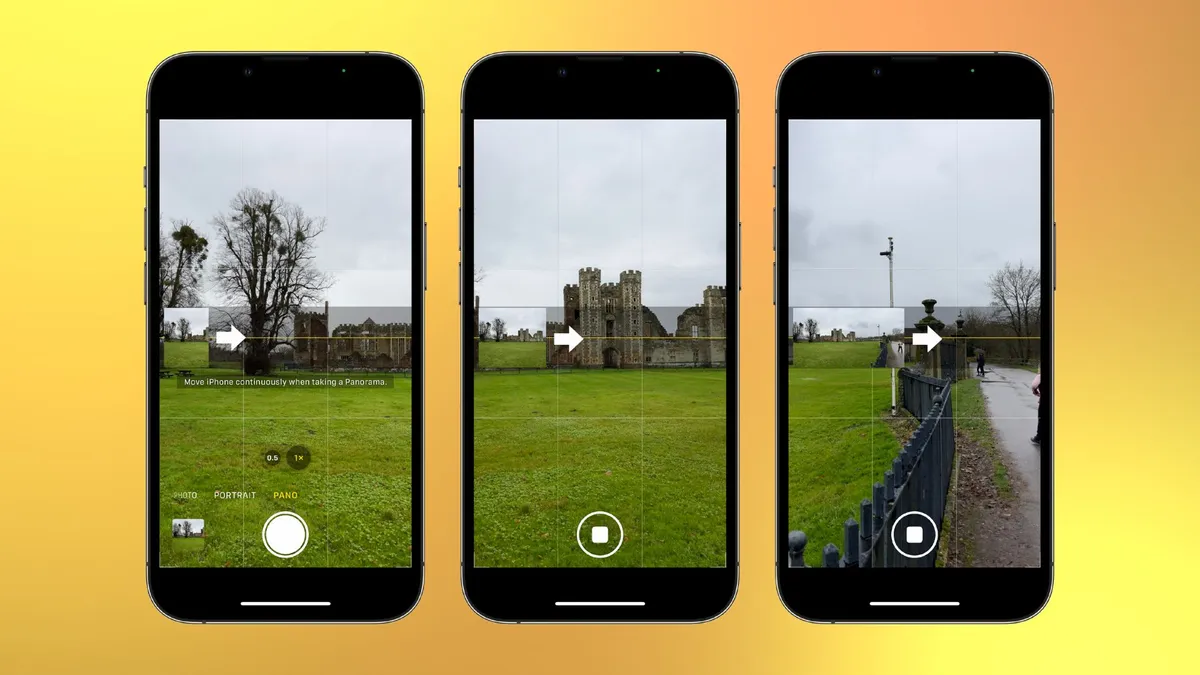
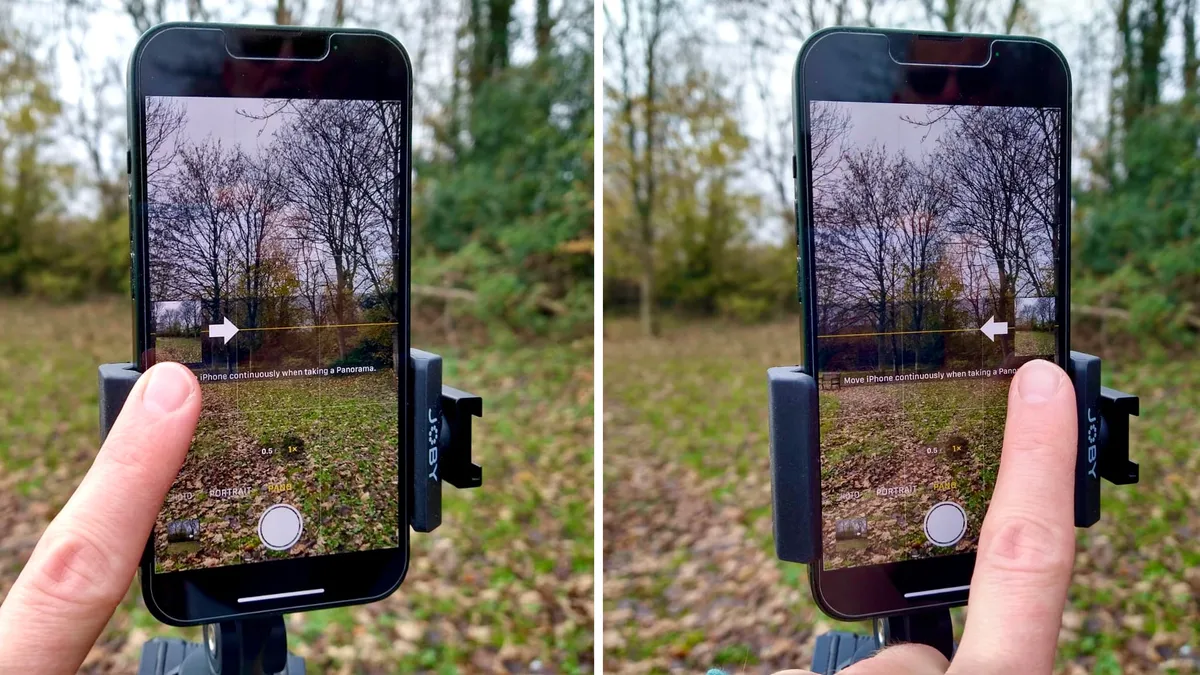
Shooting a panorama on an iPhone is incredibly simple. When you select Pano mode in the Camera app, it automatically swaps to a 16:9 aspect ratio. You still get the full-screen preview that you get in other photo modes, but you’ll also notice a thin strip across the middle of the screen. On the left-hand side is a small live view preview and a right-pointing arrow centered on a thin yellow line.
To capture a panorama, you fire the shutter and pan in a clockwise motion. As you do so, the arrow will begin to move as the small live view image elongates, so you can preview what your panorama will look like. If you tilt the camera up/down, the arrow will move above/below the yellow line respectively. You aim to keep it as centered on the yellow line as possible, which takes a little practice. When you reach the end of the strip, you will have spun roughly 180 degrees, and the panorama will end.
- Open the Camera app and scroll right on the mode menu to select Pano
- Frame what will be the left-hand edge of your image and fire the shutter to begin panning
- Pan right and keep the arrow on the yellow line, tilting the camera down/up slightly if it goes above/below respectively
- When you reach roughly 180 degrees, Pano mode will stop and the image will render
Aspect ratio and orientation
While it’s a lot of fun to capture a full 180-degree panorama, you’ll struggle to achieve an attractive composition with such extreme image dimensions. You can stop your pano and render the image at any point by tapping the shutter button again. It’s best to start panning a little before and finish panning a little after your intended composition. You can then refine the composition by cropping the image in the edit. This gives you much more control over your composition and it’s always worth having a little more space, you can’t bring back what’s not there.
A panorama doesn’t have to be a landscape-orientation image. You can tilt your camera to capture portrait-orientation panoramas too. This is helpful if you’re photographing something tall and thin, like a building. Simply spin your camera 90 degrees anti-clockwise. You’ll then start at the bottom of the subject you’re photographing and tilt the camera upwards to capture the pano.
If you find it easier to pan in an anti-clockwise motion or by starting at the top of a vertical subject and tilting the camera downwards, you can do this by flipping your iPhone 180 degrees. The image you are taking will always remain the right way up, the only consideration is that you might have to adjust the way you hold your iphone so as not to cover up the cameras. However, you can avoid this by tapping on the right side of the screen to move the live view box to the right and flip the arrow so it’s pointing the other way. You can then pan in an anti-clockwise motion.
- Tap the shutter button at any time while panning to stop Pano mode and render the image
- Tilt your camera horizontally to shoot vertical panoramas
- Tap the right side of the thin strip to move the small live view preview to the right of the screen
- You can now pan anti-clockwise or capture vertical pans from top to bottom
How to shoot a pano on a tripod

Apple’s optical image stabilization [OIS] and computational photography is increasingly impressive. The former helps to mitigate camera shake – crucial when you’re shooting handheld – while in Pano mode the latter works to stitch together multiple shots so you end up with a sharp, evenly exposed and seamless image. This means the latest iPhones are extremely adept at allowing you to capture handheld panoramas. However, if you’re intent on capturing the sharpest, most detail-rich image possible, you’ll need to use a tripod.
Not only will this minimize movement, it will help you keep your iPhone on an even plane. This will allow you to retain as many pixels as possible, because if you pan in an uneven motion, it can cause patches of lost pixels, forcing you to crop the image. The Camera app has a built-in level so you can ensure your horizons are straight. Unfortunately, this only appears in Photo mode. But if you’re shooting on a tripod, your framing is constant, so this shouldn’t prove problematic. However, when panning, it’s not good enough to simply have a level horizon. You need your panning axis to be perfectly level so your horizon doesn’t gradually ascend or descend as you pan.
The most effective way to do this is by unscrewing the tripod head and resting a small bubble level across the mounting plate – just above the legs. You can then extend or retract each individual leg until the plate is level. If you don’t have a bubble level, you can use your iPhone’s Measure app. When the device is in an upright position, this can be used to straighten horizons, but when the device is laid flat, it can be used to balance the iPhone so it’s perfectly level.
- Extend the thickest tripod legs first to ensure as much stability as possible
- Make sure your tripod mounting plate is level by using a bubble level or the Measure app
- Use the level in Photo mode or the Measure app to straighten your horizon
- If the level in Photo mode doesn’t appear, go to Settings > Camera and check Level
How to make a portrait pano

A multiplicity photograph depicts the same person in various places and positions within the same image. Traditionally, this would be created by placing the camera on a tripod, capturing multiple images of the person and manually blending the images together in editing software. However, a similar effect can be achieved using your iPhone’s Pano mode.
Place your subject on the left side of the frame and start panning. When a large enough gap is available on the right side, hold the camera as still as possible and direct your subject into the gap. As soon as they’re in position, continue panning. Repeat this process – moving your subject into the right side of the frame – to create your multiplicity. This does take a little trial and error to get right, but the results are certainly worth it.
- Open the Camera app and select Pano mode
- Position your subject on the left side of the frame and begin to pan until you make a big enough gap for them to move into
- Hold the camera still until they’re in position and continue panning
- Repeat this process or hit the shutter again to render your multiplicity
When should I shoot an iPhone panorama?
Panoramas are rather unconventional images, so it can be a little tricky working out when to use them. The most obvious reason to shoot a panorama is because you simply cannot fit everything you want into the frame. You may also choose to shoot a panorama to balance the frame. If you’re shooting a long subject like a city skyline and find yourself framing too much sky, elongating the image can help to balance this out. Panoramas can also work when you have a stunning vista in front of you but no obvious focal point.
They’re a great way to spice up your Instagram, too. You can split them into three 1:1 images and line them up along your feed. Alternatively, you can split them into multiple 4:5 images and post them as a carousel so users can swipe across the entire image. You may also choose to capture a panorama because you want to work with a larger, higher-resolution image. You might do this so you have room to make multiple sized crops in post, while still maintaining a decent amount of pixels, or so you can physically print a larger image. iPhones have been able to produce up to 63-MP panoramas ever since the iPhone 6, and the iPhone 15 hasn’t changed that. Here’s hoping we can capture mega ProRAW panos in the future.
