

Take better photos with the camera in your pocket. iMore's iPhone Photography Week 2024 is filled with great content that will take your iPhone camera-snapping ability to the next level.
- More iPhone Photography Basics
- Check out more iPhone Photography Week 2024
#iMorePhotographyWeek
If ever there was a shortcut to improving your iPhone photography, it would be studying composition. Composition is arguably the single most important component of an image. Sure, light is a necessity, without it, there’s no photo. But you can work around poor lighting. And yes, an interesting subject or decisive moment certainly puts you at an advantage, but a skilled photographer can use composition to turn even the most boring subject into a photo worth taking.

For anyone who thinks photography is little more than capturing what’s already in front of you, composition is the brush photographers use to ‘paint’ their vision and tell their story. Best of all, it doesn’t matter if you’re using the affordable iPhone SE, Apple’s most advanced camera tech in the iPhone 15 Pro Max, or a professional mirrorless camera. Composition is the great divider. It’s–all–down–to–you.
Here’s how to improve the composition of your iPhone photos…
Share your results with iMore on X (Twitter) using #iMorePhotographyWeek

I’m Deputy Editor of N-Photo: The Nikon Magazine, but moonlight as iMore’s go-to photography know-it-all. I’ve worked in the photo industry for over six years and have been an avid iPhone photographer since the iPhone 4. I firmly believe that iPhone photography is a great starting point for burgeoning photographers, so I’ve created a series of iPhone photography basics tutorials so you can either firm up your existing iPhone camera skills or embark on a whole new passion.
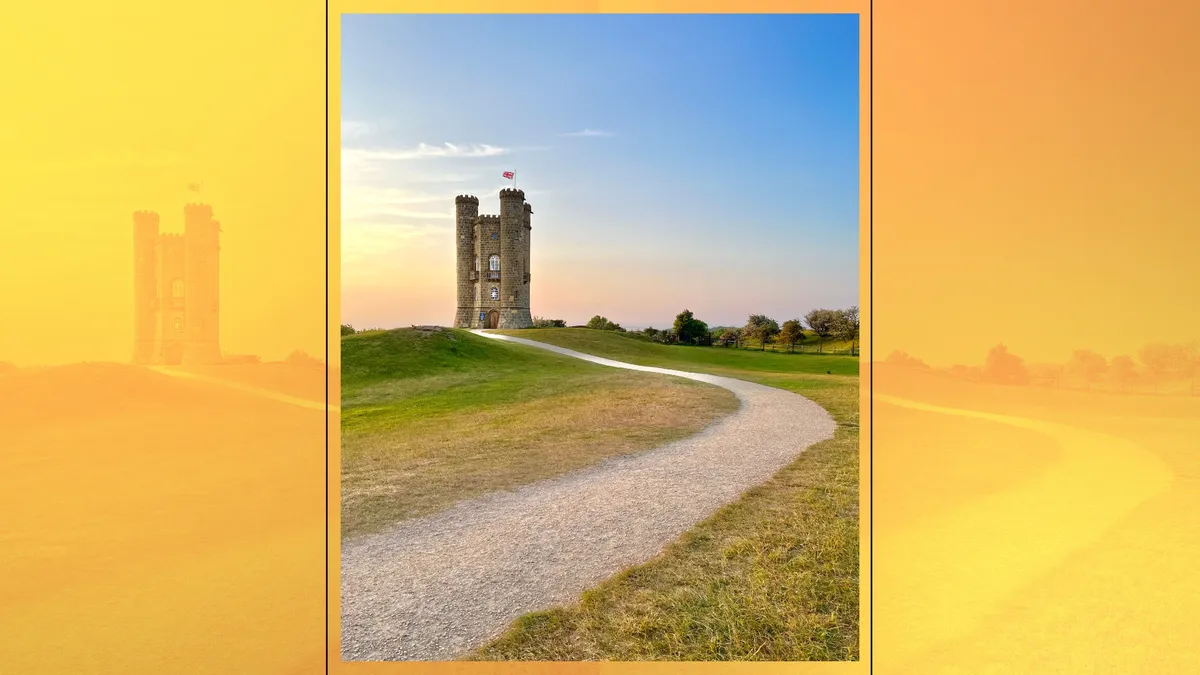
How to apply the rule of thirds

Your iPhone Camera app’s 3 x 3 grid is a useful but sometimes overlooked compositional tool. Its main purpose is to provide a visual aid for the rule of thirds. By dividing the screen into nine equal rectangles you have two horizontal lines and two vertical lines, which intersect at four points in the center of the frame.
Position the most interesting part of your image (the focal point) on one or more of these ‘intersection points’ and you can’t go far wrong. You can also use the rule to split landscapes into thirds by positioning the horizon on either horizontal. The top horizontal will give more weight to the bottom portion of the scene — handy if you’re photographing a beautiful field of flowers — and the bottom horizontal will give more weight to the top of the scene — ideal when capturing an atmospheric sky. And best of all, it works in landscape or portrait orientation.
- Head to Settings, then Camera and ensure Grid is turned on
- Decide whether you want to shoot in portrait or landscape orientation
- Look at your Camera app’s rule of thirds grid
- Position your horizon on one of the two horizontal lines
- Decide whether to position your focal point on the left or right side of the frame
- Position your focal point on one or more of the most suitable intersection points
How to frame leading lines
An image’s focal point should be the most interesting portion of the frame, and to work effectively it should draw the viewer’s gaze almost instantly. Composition plays a huge part in guiding the viewer’s eye towards the focal point, and one of the most effective methods is leading lines. Think of leading lines as natural arrows within a scene, pointing towards a point of interest.
The simplest example would be a portrait of a person standing in the middle of a straight road. As the road recedes into the distance, multiple elements: the edges of the tarmac, white lines and grassy verge would all form ‘leading lines’, subconsciously guiding the viewer’s gaze towards the subject. Leading lines work best when they begin beyond the image, so they catch the viewer’s gaze as soon as it strays into the frame. But they can have an adverse effect too, if they lead the viewer away from the focal point or back out of the frame.
- Identify your focal point
- Look for lines within the scene that point towards the focal point
- Alter your position and shooting angle to accommodate the leading lines so they ‘lead’ into the frame and point towards your subject
How to compose a frame within a frame
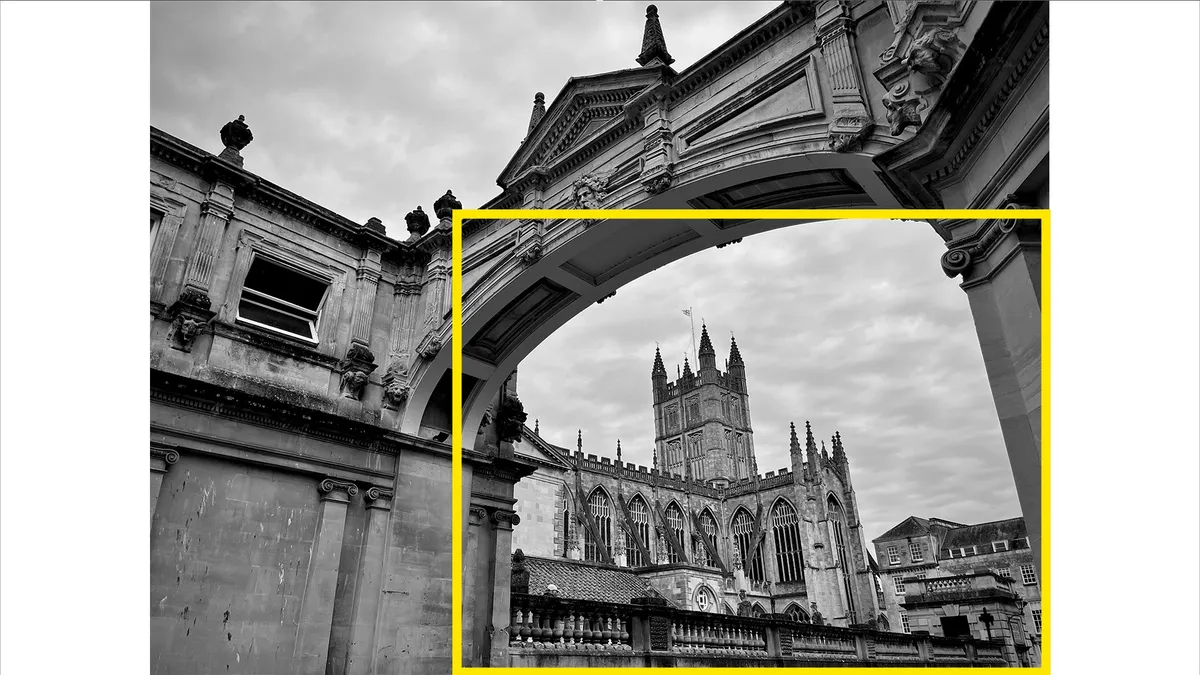
This compositional technique works very similarly to leading lines, by guiding the viewer’s gaze towards the focal point of the photograph. It involves using an element or elements within a scene to surround the subject, creating a second frame within the image’s frame. Frames needn’t be limited by size, shape or number and they can be artificial and structured or natural and formless.
Examples include a person framed through an open doorway or a seascape framed through the opening of a cave. Clever photographers use frames to spice up their composition by providing additional interest, adding depth to an otherwise flat image or obscuring unwanted elements. You might use a frame to isolate a single person on a busy street or to draw attention to a tall, thin building that would otherwise be surrounded by huge portions of uninspiring blue sky.
- Identify your subject
- Search for artificial or natural elements that could frame it
- Line up your shot so the subject is visible through the frame
How to use the rule of odds
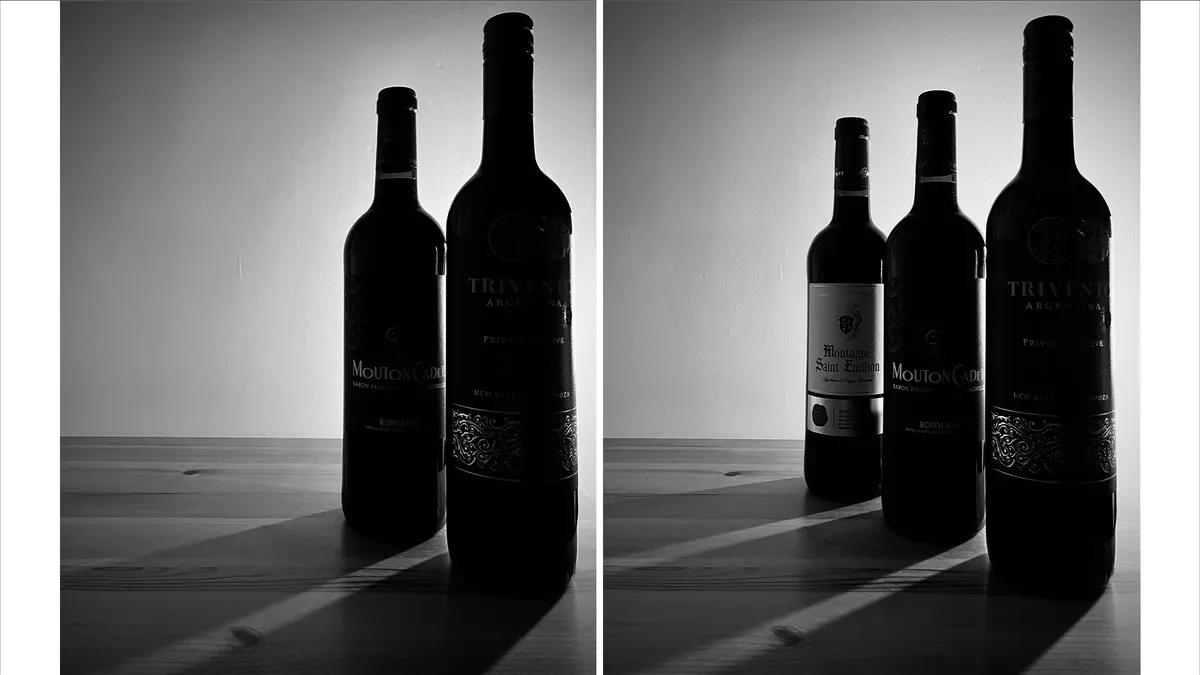
The rule of odds is one of the easiest ways to enhance your photography overnight. It’s a simple premise; odd elements within an image are more pleasing than even ones. Now you know about it, you’ll start seeing it everywhere: artworks, graphic design and even movies. It has its limits, though. Once the number of objects is too great for the viewer to comprehend, it becomes a moot point. You certainly don’t have to worry about counting the number of leaves on a tree…
This isn’t to say that you can simply frame three objects and walk away with a fantastic photograph every time. Factors such as the distance between objects, color, lighting, how they interact with each other or elements around them and other compositional techniques that are present, will impact the image. But ultimately, the core rule is a great starting point if you’re learning the ropes and will have an immediate effect on what you capture.
- Count your subjects
- If there’s an even number try to frame an odd number
- Remove or add objects if you can, if you’re shooting something like a still life
- Remember that the rule doesn’t apply to large numbers of objects
How to capture a clean background
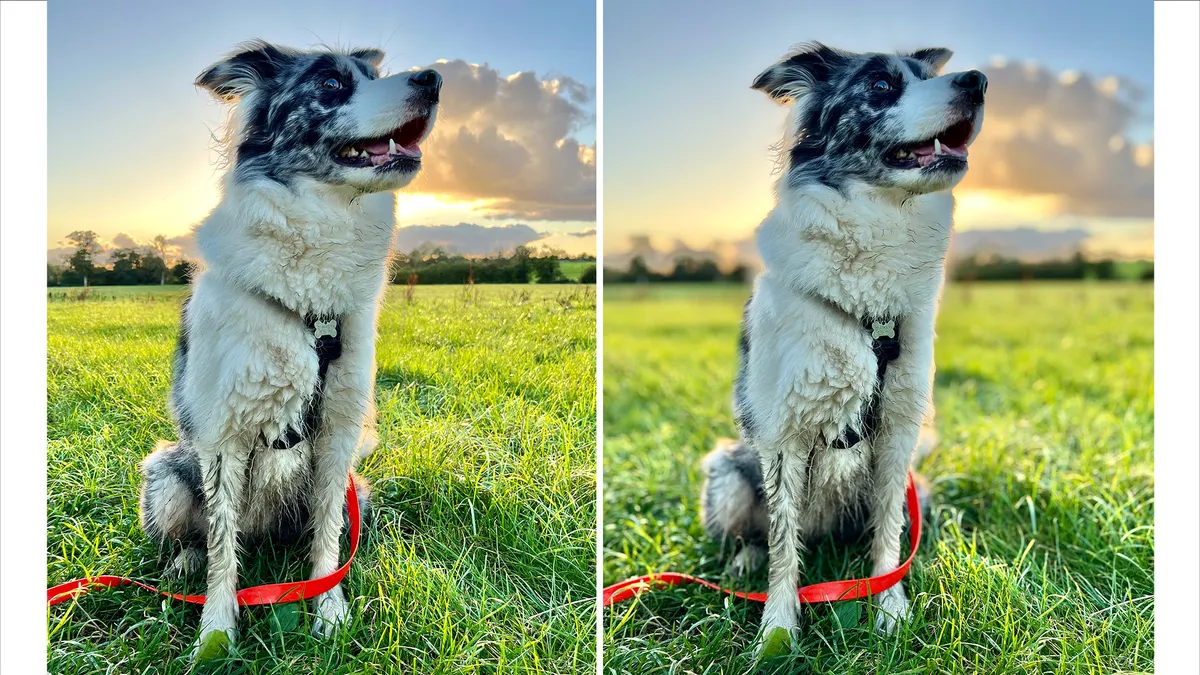
A clean background draws attention to your subject, while a busy background has the adverse effect. You risk the viewer ‘losing’ your subject as their gaze wanders into more interesting areas of the composition. This is why studio portraits tend to opt for solid-coloured backdrops as opposed to distracting patterns. This doesn’t mean you can’t frame subjects in front of busy backgrounds, you just need to find ways to separate them from the visual hubbub.
For example, you could use leading lines to guide the viewer to your subject, or ambient or artificial lighting to highlight the subject and lift it from the background. You capture your subject in front of a clean section of the frame so they’re separated from the busier areas. But perhaps the most common technique is to use a shallow depth of field so your subject is sharp and the background is completely out of focus. On a manual camera this is controlled by widening the aperture (a variable opening inside a lens). But Apple makes this much easier on the latest iPhones, by using computational photography to simulate a shallow depth of field in Portrait mode.
- Open the Camera app
- Select Portrait mode (next to Photo)
- Tap your subject on the screen to focus
- Watch as your iPhone blurs the background
How to insert foreground interest

Intentionally leaving space is a compositional topic in its own right, but unwanted space can leave an image feeling unbalanced. This is especially true when shooting landscapes and seascapes. If your main subject is a distant mountain or lighthouse, you may find yourself faced with an overabundance of terrain or sea in the bottom portion of your frame. Finding something to fill that gap is called foreground interest.
Stone walls, gateways, a lone tree, flowers, rocks and anything else that doesn’t detract from the natural feel of the scene will work. And if you’re shooting a seascape, foreground interest can be as simple as lowering your camera to frame rock pools or water lapping over pebbles, but more adventurous examples might include crashing waves or the few remaining timbers of an old shipwreck.
Foreground interest can also help to elevate a scene that otherwise has no discernible subject. You might witness an incredible sunset over a lake, with no mountains or hills in the distance, but by framing an old jetty in the foreground, the image is suddenly transformed. And if you’re really stuck, ask a friend to stand in the foreground and gaze off into the distance wistfully.
- Frame your subject
- Consider how much space is in the lower portion of the frame
- If there’s a blank void adding nothing interesting to the image, look for something nearby that you can frame in the foreground
- Frame the object so it fills the blank space, but doesn’t detract from your intended subject
How to use symmetry to enhance images
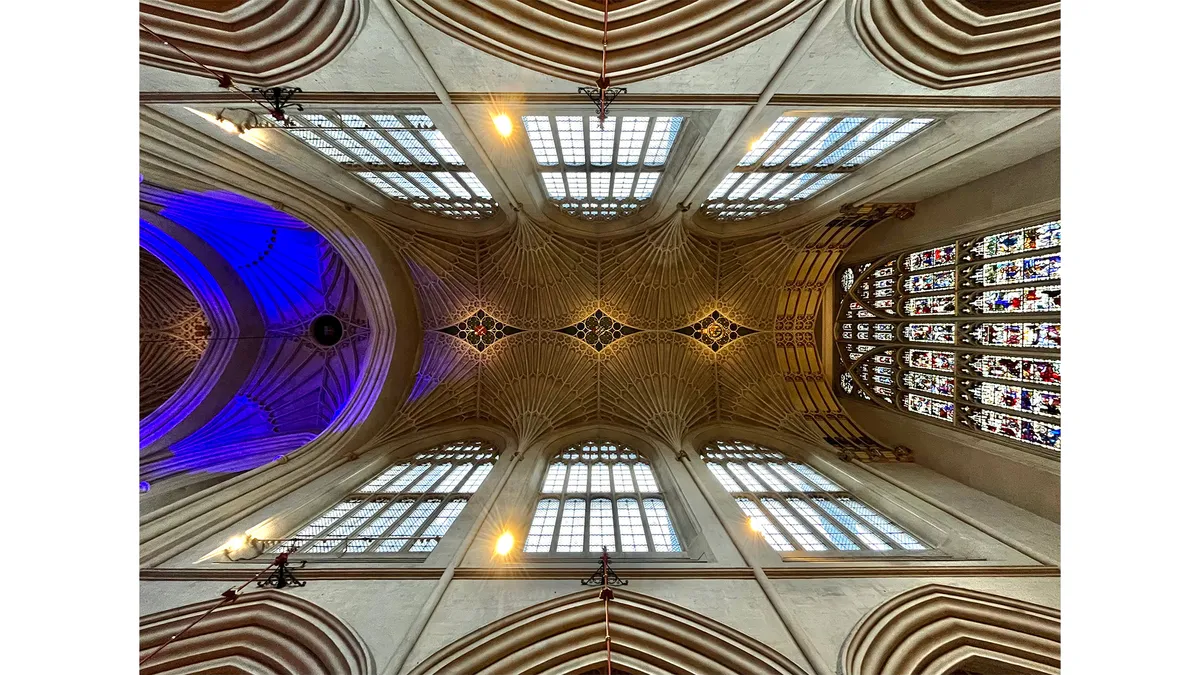
Symmetry is one of the most simple techniques to explain, but difficult to perfect in practice. Once you’ve found a symmetrical subject you’ll need to center your iPhone Camera as accurately as possible. This means physically moving your camera until the parallax effect causes each element to perfectly align, while twisting and tilting your iPhone Camera accordingly. Perfectly still water offers great potential for symmetry, due to the mirror-like reflections.
Fortunately, your iPhone Camera app is equipped to help. That rule of thirds grid is extremely handy when framing your symmetrical scene. You can use the intersection points and lines as a guide to ensure everything is lined up perfectly. The camera will also detect when your iPhone is nearly square to the ceiling or floor. Two cross reticles will appear in the center of the screen. Once they’re lined up, you know your iPhone is perfectly square.
You can also use the Camera app’s editing suite to refine your composition by using the crop tool, as well as the Straighten, Vertical and Horizontal sliders. It’s worth remembering that very few subjects are perfectly symmetrical and that wide-angle lenses exhibit barrel distortion, which makes horizontals and verticals curve slightly towards the edges of the frame. Turning on Lens Correction in the Camera’s settings will help mitigate this somewhat.
- Go to Settings, then Camera. Ensure both Grid and Lens Correction are turned on
- Stand directly in front of your subject
- Use your Camera app’s rule of thirds grid to help center and line up your subject
- Line up the cross reticle if you’re shooting something directly above or directly below you
- Use your Photos app’s editing suite to refine the image’s alignment
Where do I go from here?
I used a standard iPhone 13 to capture all of the images below, proving that you don’t need the best iPhone to compose great-looking images. The techniques above are what I consider to be the easiest-to-implement compositional techniques for beginners, which makes them some of the most important. It’s far from an exhaustive list, but if you start to use even a couple, you’ll see a marked improvement in your iPhone photography. That said, it’s important to remember that image making is a creative endeavor and you should never feel constrained by composition.
There’s actually no right or wrong way to compose an image. The trick is making sure that all of your compositions are intentional. If you know about compositional theory you can then make an informed decision about how you want to approach a subject, instead of snapping away and hoping for the best. My final piece of advice is to ask yourself: Why? At least once every time you take a photo. You might not always have an answer, but soon enough, thinking about composition will start to become a habit.
Share your photos with iMore on X (Twitter) using #iMorePhotographyWeek
