
Take better photos with the camera in your pocket. iMore's iPhone Photography Week 2024 is filled with great content that will take your iPhone camera-snapping ability to the next level.
- Check out more iPhone Photography Week 2024
#iMorePhotographyWeek
While color photography has long become the default for working professionals, enthusiasts and casual snappers alike, black and white photography is still always in vogue. While black and white video has become something of a novelty, a stylized choice adopted largely by the odd indie filmmaker, monochrome photographs have proven a mainstay. There’s a romanticism to a black and white photograph, it’s a hallmark of fine art and a callback to a simpler time.

But the main reason why black and white photography persists is arguably nothing more complicated than aesthetics; black and white photographs just look really good. Strip away color and you remove a plethora of complications. Black and white photography is raw and easy to digest. And although it harks back to the age of analogue image making, there’s no reason why you can’t capture filmic black and white stills on your cutting-edge iPhone Camera.

I’m Deputy Editor of N-Photo: The Nikon Magazine, but moonlight as iMore’s go-to photography know-it-all. I’ve worked in the photo industry for over six years and have been an avid iPhone photographer since the iPhone 4. I’m a firm believer that iPhone photography is a great starting point for burgeoning photographers, which is why I’ve created a series of iPhone photography basics tutorials, so you can either firm up your existing iPhone Camera skills or embark on a whole new passion.
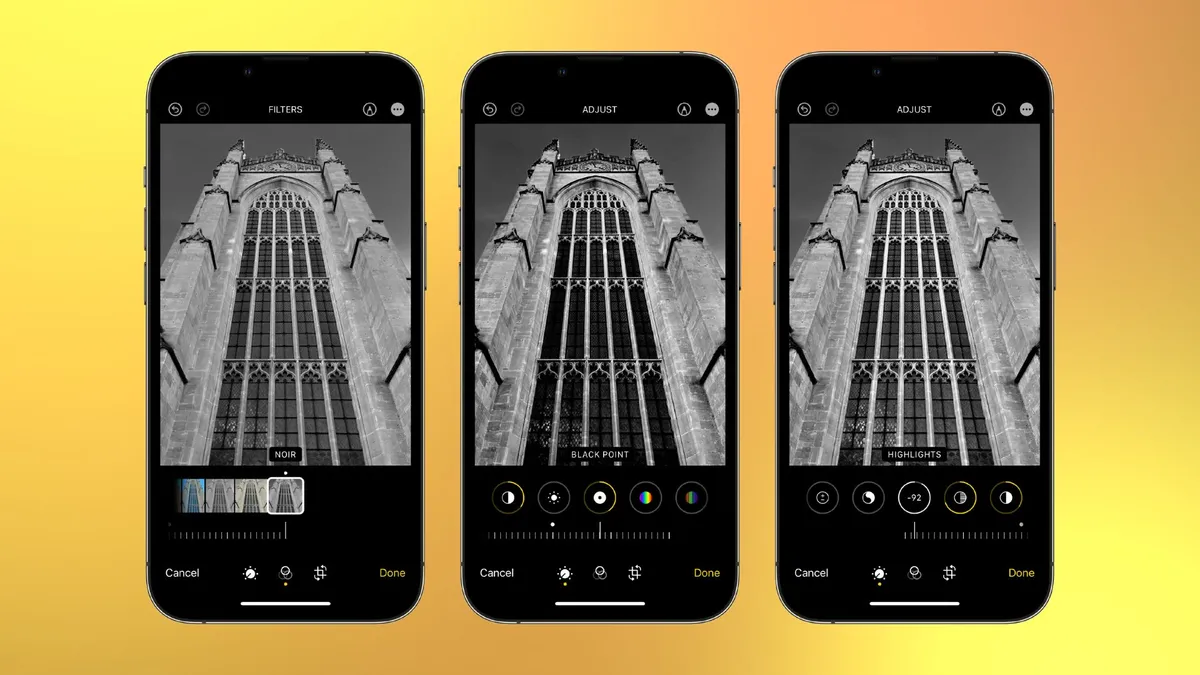
Try a black and white conversion
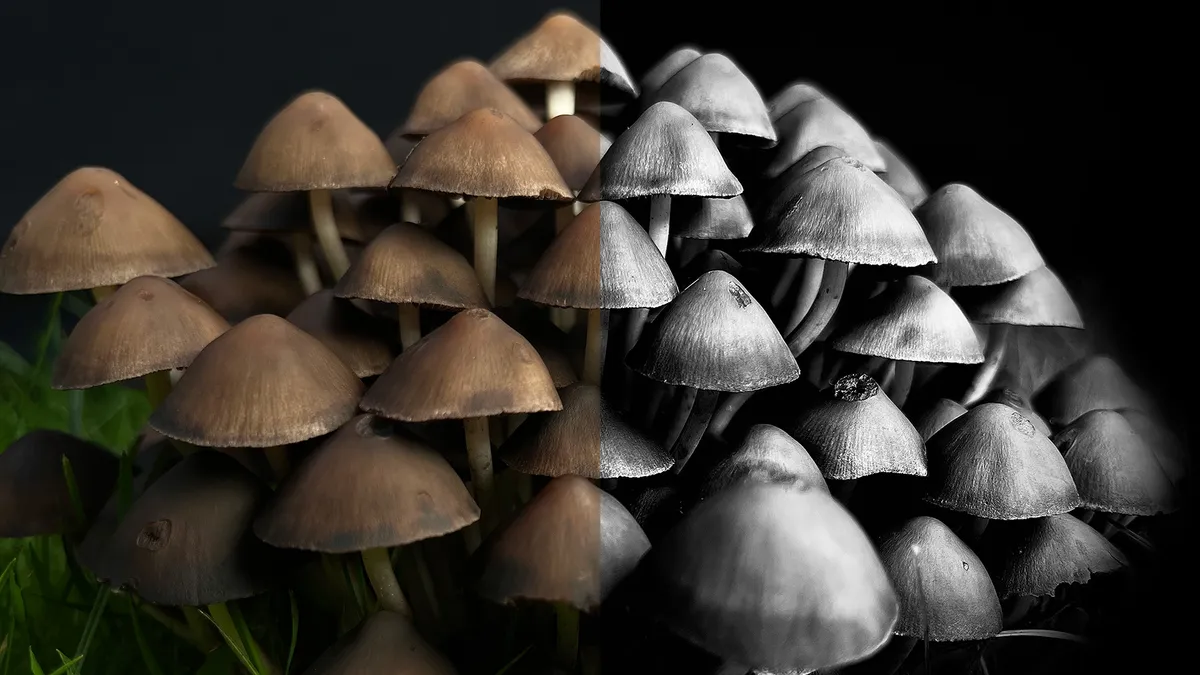
Sometimes a color image just doesn’t work. This might be because uncomplimentary colors are clashing with each other, there simply isn’t enough color so the image looks flat and dull or because harsh lighting is casting hard, unsightly shadows across the frame. But before you resign your image to the bin, open it up in the Photos app’s editor and convert it using a monochromatic filter.
You may find that the simplified color palette transforms the image, by allowing you to focus on the subject or shapes and patterns within the frame much more effectively. You see, a monochromatic conversion will simplify your scene and potentially quell distracting elements within the frame. It’s still best practice to purposely shoot in black and white, but plenty of great photographs have come to life in the edit.
- Open the Photos app and find your chosen photo
- Tap Edit in the top-right corner
- Select the Filters icon (three rings)
- Choose one of the black and white filters
Lean into the vintage vibe
Convert an image to black and white if it’s noisy or your subject is slightly blurred. Noise refers to a colored grain that reduces the quality of a photograph. It appears when a camera’s sensor is made more sensitive to light to mitigate low-light conditions. This is controlled via an exposure setting called ISO, which your iPhone adjusts automatically. The further the sensor is pushed, the more pronounced the noise becomes.
The latest iPhones can dramatically reduce noise by using computational photography to remove it and offering Night Mode, which allows more light into the camera by performing long exposures and thus avoiding the need to push the sensor’s sensitivity. But you can only digitally remove so much noise and Night Mode will add motion blur to moving subjects.
A simple hack is to turn a noisy or slightly soft image black and white. The colorful specks will appear to resemble film grain – a texture present on processed film – and the increased contrast will help to hide soft areas of the frame somewhat (this only helps images that are subtly blurred). And, since black and white harkens back to the age of analogue film photography, we tend to be more forgiving when viewing imperfections in a monochrome image.
- Check to see if your image looks noticeably noisy
- Check to see if there’s a subtle blur
- Convert your image to black and white in the Photos app to give it a vintage vibe
How to see in black and white
While monochrome images can mitigate poor colors, noise or blur, to become a truly great black and white photographer, you need to shoot with intent. I’ve already explained how a black and white image is fundamentally different to a color image, so you’ll end up with much better monochrome shots if you set out to capture a black and white image in the first place.
Back in the days of film, photographers had to look through an analogue, optical viewfinder. They had to learn to see in black and white. Nowadays, most cameras feature electronic viewfinders or screens, so the photographer can see a precise digital representation of what the image is going to look like when it’s taken, even in black and white.
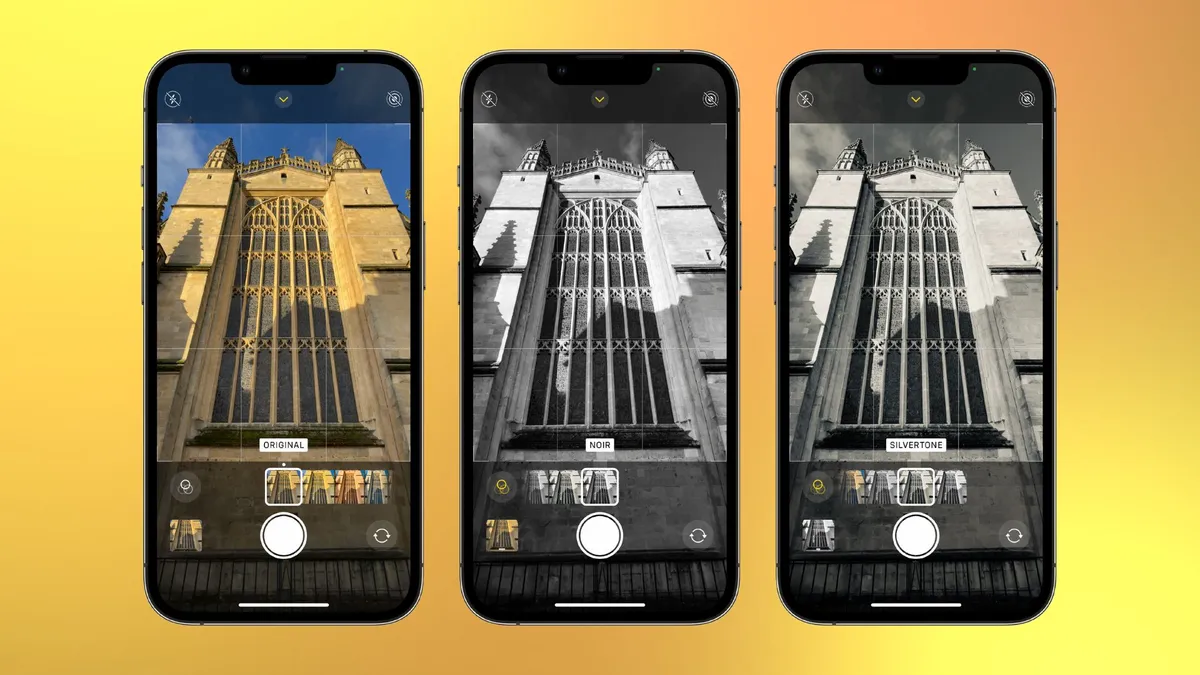
iPhones are equipped with black and white filters that can be applied to the live view screen before taking the shot. And better yet, the color information is retained, too. So, if you suddenly change your mind, you can always convert your mono images back to color.
- Open the Camera app and flick in an upwards motion on the live view screen
- A bar of icons will appear, tap the three-rings icon to select Filters
- Choose your preferred mono filter and capture a photo
- Open the photo in the Photos app and tap Edit
- Select the three rings icon once again
- Tap the Original Filter to revert the image back to color
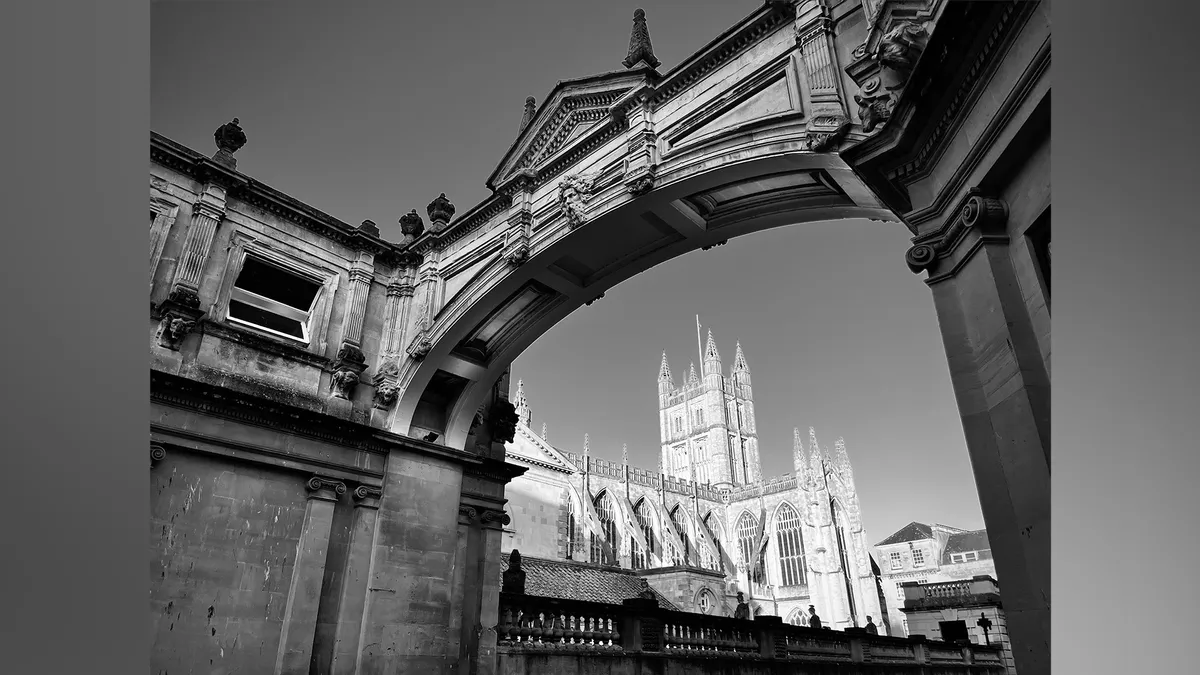
Look for lines, shapes, and texture
Black and white images behave differently to color images. Complementary or contrasting colors can be used to draw the viewer’s attention, while warmer or cooler color temperatures can change the mood of an image entirely. Strip all of that away and suddenly shapes and textures really come to the fore. Look for shapes and textures that will draw the viewer’s gaze, as well as leading lines that guide the viewer towards the focal point of the image.
Shape and texture isn’t just limited to physical objects, either. A scene can look totally different during different times of day and in different conditions, depending on how the light falls onto objects and how shadows are cast. Be mindful of patterns, too. Line up identically shaped objects to create symmetry or frames within frames. Compose a repeating pattern right to the edges of the frame and beyond so you’re left with a tessellation. In a similar vein, the reliance on shape and texture means black and white images can create very effective abstracts.
- Look for shapes and textures in a scene
- Find leading lines that point towards your subject
- Line up shapes to form symmetry or a frame within a frame
- Search for patterns
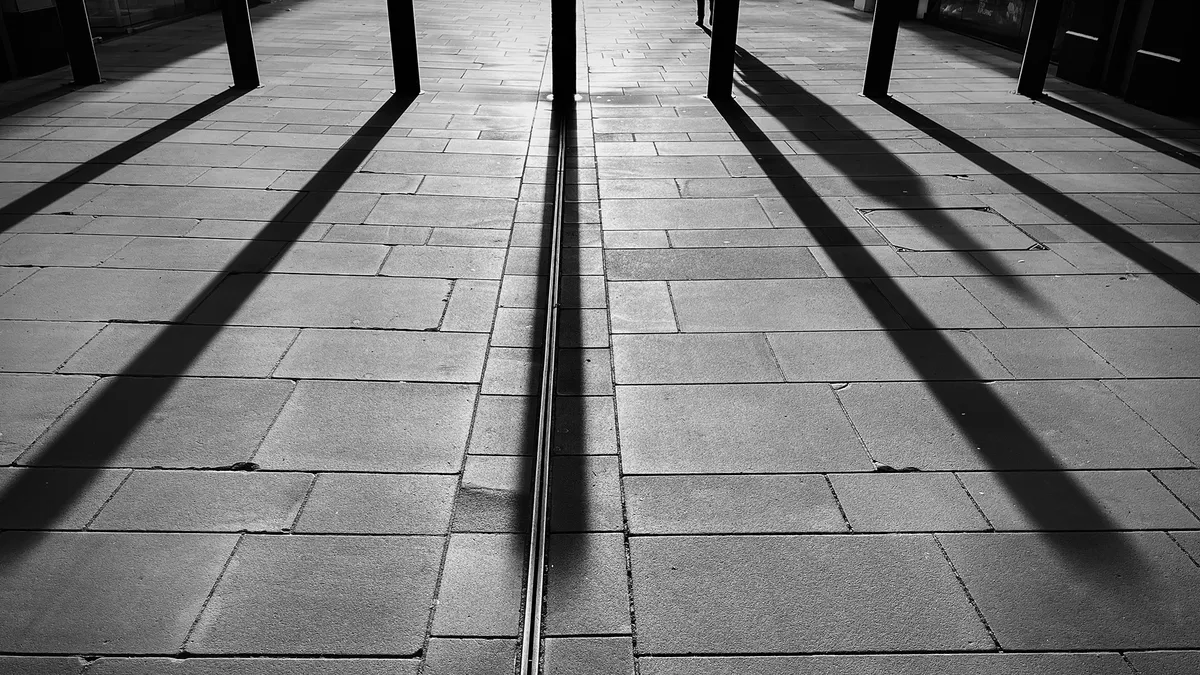
How to use contrast and tone
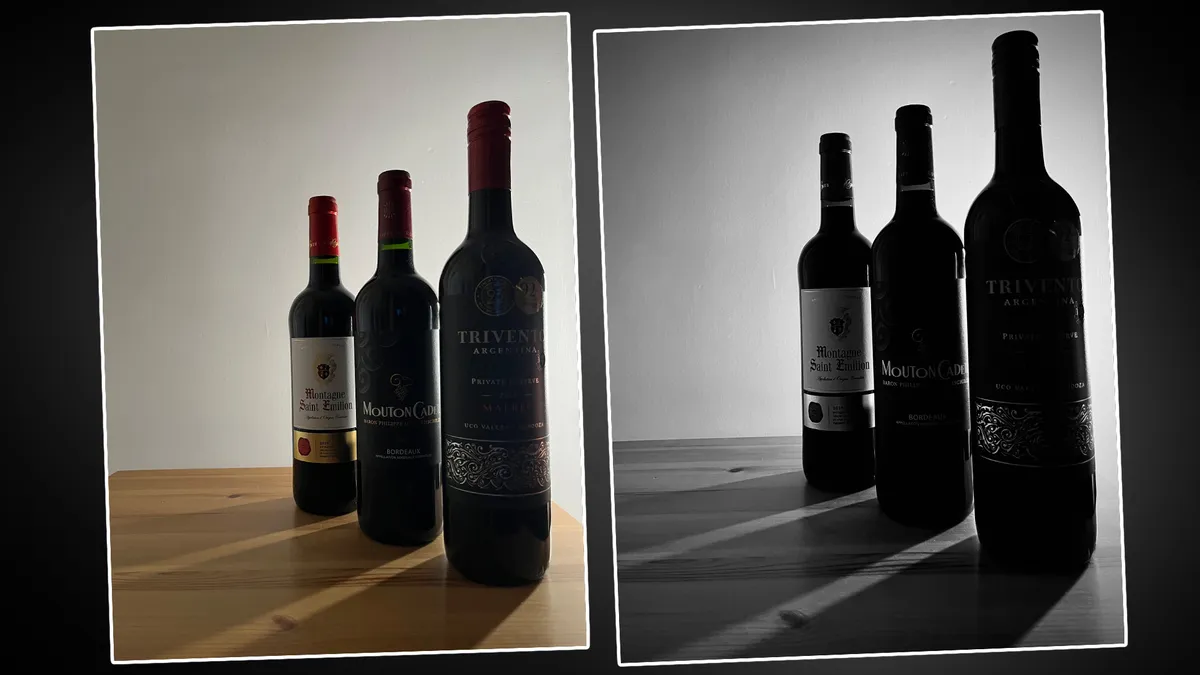
Black and white photographs also emphasize tone (the varying brightness of elements within an image). This means that high-contrast scenes, which are more often avoided when shooting in color, can provide plenty of photographic potential. Softer lighting conditions work well too, as long as there’s enough tonal variety from whites to blacks and everything in between. An image that only displays gray tones will often look dull and flat.
Contrast between tones helps shapes and textures pop, while also providing a real sense of depth. Light and shadow is key when searching for contrast. Examples of this include soft window light illuminating a subject standing in a dark room, light hitting a white lighthouse set against a brooding sky or a backlit pedestrian, casting a long shadow.
- Search for high-contrast scenes that display bright highlights and rich shadows
- Revisit locations to observe how the light behaves at different times of day
- Light and shadow is key to providing both tone and contrast
How to capture a mono-minimalist photo
Black and white and minimalism go together like coffee and cream. Minimalist photography revolves around simplicity. It’s about cleaning up the frame by cutting out as many distractions as possible and utilizing space, shape and tone to emphasize the subject.
Think of a backlit lone tree on a hilltop, set against an even overcast sky or a single person walking past a simplistic modern building. Monochrome is used so often in minimalist photography, because it simplifies the frame further by eliminating any contrasting or distracting colors, while also amplifying the subject’s shape. This allows you to control precisely what the viewer is drawn to.
- Find a clean-looking scene with lots of space
- Search or wait for a single subject that you can frame within the wider scene
- Don’t compose the subject too tightly – make sure there’s plenty of negative space
- Capture your image and convert it to black and white in the Photos app
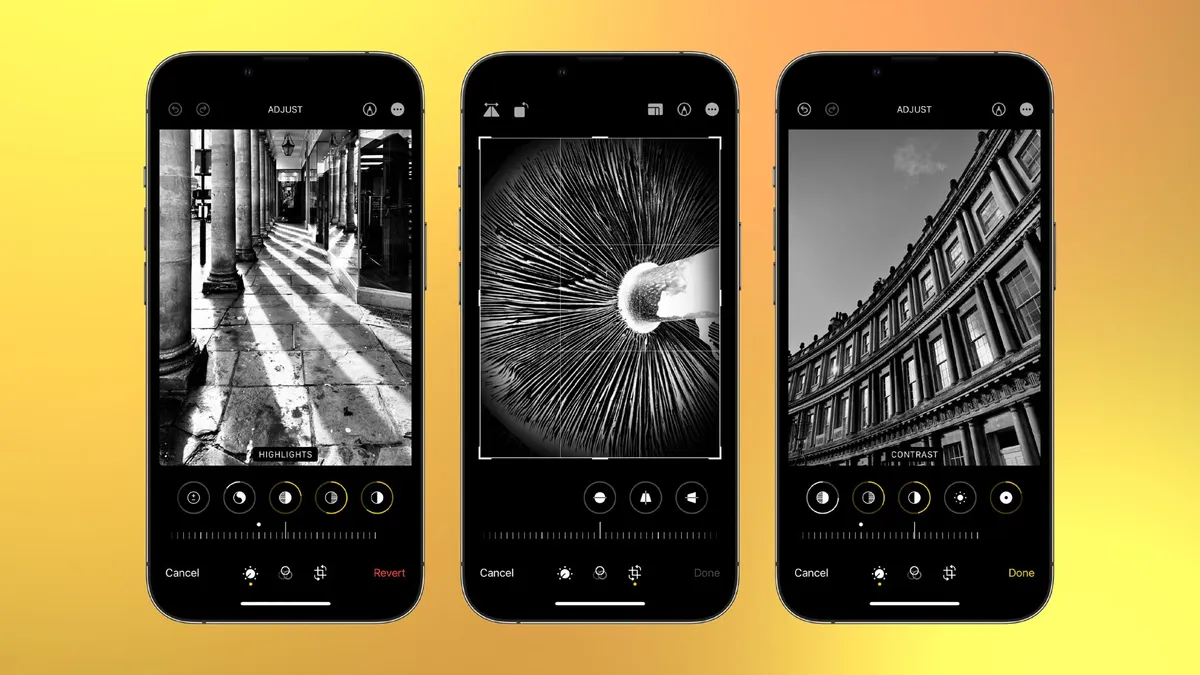
How to edit in black and white
The first step is to convert your image to black and white. If you’re using the Photos app’s editing suite, you can either start with your preferred black and white Filter (if you weren’t already shooting with it) or you can head to the Adjust settings and set the Saturation slider to -100. The former will give you instant results that you can then tweak to your own taste, while the latter will provide a flatter, blank canvas to work from.
Since contrast is the foundation of a good black and white photo, the Contrast slider is your friend. You can also increase the contrast of your image by dropping the Shadows, boosting the Black Point, lifting the Highlights or increasing the Definition sliders. But, it’s easy to go overboard when adding contrast. A neat trick is to leave the finished edit and come back later with fresh eyes, to gauge the intensity of your work.
If you want to add a little more tonal range to your black and white image you can lift the shadows. Just make sure you don’t lift them too far as this can neutralize the blacks and make the image look flat. Visit our editing guide for a more in-depth explanation of how to edit photos the right way.
- Open your image in the Photos app’s editing suite
- Either select a mono Filter via the three-rings icon or set Saturation to -100
- Use Contrast, Black Point and Definition to darken the blacks
- Increase Highlights to lift the whites
- Boost Shadows to increase the tonal range
Where do I go from here?
Once you’ve learned the iPhone photography basics and are comfortable capturing and editing black and white photographs, start to focus on particular genres such as portraiture, landscapes, street photography and architecture. This will help you to channel your creativity and allow you to learn advanced skills that pertain specifically to your chosen genre. It’s also worth following lots of black and white photographers that you admire on Instagram. As you observe the work of others you’ll begin to get a flavor of what compositions, subjects and editing styles you enjoy, inspiration that you can then apply to your own work.
This tutorial is part of iPhone Photography Week 2024. Expect new posts to appear daily, focused on making your photos shot with iPhone better than ever before.
Share your photos with iMore on X (Twitter) using #iMorePhotographyWeek
