
Editor's Note: This is a full product review created by a member of the iMore community, and we're thrilled to share it with you! If you'd like to participate in this program, please read this forum thread and contact our Community Manager for more information.
There is no doubt you want to protect your new iPhone X and RhinoShield is probably one of the best brands you might have heard when it comes to protecting iPhones.
With their unique CrashGuard Bumper Cases, RhinoShield offers military-grade drop protection while not adding additional weight or extra body to your iPhone. One of my pet peeve with these bumper cases is that every bumper case looks the same and kinda boring. With the new Mod modular case, RhinoShield offers a variety of modular accessories starting with the frame, backplates, rims and side buttons.

I have been using the RhinoShield modular case for over a week now and this is the review of the Mod case and RhinoShield screen protectors for the iPhone X.
Screen protectors
Let's start with the screen protectors. RhinoShield offers two types of screen protectors for the iPhone X:
- Shatterproof impact protection screen protector, and,
- 3D curved edge to edge 9H tempered glass protector
If you don't prefer the tempered glass and rather want a much nicer and thinner material, then the shatterproof impact protection screen protector is the way to go. Just because it is not tempered glass, it doesn't mean you don't get protection.
According to RhinoShield, this high strength screen protector can absorb 5 times more impact energy than normal screen protectors. It's no joke when you watch this video of a guy demonstrating the power of this screen protector by repeatedly beating an iPhone screen with a hammer!
As I have reviewed (for Samsung Galaxy Note 8 and S8) the RhinoShield's 9H tempered glass protectors before, I decided to use the shatterproof impact protection screen protector this time with my iPhone X.
Unlike in the tempered glass protector where the adhesive layer covers only the sides of the screen protector, the adhesive layer in this screen protector covers the entire screen protector. This was a welcoming change for me as I usually find one or other issues with tempered glass protectors with adhesives on the sides, especially with touch sensitivity. You don't have those issues with this impact protection screen protector.
While there is nothing new in the process of installing the screen protector, I did spend quite a lot of time installing it. Before you install, make sure to use the provided wipes to clean and remove any dust on the iPhone X display so you don't end up with specks of dust underneath your screen protector.

The hard part was to align it perfectly with the iPhone X. It was impossible for me to install the screen protector without having the display on as I was not able to infer the (infamous) notch's edges. Luckily, this impact protection screen protector is reusable. So, I was able to apply, adjust, reapply until I got it right.
As long as the adhesive layer is not damaged, you can reapply this screen protector as much as you like. The corners did not lose their shape even after reapplying it several times. While you do get some bubbles while installing the screen protector, they go away as you press down hard on the screen protector from the center of the display.
One thing to keep in mind is that this screen protector does not cover the entire front screen rather just the display. You will have a portion of the edges exposed which is by design. This can be overcome by installing a protective case which should protect those edges.

Once you have it installed, it fits perfectly. With just 0.29mm, it doesn't add much thickness to your iPhone X screen. If you still have some bubbles left after the installing, just use the provided squeegee to push those bubbles out the sides. My installation was bubble free!
I have been using it for over a week now and I almost forget I have a screen protector installed. I have not had any issues with the display or touch sensitivity. It's no different to using your iPhone X without a screen protector.
Another good thing about this screen protector is that it's fingerprint resistant. That said, sometimes I did notice few fingerprint/greasy marks now and then but it was easy to clean them with a simple wipe.

These greasy marks do not stay for long, that's for sure. The display is free of any glares and I did not find any issues using it in bright sunlight as well. As with any screen protector that leaves the edges exposed, the dust collects easily along the edges so you might want to clean that from time to time. The more I use it, the more I like it.
Pros
- Super thin
- Hardly noticeable
- No glares or so whatsoever
Cons
- Hard to align it with the phone
- Holds temporary greasy marks from your usage
- Does not cover the entire display
If you want to remove the screen protector for some reason or try out a different one, simply remove the screen protector and attach it to a flat clean surface such as glass or window. Just make sure it's clean and free of dust. To put it back on, just install the protector again.
The Mod Case
RhinoShield is known for its unique CrashGuard bumper cases that provide maximum protection. With the iPhone X, RhinoShield goes one step further by adding modularity to these bumper cases.
With this modularity, you can choose from a variety of frames, rims, backplates and side buttons to customize your Mod case. The frame along with the rim makes your usual bumper case while the frame along with a backplate will give you a case with an enclosed back.

When you purchase the Mod case from RhinoShield, you get the entire package, your choice of the frame, rim and a back plate.
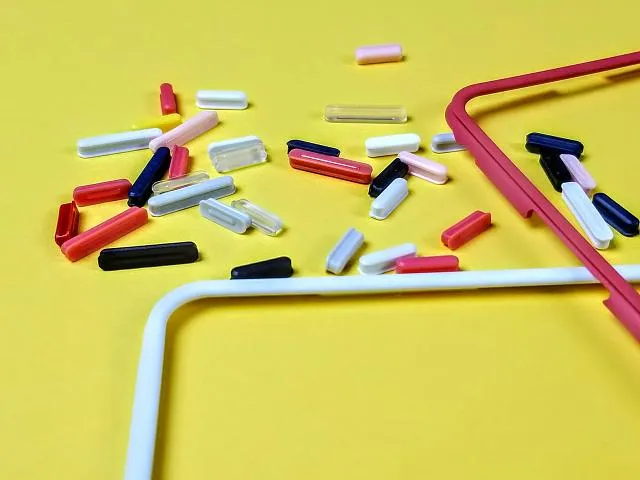
Before making your purchase, make sure you have gone through RhinoShield's catalog to select your choice of the frame, rim, backplate and the side buttons. The frame and the rim are available in black, dark blue, coral pink and white colors.
There are more than 100+ backplate designs to choose from. And, don't forget those colorful side buttons package as well. Yes, I love these colorful side buttons.
The Mod case comes with detailed instructions on how to install. I would highly recommend reading those instructions before you start installing the case. Basically, you can choose to use the Mod case just as a bumper case (frame + rim) or case with the back (frame + backplate). In either case, you will need to first install the rim or the backplate to the frame before putting the case on the phone.

If you are looking to use a screen protector, regardless of whether it is RhinoShield's own screen protector or any other brand, make sure you install the screen protector first before installing the case.
Pros
- Flexible modular design
- Tight fit
- All-around protection coverage for your iPhone X
Cons
- At times, the case is slippery
- Buttons feel wobbly, could be improved
- Expensive, as accessories and other mods, add up cost to the bumper case
Installing the bumper case
Lets start with the instructions to build the bumper case. You will need the frame and the rim to start. If you want to install your choice of the buttons, then this is the right time to do so as well. Once you have both, start with the corners where you have the RhinoShield logo (ie., text), align the RhinoShield logos on both the frame and the rim and then snap the rim's ridges into the grooves of the frame. Continue with the other corners until you have snapped the remaining ridges in.

Now, just flip the bumper case and start by inserting the sides of the phone first into the case. Once one of the sides are in the case, continue with pressing the other side until the phone snaps into the case. That is it, you just modded this case into a bumper case!
To remove the bumper case off of the phone, just put the phone face down and slowly remove the rim from the bottom. If you find it hard, just slightly lift the frame to pull the rim out. Once you have removed the rim, now just snap the phone out of the case by pushing from the bottom.
Installing the case with the backplate
For this task, you will need the frame and the backplate. You do not need the rim. If you have installed the rim, then follow the instructions as stated above to remove the rim. You will need the frame and the rim to start. If you want to install your choice of the buttons, then this is the right time to do so as well.
Once you have the backplate and the frame, start with the corners where you have the RhinoShield logo (ie., text), align the RhinoShield logos on both the frame and the rim and then snap the backplate's ridges into the grooves of the frame. Continue with the other corners until you have snapped the remaining ridges in.

Now, just flip the case and start by inserting the sides of the phone first into the case. Once one of the sides are in the case, continue with pressing the other side until the phone snaps into the case. That is it, you just modded this case to install the frame and the backplate!
To remove the case with the backplate, you will have to remove the backplate first. Put the phone face down and pull the side of the frame from the middle and then pull the frame out slightly. Then start pulling the frame from the rest of the sides until it's loose. Once you have removed the backplate, now just snap the phone out of the case by pushing from the bottom.
Using the Mod case
There is no doubt this is my favorite case so far for the iPhone X. It feels great in the hands. Whether you are using the bumper case or the case with the backplate, RhinoShield has done a great job with this case.
Since I have used RhinoShield bumper cases before, this time around I used the case with a backplate and never been happier with my choice. I am also happy that I was able to build my color scheme using the frame, backplate and the side buttons. My favorite combination is the coral pink frame with the clear back plate and yellow side buttons.

The iPhone X fits nicely in the case and there is no sign of any modularity as the phone sits tight inside the case. In the front, it has got good raised lips to protect the phone's display from any accidental scratches. But then, I would still recommend installing a screen protector to fully protect your display. If you don't want to use a screen protector, the raised lips will at least help you for a while.
The speakers and charging port cutouts have ample opening and raised cutouts. I did not find any issue using the charging port. I was able to plug in and out the charging cable with ease.
The camera cutout is also raised to protect from any scratches from the surface. Since the side buttons are mods, I found them a little bit wobbly but not so much as they are perfectly usable and have good tactile feedback when you press them. The mute button is also hard to reach with its raised cutout.

As there are no side grips on the frame, you may find the case a tad slippery but not all the time. Other than this I did not find any issues using the case.
With regards to the strength of the case, RhinoShield is using their new ShockSpread material which is highly durable and is able to resist strong impacts. As per RhinoShield's website, this material can absorb over 11 feet (3.5M) of impact. As always, you can also find their traditional honeycomb structure on the inner surface of the case that helps to absorb shocks during falls.
Add-on lenses
Along with the various mods - frames, rims, backplates and buttons, RhinoShield has a new Mod case accessory - The add-on lenses that you can attach to your iPhone X camera and get more out of the camera with different lens types.
To use these add-on lenses you also need the add-on lens adapter and then one of the lenses that are sold separately. To install the adapter, remove the phone from the case first and then just fit the lens adapter onto the camera cutout and then install the phone back into the case.

Now attach the add-on lens by screwing it tightly onto the lens adapter. Note that only the wide-angle camera which is usually the first of the cameras (from the left) in the iPhone works with these add-on lenses and not the telephoto camera.
RhinoShield sent me two add-on lenses to test - the 0.6X HD Wide Angle and the Super Wide Angle lenses. You can also get the Fisheye and Macro lenses from their website.
The 0.6X HD wide angle lens has a 110-degree view angle and can capture some great shots. Below are some of the pictures I shot with this wide angle lens.

The super wide angle lens has a 165-degree view angle and can capture a wide area. Below are some of the pictures I shot with this super wide angle lens.
I quite like these add-on lenses especially that I can now capture superb wide angle shots. However, I noticed a lot of distortion along the sides of the pictures when using the super wide angle lens. This happened a lot when I took pictures in the landscape mode than portrait mode.

That said, I am quite happy with the 0.6X HD wide angle lens output and there is no doubt it will be in my carry bag all the time from now on. The 0.6X HD wide angle lens also comes with a lens hood which is a bonus, especially for those sunny days!
What do you think?
RhinoShield has gone above and beyond with this Mod case's design. If you are someone that loves the flexibility in designing your case and still want the best protection out there for your iPhone, then this Mod case is the perfect choice for you. With several backplates and side buttons to choose from, you can make your own colorful Mod case of your choice!
You can buy the Mod case for your iPhone X directly from RhinoShield's website. Pricing starts at $31.99 USD for the base bundle which includes a frame, rim, backplate and buttons of your color choice. Any additional accessory will add up to that price. Mod case and its accessories are available for the iPhone X, iPhone 8/8 Plus, iPhone 7/7 Plus, iPhone 6/6s, iPhone 5/5s, and iPhone SE.
If you are using a Mod case or if you are planning to buy one, let us know what you think and any questions you have about the case and its accessories.

