If you've got an AT&T/GSM iPhone 4 and the earpiece doesn't seem to work or gives bad feedback, a DIY repair should get it back in working order. An earpiece replacement isn't an extremely difficult repair to perform and only takes about 20 to 30 minutes or so. It'll also cost you a lot less than a trip to the Apple Store for a new or replacement iPhone if you're out of warranty and not eligible for an upgrade.
Follow along and we'll get you back up and running in no time!

Disclaimer: As with any repair, iMore cannot be held responsible for any damage you may do to your device. It's also worth considering that opening up your device to perform any repair or modification can and will void your Apple warranty. If you don't feel comfortable opening your device, don't. Use extreme care and caution when performing a repair on any device.
What you need for a DIY GSM iPhone 4 earpiece replacement
iMore recommends using only quality and genuine parts from a reputable supplier like iFixYouri. They have quality parts, tools, and much more for all your repair needs.
- Replacement earpiece speaker
- 5-point security screwdriver
- Standard #000 Phillips screwdriver
- Spudger tool
- Razor blade
- iSesamo Opening tool (not necessary but awesome for prying up cables and getting under adhesive)
Power off your iPhone 4

Before performing any repair, always power off your device before removing any screws or parts.
Remove the back

- First remove the bottom 2 dock connector screws in your iPhone 4. Use either your #00 screwdriver or the five point depending on whether or not your iPhone 4 has security screws in the dock connector. Almost all newer devices will have security screws.

- To remove the back simply slide the back upwards and lift it off gently.
- Set the back and 2 dock connector screws aside.
Remove your SIM card
Use a SIM removal tool or a paperclip to remove your SIM card and tray. Set them aside.
Remove the battery

- To remove the battery you'll need to remove the #00 screw holding the battery clip in place. Remove this screw located to the bottom left of the battery.

- The metal clip on the battery is what clips the battery to the logic board. You'll need to pop this clip up with your plastic pry tool. Simply stick the end of your pry tool underneath the clip and gently pull upwards until it unfastens from the logic board.

- To remove the battery, I do not recommend using the plastic pull tab. There is quite a bit of adhesive underneath the battery and the tab will normally just rip off or you can bend the battery. Instead, run your pry tool along the right side of the battery and break the adhesive that way. Once the battery is free from the adhesive, you can pull the battery out of the phone. There are no other connectors holding it in.

- You will notice a tiny grounding clip sitting underneath where you unscrewed the battery. Set this aside for replacement during reassembly. This is a grounding clip for your antenna. Make sure you put it back in place before reconnecting your battery.
Remove the Dock connector shield and disconnect the cable

- There is a shield held on with two screws covering the dock connector cable. Remove the two screws holding it in place and set the shield and screws aside, remembering where they came from.

- Next, use your pry tool to pry up the actual dock connector cable. Be careful as there is adhesive holding the cable in place as well. Peel back the adhesive gently to free the cable.
Remove the top logic board shield
- There are 5 screws holding the logic board shield in place. Remove the 5 screws holding it in place. Just be sure to remember which holes they came out of as the screws are different sizes. I always keep them in order of how they came out.
- Next you'll need to remove the shield. There is a tiny clip built into the shield holding it in place. (Refer to the photo above.) Pop it up with your pry tool and you should be able to slide the shield up fairly easily. Just take care not to bend it or break off a clip.
Disconnect the 6 cables from the top of the logic board
- There is only one connector holding the camera to the logic board. Remove this cable in the picture above using your pry tool. Gently lift upwards and it will pop right off.

- Next gently lift the camera out of the device. You'll notice there is a tiny tab that is seated underneath the LCD and digitizer cables to the right.
- Next pop up the LCD and digitizer cables to the right of where the camera cable was connected. You pop them up in the same direction.
- The 3 cables further to the right will need to be disconnected as well. They pop up in the opposite direction.
Disconnect the cellular antenna

To disconnect the cellular antenna, just pop the round cable up from the logic board holding it in place. It is connected to the speaker housing so just leave it where it is for now.
Remove the logic board
- Start with the 2 screws holding the logic board down in the middle and at the bottom left. Both use your #00 Phillips screwdriver. They are the same size. The one on the right of the logic board in the middle of the device has a water sensor over it you'll need to remove.
- The second screw is located where the logic board meets the speaker assembly towards the bottom left of the device.
- The third and final screw holding the logic board in is located at the top of the logic board off to the right. It is the only cross-head screw in your device. Use a small flathead screwdriver to carefully remove it.

- You should now be able to remove your logic board. Holding it at the bottom, gently pull it upwards. I use my other hand to lift up at the top where the rear facing camera used to be.

- Take note that there is a small rubber piece that sits at the top of the logic board. You will need this for re-assembly so make sure it doesn't fall off. If you lose this, you could see reception issues.
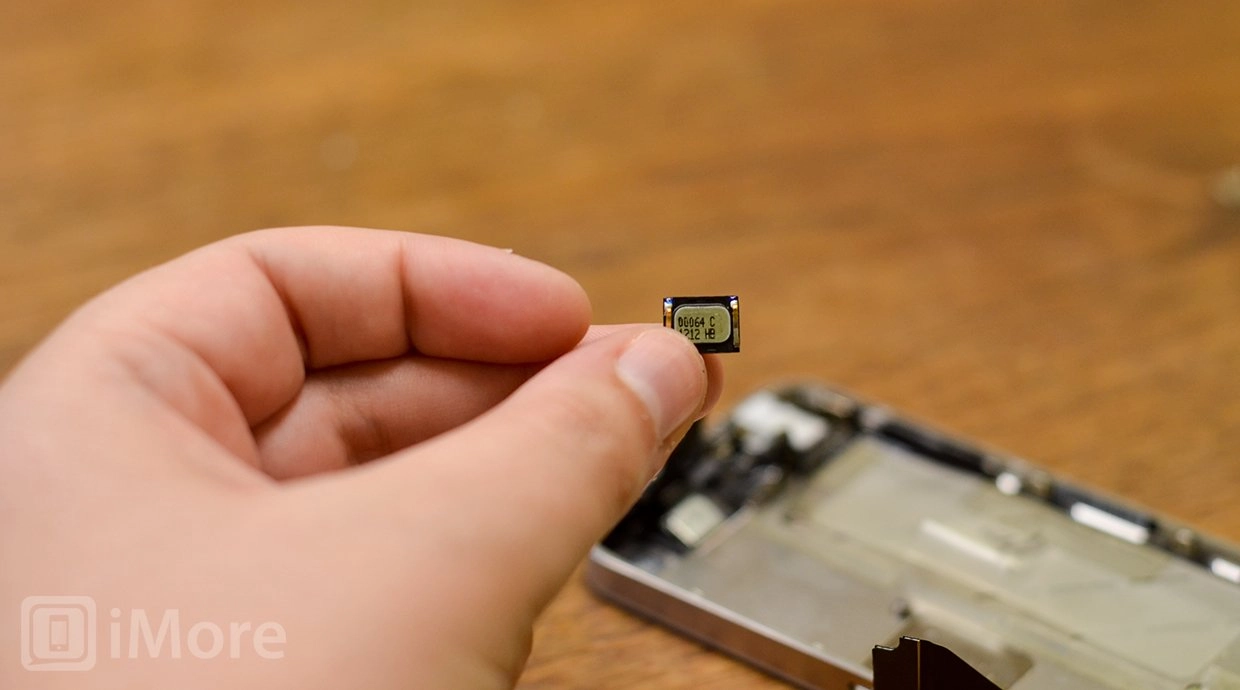
Remove the broken earpiece assembly
- Carefully use your pry tool to pull up the earpiece assembly from the midframe. It is held in with a foam type of adhesive. When removing the earpiece, be careful not to pull the sensor cable underneath it up with it.

- Once you've removed the earpiece assembly you can move on to the next step.
Insert the new earpiece assembly

- The new earpiece assembly should come with adhesive and foam already installed. Just peel the backing off of the adhesive.
- Place the earpiece assembly carefully into the iPhone making sure you're placing it the correct way so the prongs are pointing in the right direction.
- Gently push down on the earpiece to make sure that the adhesive has attached on the underside.
Reassemble your iPhone 4
Now that you've replaced the earpiece it's time to finish putting your iPhone back together. To do so, you can either follow these directions in exact reverse order or watch our reassembly video above. The video is a complete teardown so you won't need to watch the entire thing but rather start from around the 4:40 mark. From this point on will guide you through reassembling your device.
And ...done!
Now that your iPhone 4 is completely put back together, push the power button to turn it back on. Place a test call and if all went well, your earpiece should be back in working order again. If for some reason you're still getting bad feedback, it's possible you need to replace the noise canceling mic or the dock connector in order to replace the other two speakers. It's not very common that this happens but on occasions it does.
○
○
○
○ DIY: Repair your iPhone
○ Fix a broken iPhone 7 or 7 Plus
○ Fix a broken iPhone 6s or 6s Plus
○ Fix a broken iPhone SE
○ Fix a broken iPhone 6 or 6 Plus
○ Fix a broken iPhone 5c
○ Fix a broken iPhone 5s
○ Fix a broken iPhone 3GS or 3G

