
If you're experiencing issues with the headphone jack in your iPhone 5c and software troubleshooting just isn't doing the trick, a DIY repair may be required. Symptoms of a defective or faulty headphone jack can include distorted sounds, crackling, sounds cutting in and out, and in some cases, no sound at all. In rare cases, a faulty headphone jack can also cause regular sounds to not work if iOS thinks headphones are plugged in when they're not.

If any of these scenarios sounds like something you're experiencing, follow along and we'll walk you through where to get parts and tools and how to DIY replace the headphone jack in your iPhone 5c for a fraction of the cost of a new iPhone!
What you need to replace an iPhone 5c dock assembly
You'll need some tools and parts in order to repair your iPhone 5c. iMore recommends using only quality and genuine parts from a reputable supplier like iFixYouri. They have quality parts, tools, and much more for all your repair needs.
- Replacement Lightning dock & headphone jack assembly
- Suction cup
- 5-point security screwdriver
- Standard #000 Phillips screwdriver
- Spudger tool
- Razor blade
- iSesamo Opening tool (not necessary but awesome for prying up cables and getting under adhesive)
As you can see from the parts list above, we'll be replacing the entire dock assembly since the headphone jack is connected to it.
1. Power off your iPhone 5c

Before performing any repair on any iPhone, iPad, or iPod touch you should always remember to power it off. Simply hold down on the Power button until you see Slide to Power off. One you're sure your iPhone is turned off, proceed to the next section.
2. Remove the two security screws on both sides of the dock connector

There are two security screws that secure the screen to the frame and they sit on each side of the dock connector. Use your 5-point security screwdriver to remove them. They are both the same size so it's okay if you mix them up.
3. Remove the display assembly
- Place your suction cup slightly above the Home button assembly and secure it to the screen.

- Holding the iPhone in place with one hand, gently pull upwards on the suction cup until you free the bottom of the screen. You should now be able to use your fingers to slowly raise up the screen and expose where the front assembly is connected to the logic board.
- Remove the four screws holding down the shield that covers the display cables. To do this, use your #000 screwdriver. These screws are different sizes so make sure you keep them organized in a way you can remember for re-assembly.

- Once all four screws are removed, carefully remove the shield and set it aside.

- Now use your spudger tool in order to remove the three cables shown in the image below.

- The display assembly should now be free from the body of the phone. Go ahead and set the display assembly aside.
4. Disconnect the battery
We don't need to completely remove the battery for this repair but it's always a good idea to disconnect the battery before removing and replacing internal components in order to prevent a short from occurring.
- Remove the two screws holding down the battery cable using your #000 Phillips screwdriver.

- Gently lift the battery shield out of your iPhone 5c and carefully set it aside.

- Use your spudger tool to carefully pry up the battery cable.

- That's it. We don't need to go any further. Just remember to keep track of the shield and what order the two screws came out.
5. Remove the loudspeaker assembly
- Start by carefully peeling up the adhesive shown in the photos below using your pry tool or iSesamo opening tool taking care not to tear it. This cable works in conjunction with your home button. It does not come completely out. You only want it to be detached from the speaker enclosure.


- Now remove the three screws shown in the photo below using your #000 Phillips screwdriver.

- Disconnect the small circular gold connector using your spudger tool. This is located under where you disconnected the battery. Pay attention to the adhesive that is holding it down. It's quite easy to break but take your time so you don't break the cable itself.

- The speaker enclosure can now be lifted out of your iPhone 5c. Just take care not to snag the dock, logic board or any cables while removing it. The photo below shows the best way to grab hold of the speaker assembly.

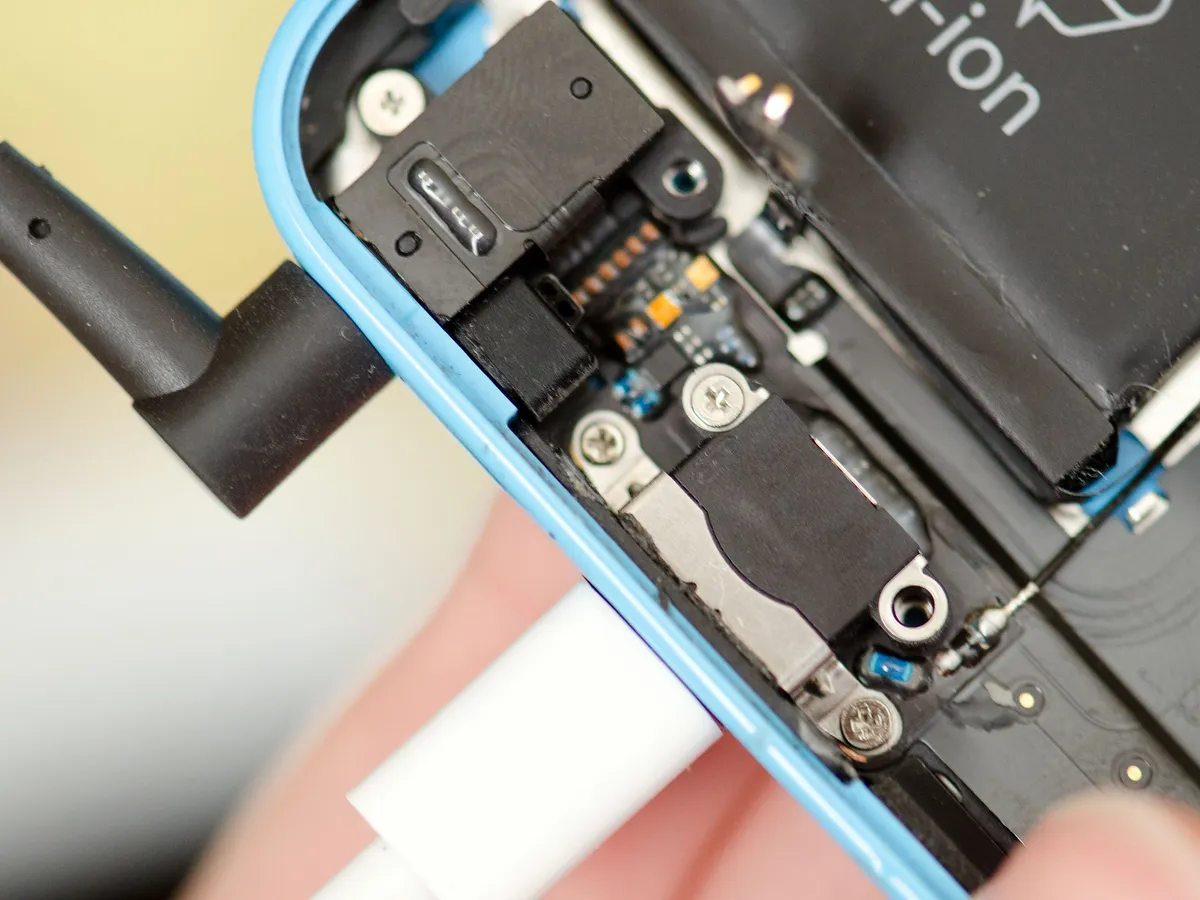
6. Replace the Lightning dock & headphone jack assembly
- Start by using your spudger tool to disconnect the single cable that connects the dock to the logic board. It is above where the battery connector is located.

- Use your #000 Phillips screwdriver to remove the remaining 4 screws that hold the dock in place. They are outlined below.

- The dock assembly is now ready to be peeled out. The only thing holding it in now is adhesive. The easiest place to start is by peeling where the cable connects to the board. Once you get to the actual dock, use your spudger tool, or iSesamo opening tool which is what I prefer, in order to break the foam adhesive around the Lightning connector.

- Use your pry tool or any opening tool in order to pop off the rubber gasket that sits next to the headphone jack. It doesn't come off completely. You just need to pop it away from the frame.

- Use your pry tool or iSesamo opening tool in order to break the adhesive around the headphone jack, which is also part of the dock assembly. You may need to use a finger on your other hand to work it up and around the battery.

- Now use your opening tool to remove the rest of the adhesive under the dock assembly, taking care not to tear anything. The dock should now come free from your iPhone 5c.

- Check out your old dock compared to your new one and make sure they look exactly the same. Peel off any adhesive backing on the new dock. This is also a good time to remove any old adhesive from inside the frame of your iPhone.

- Start by lining up the headphone jack and Lightning dock assembly with the screw holes. You can also lay the adhesive on the right side of the dock at this time and re-connect the cable to the logic board to ensure a good fit.
- Once you're confident the dock is lined up, replace the four screws you removed earlier using your #000 Phillips screwdriver.
- Now is a good time to plug in a charging cable and a pair of headphones to ensure a good fit. If you can't push one or the other in all the way (or both), the dock is lined up incorrectly and needs to be repositioned. Better to figure this out now instead of when you have reassembled your entire iPhone.
- If everything is lined up and looks good, you can move on to putting the loud speaker back in.
7. Reinstall the loudspeaker assembly
- There are contacts on the dock assembly that must make contact with the loud speaker for it to function. Take note of those below and make sure you position your speaker accordingly.

- Once the speaker assembly is lined up, replace the three screws you removed earlier in order to secure it down.
- Replace the gold connector you removed earlier.
8. Re-connect the battery
- Re-connect the battery cable that you pried up earlier.
- Replace the battery cable shield.
- Replace the two screws holding the battery cable down using your #000 Phillips screwdriver.
9. Re-connect the display assembly
- Carefully reconnect the three cables running from the display assembly to the logic board.
- Reposition the metal shield that sits over the three cables and replace the four screws that hold it in place, remembering where each one came from — they are all different sizes.
- Line up the top of the screen carefully and make note of the teeth that line up to the top of your iPhone 5c's frame. Once the top of the display is lined up, carefully snap down the remainder by moving your fingers along the edge.
10. Replace the security screws on each side of the dock connector
Once you are confident that the display is seated correctly again, use your security screwdriver in order to replace the two screws on either side of the dock connector.
11. Test the new Lightning dock & headphone jack assembly
After you're iPhone 5c is fully assembled, turn it back on. Here are some things you should do in order to fully test the new Lightning dock & headphone jack assembly:
- Ensure your iPhone 5c charges as it should
- Play music through the headphones
- Test volume control and skip track functions through headphones
- Test the loudspeaker since we removed it by either taking a call on the speaker or by playing music
- Ensure your iPhone 5c does not get too warm when charging it, if it does, remove the replacement dock immediately and have it replaced
If all of the above checks out okay, you're good to go!
Questions?
Let us know below.
○ Fix a broken iPhone 7 or 7 Plus
○ Fix a broken iPhone 6s or 6s Plus
○ Fix a broken iPhone SE
○ Fix a broken iPhone 6 or 6 Plus
○ Fix a broken iPhone 5c
○ Fix a broken iPhone 5s
○ Fix a broken iPhone 5
○ Fix a broken iPhone 4s
○ Fix a broken iPhone 4 (GSM)
○ Fix a broken iPhone 4 (CDMA)
○ Fix a broken iPhone 3GS or 3G

