How to enable Wi-Fi on your iPhone and iPad
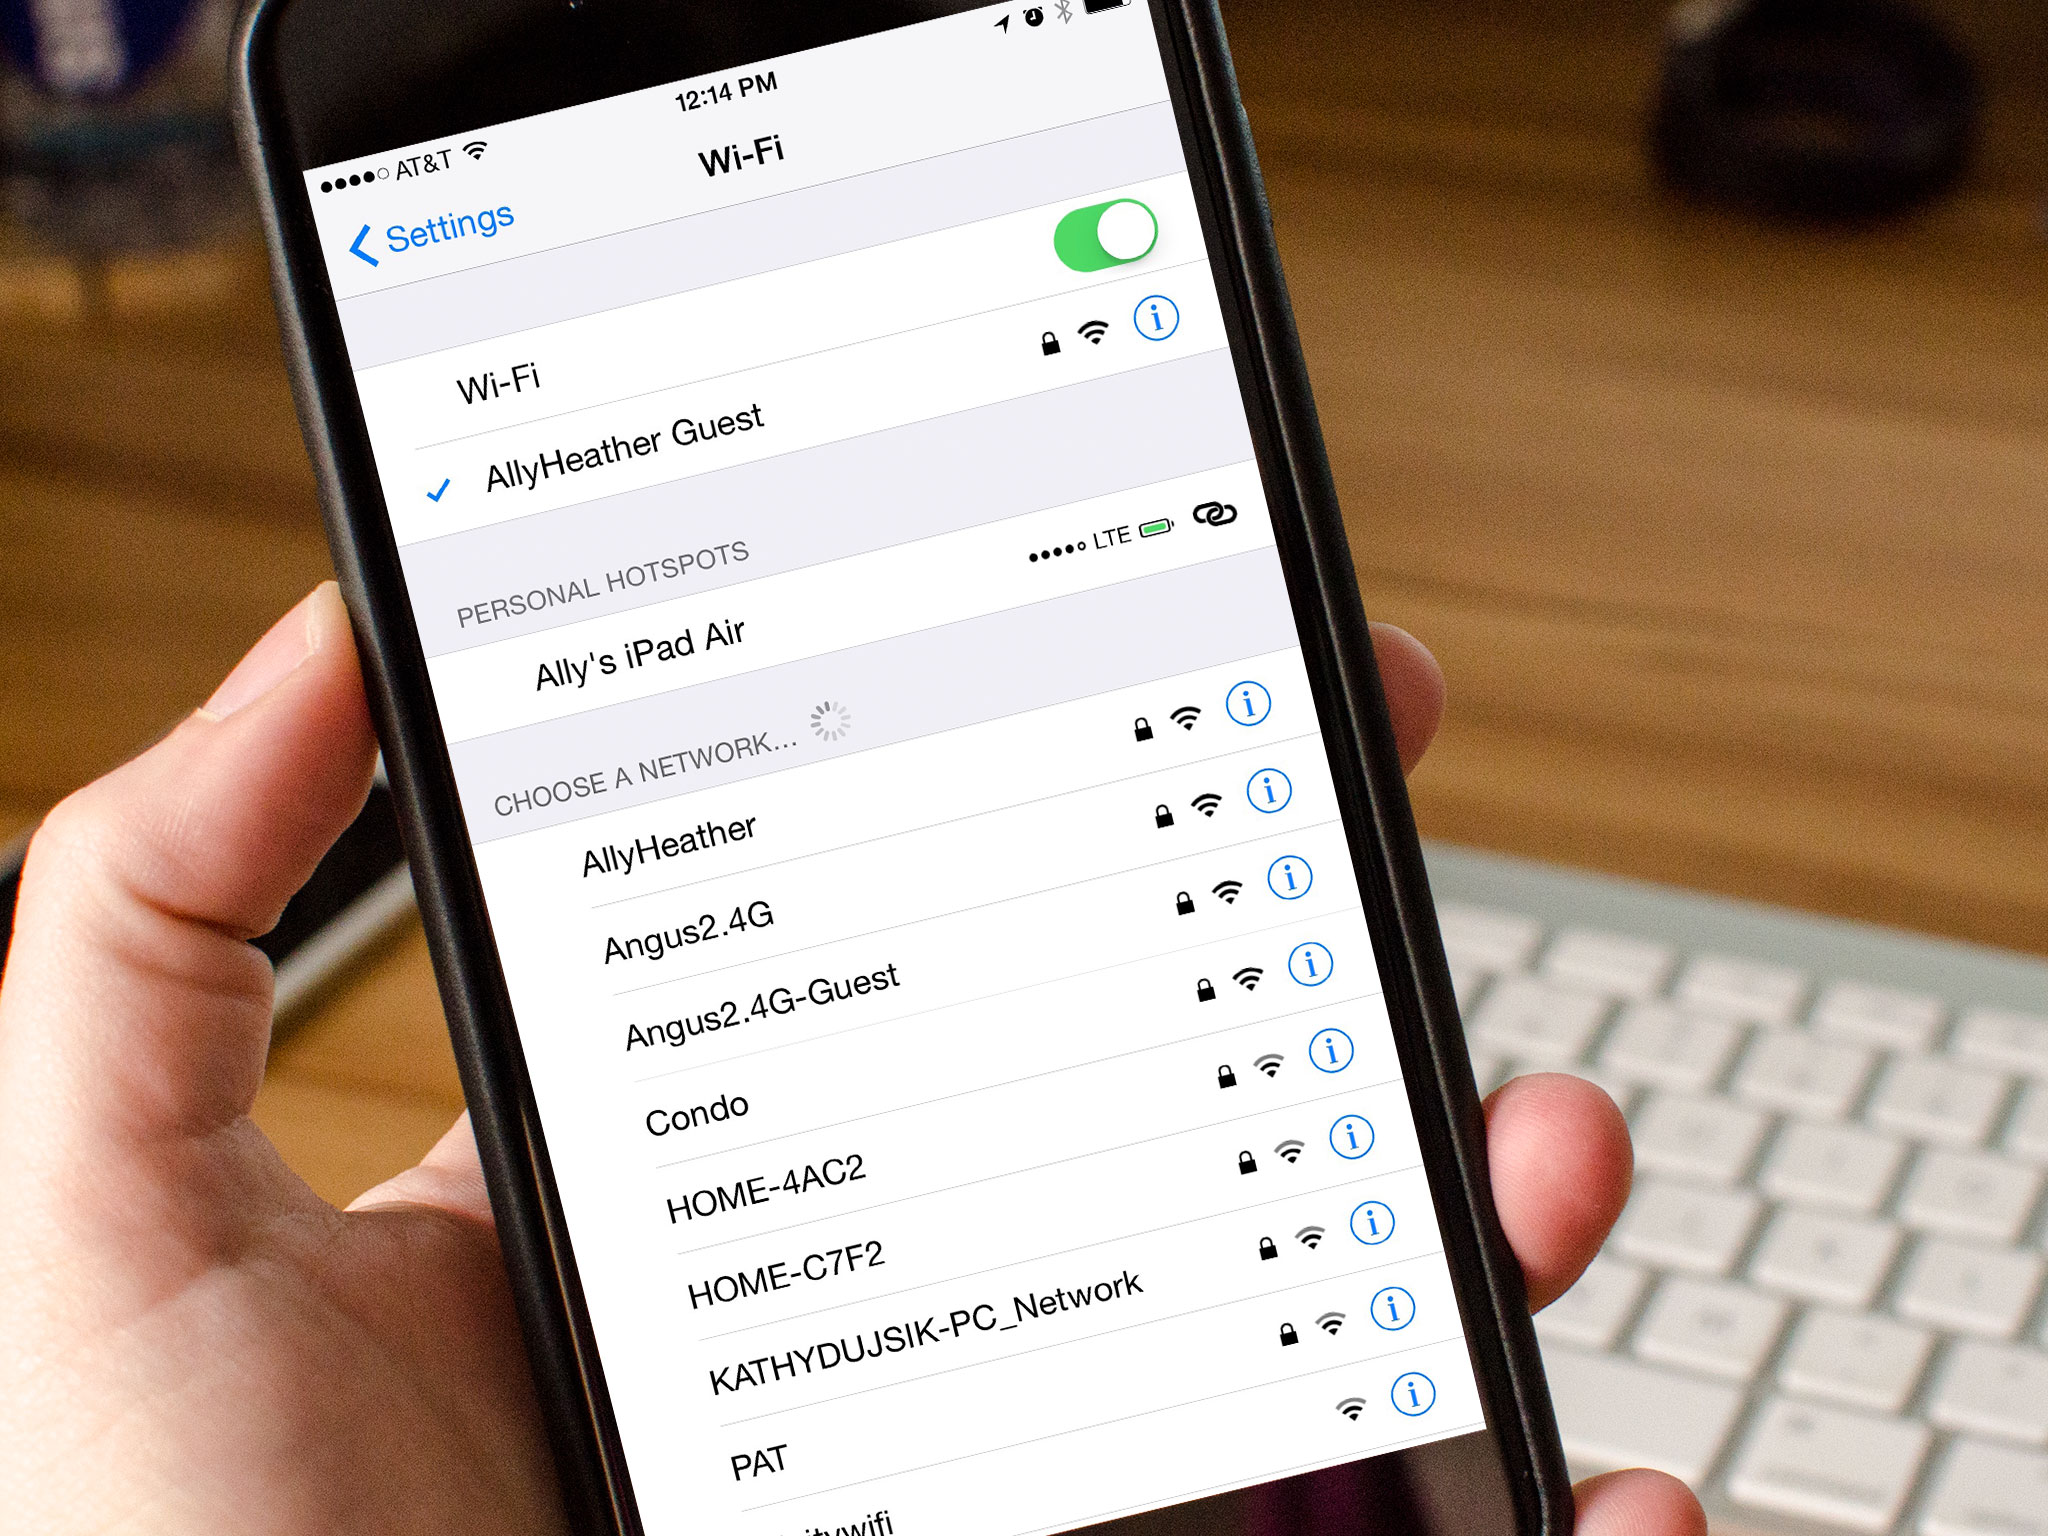
Connecting your iPhone or iPad to Wi-Fi not only gives you access to the internet and all its glory, it also saves you from using data for your apps, games, and web browsing, which can save you some money on your bill.
If you want to know how to join a Wi-Fi network, forget a network, use an HTTP Proxy server, and more, read on for step-by-step instructions!
- How to connect to a Wi-Fi network on iPhone and iPad
- How to connect to a custom Wi-Fi network on iPhone and iPad
- How to forget a network on iPhone and iPad
- How to turn on Ask To Join network on iPhone and iPad
- How to turn off Auto-Join network on iPhone and iPad
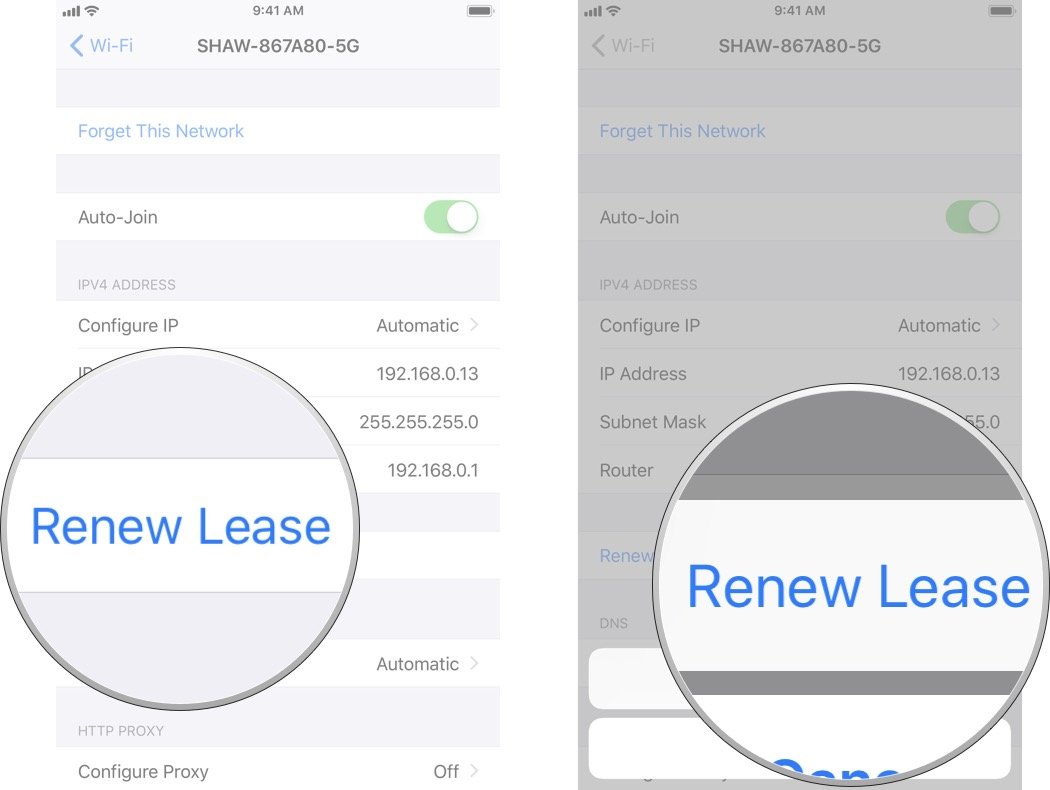
- How to Renew Lease on a Wi-Fi network on iPhone and iPad
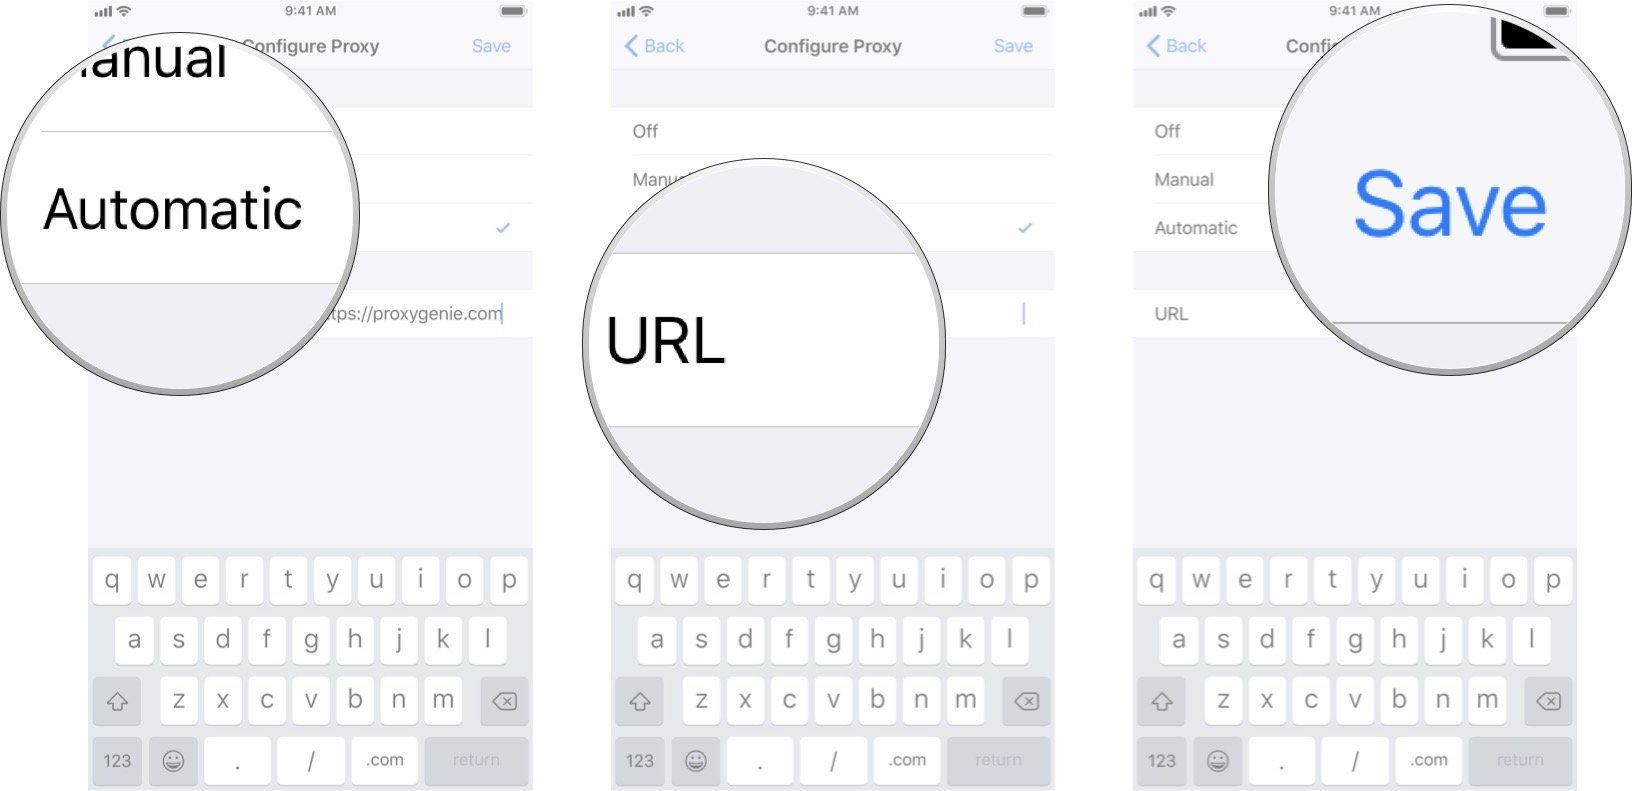
- How to use an HTTP Proxy on iPhone and iPad
How to connect to a Wi-Fi network on iPhone and iPad
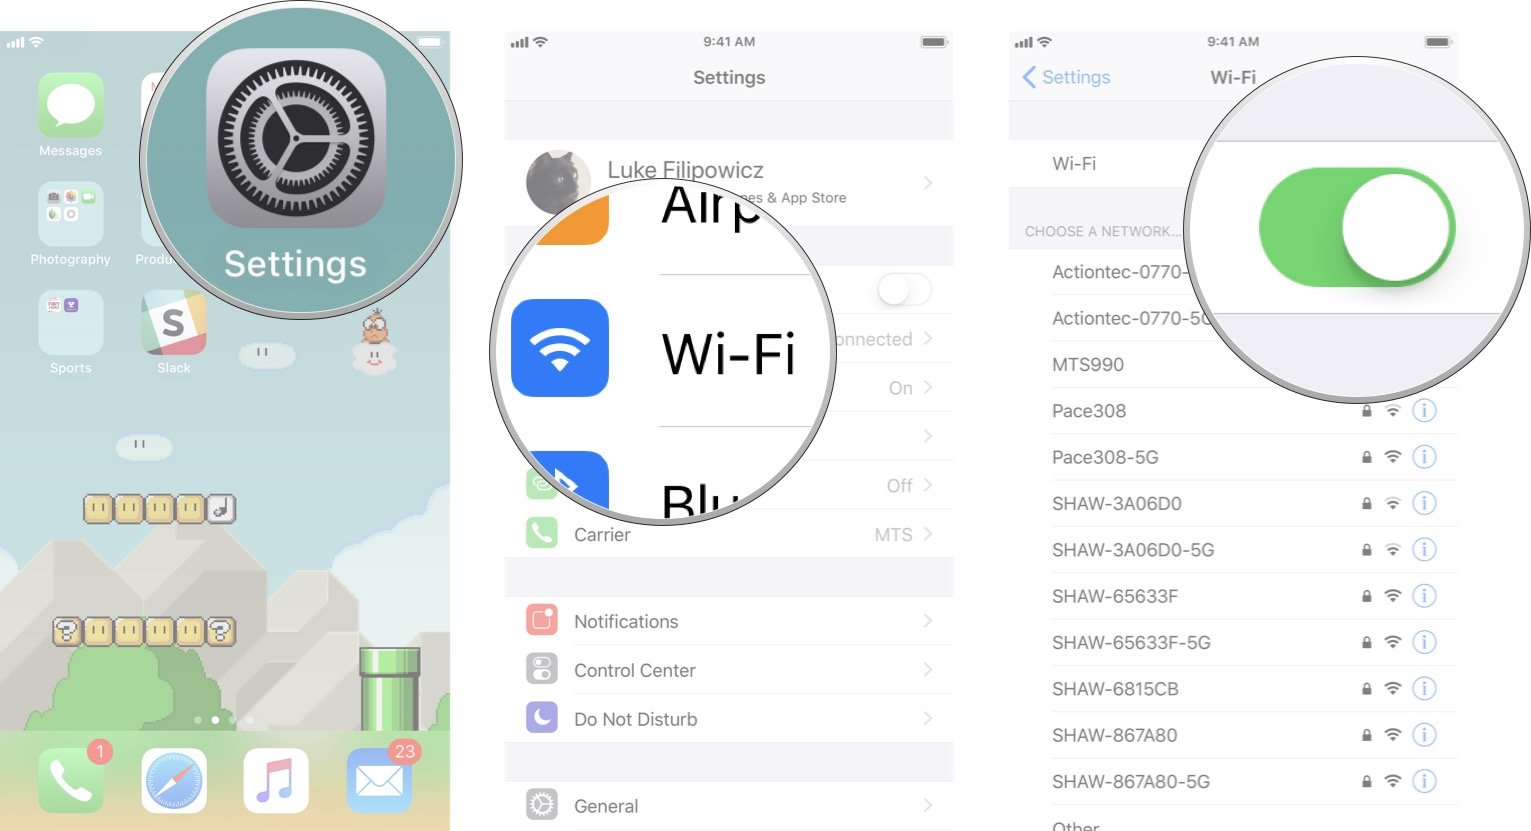
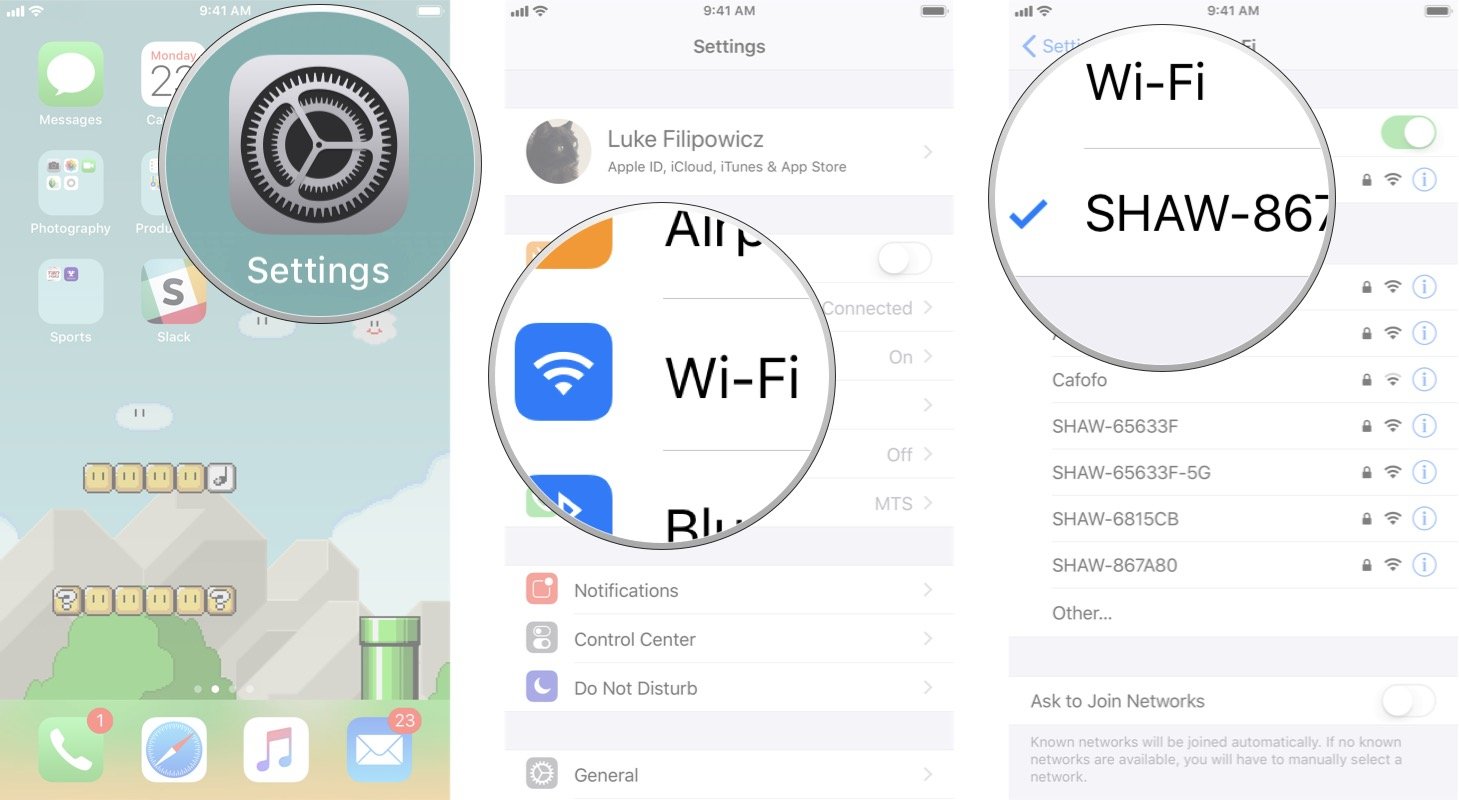
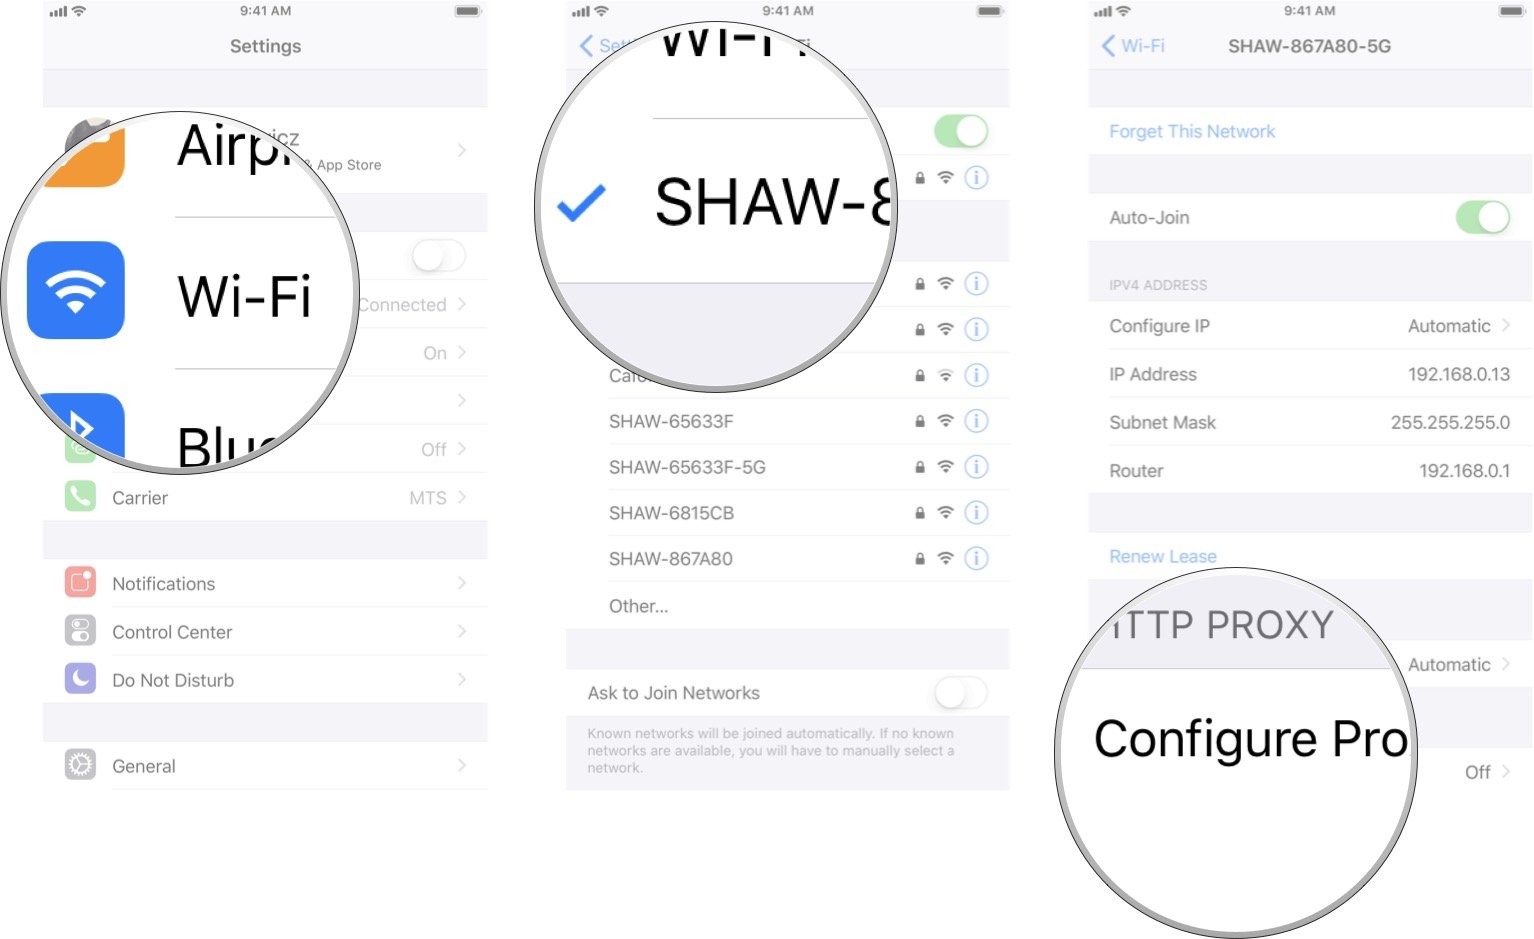
- Launch Settings from your Home screen.
- Tap Wi-Fi
- Tap the Wi-Fi On/Off switch. You'll want the switch to be green.
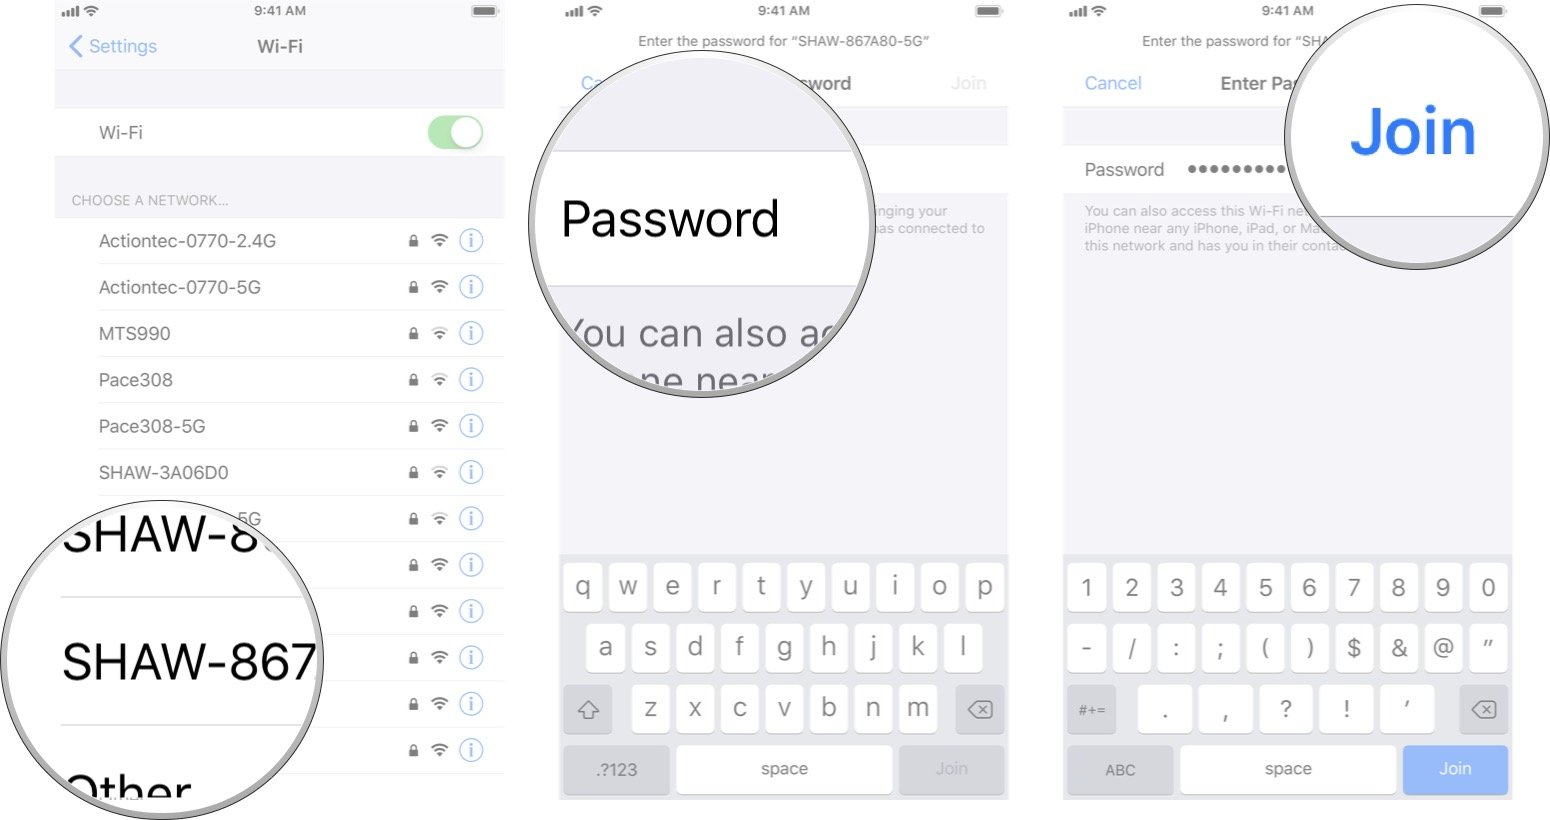
- Tap on the network you want to join.
- Type in the network password. If the network has no password you won't need this step.
- Tap Join.
Now you're free to surf the net without using your data! Look at all the cat gifs and YouTube videos you want!
How to make your iPhone or iPad choose the right Wi-Fi network
How to connect to a custom Wi-Fi network on iPhone and iPad
If there is a particular Wi-Fi network you want to join — like an unlisted one — you can do so by joining a custom network. You'll need the name of the network and password before you start.
- Launch Settings from your Home screen.
- Tap Wi-Fi
- Tap the Wi-Fi On/Off switch. You'll want the switch to be green.
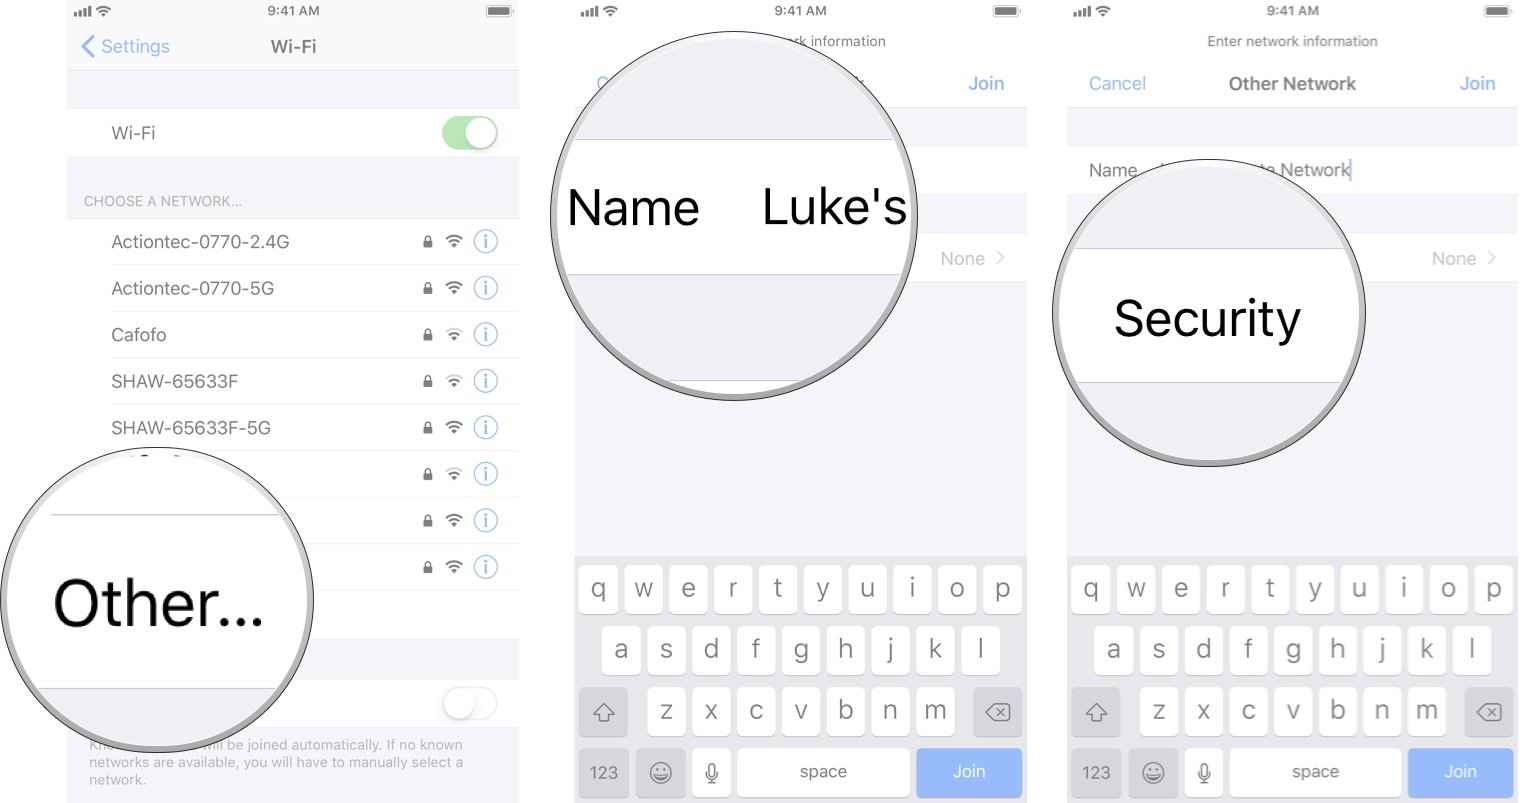
- Tap Other…. You may have to scroll down to see it.
- Enter the name of the network you want to join.
- Tap Security.
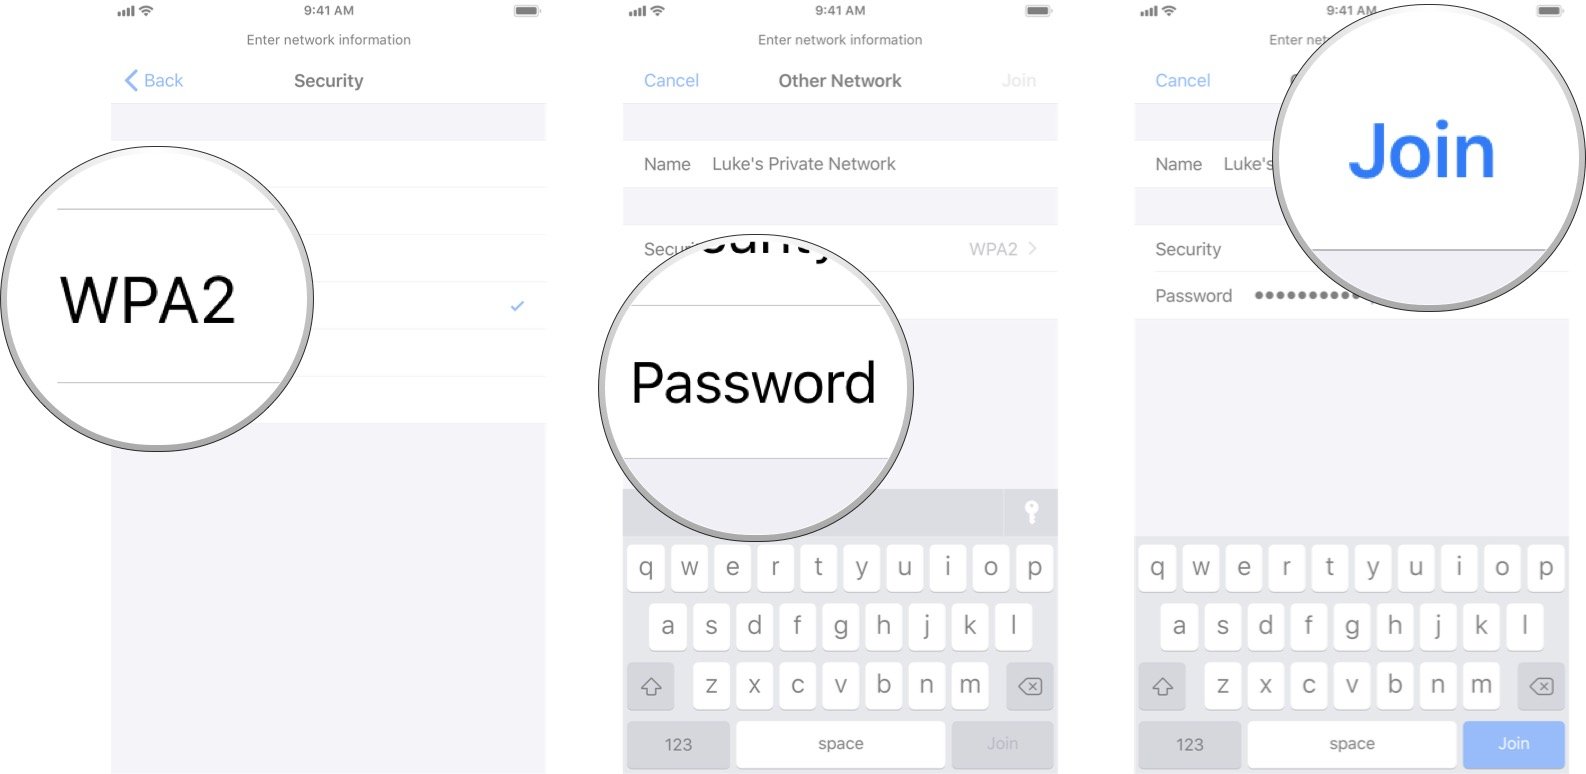
- Tap the type of security the network uses. If there is no security you can skip this step.
- Enter the password for the network.
- Tap Join.
Provided you enter all the right information, you will now be connected to the particular network you wanted to use.
How to forget a network on iPhone and iPad
You iPhone and iPad will automatically join familiar networks after you've been connected once before, in order to break your connection to a network permanently, you'll need to forget the network.
iMore offers spot-on advice and guidance from our team of experts, with decades of Apple device experience to lean on. Learn more with iMore!
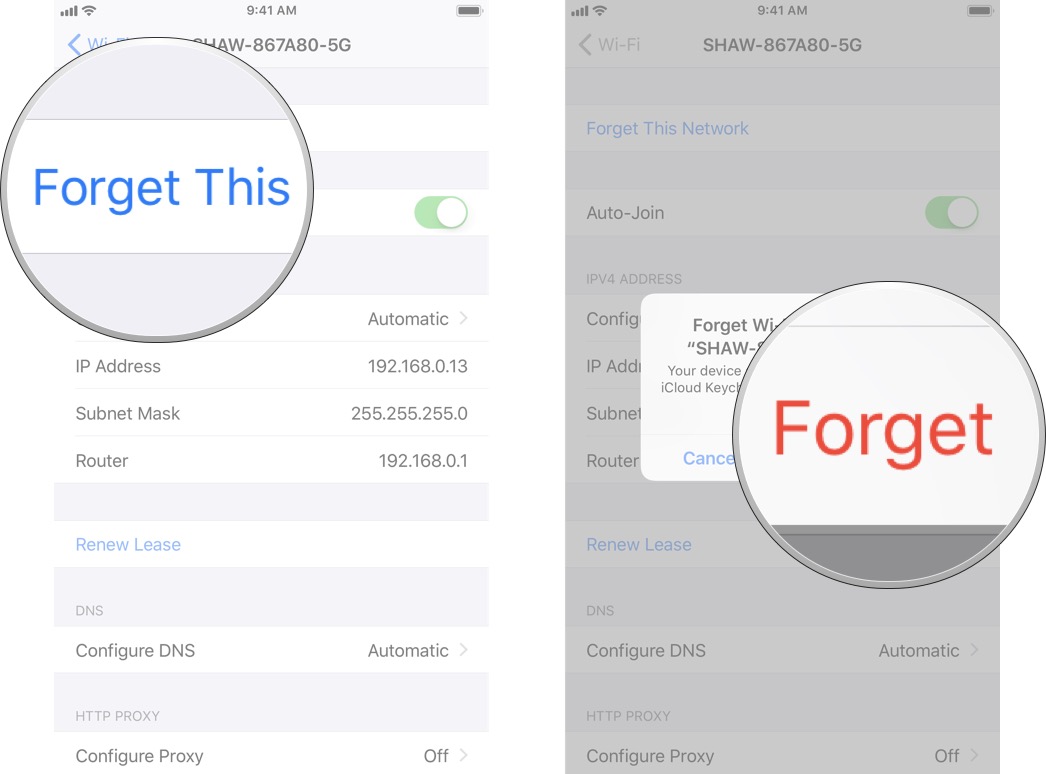
- Launch Settings from your Home screen.
- Tap Wi-Fi
- Tap on the network connected to your device.
- Tap Forget This Network.
- Tap Forget.
Your iPhone and iPad won't automatically connect to this network, you'll need to connect to the network again.
How to turn on Ask To Join network on iPhone and iPad
Your iPhone and iPad will automatically connect to any network that it can including public Wi-Fi networks that require no password. If you don't want to join any network automatically, you can turn on the Ask to Join Networks feature.
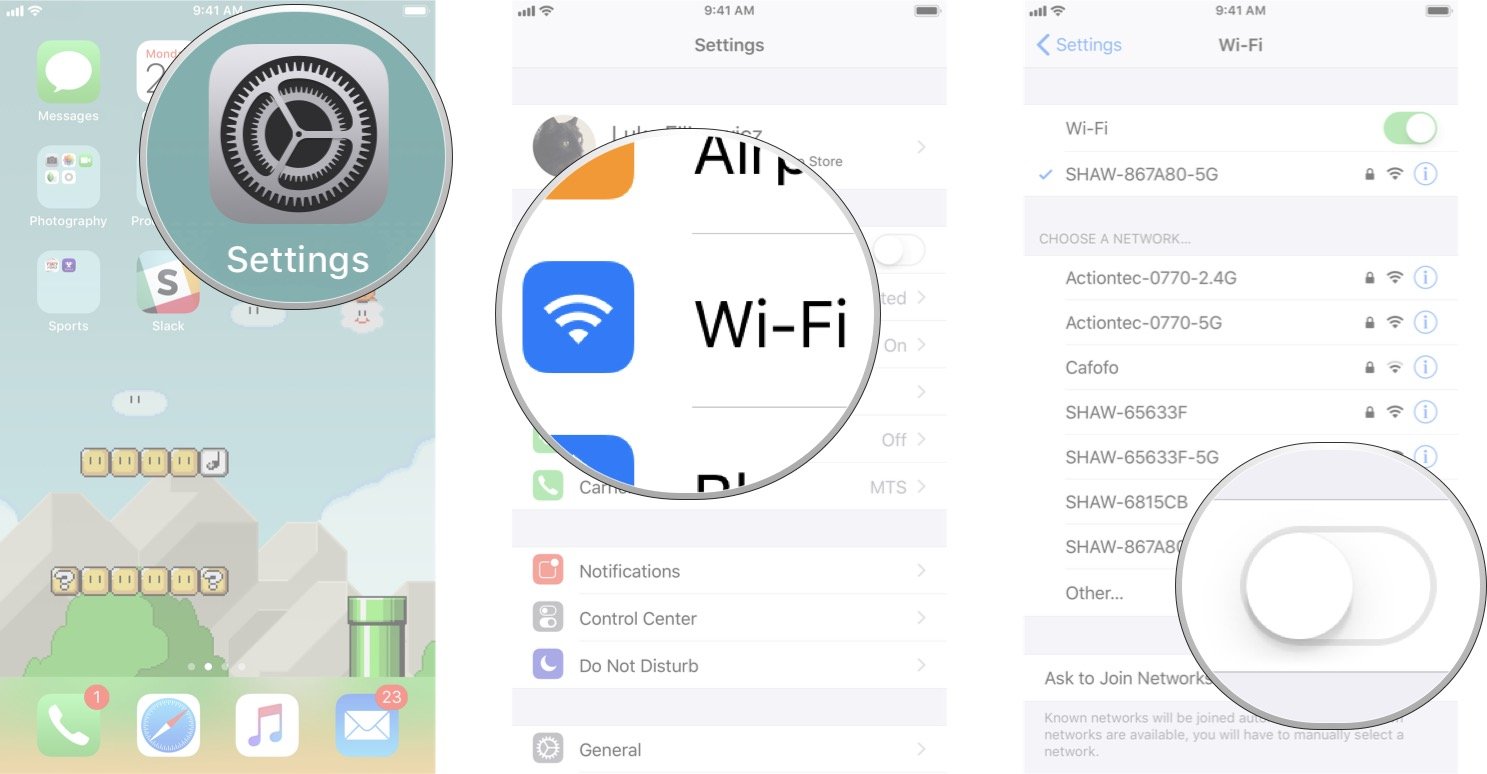
- Launch Settings from your Home screen.
- Tap Wi-Fi.
- Tap the Ask to Join Network On/Off switch. If the switch is green that means the feature is turned on.
How to turn off Auto-Join network on iPhone and iPad
If you want to stop your iPhone or iPad from automatically joining a network you've already connected to, you can turn off the Auto-Join feature in your settings.
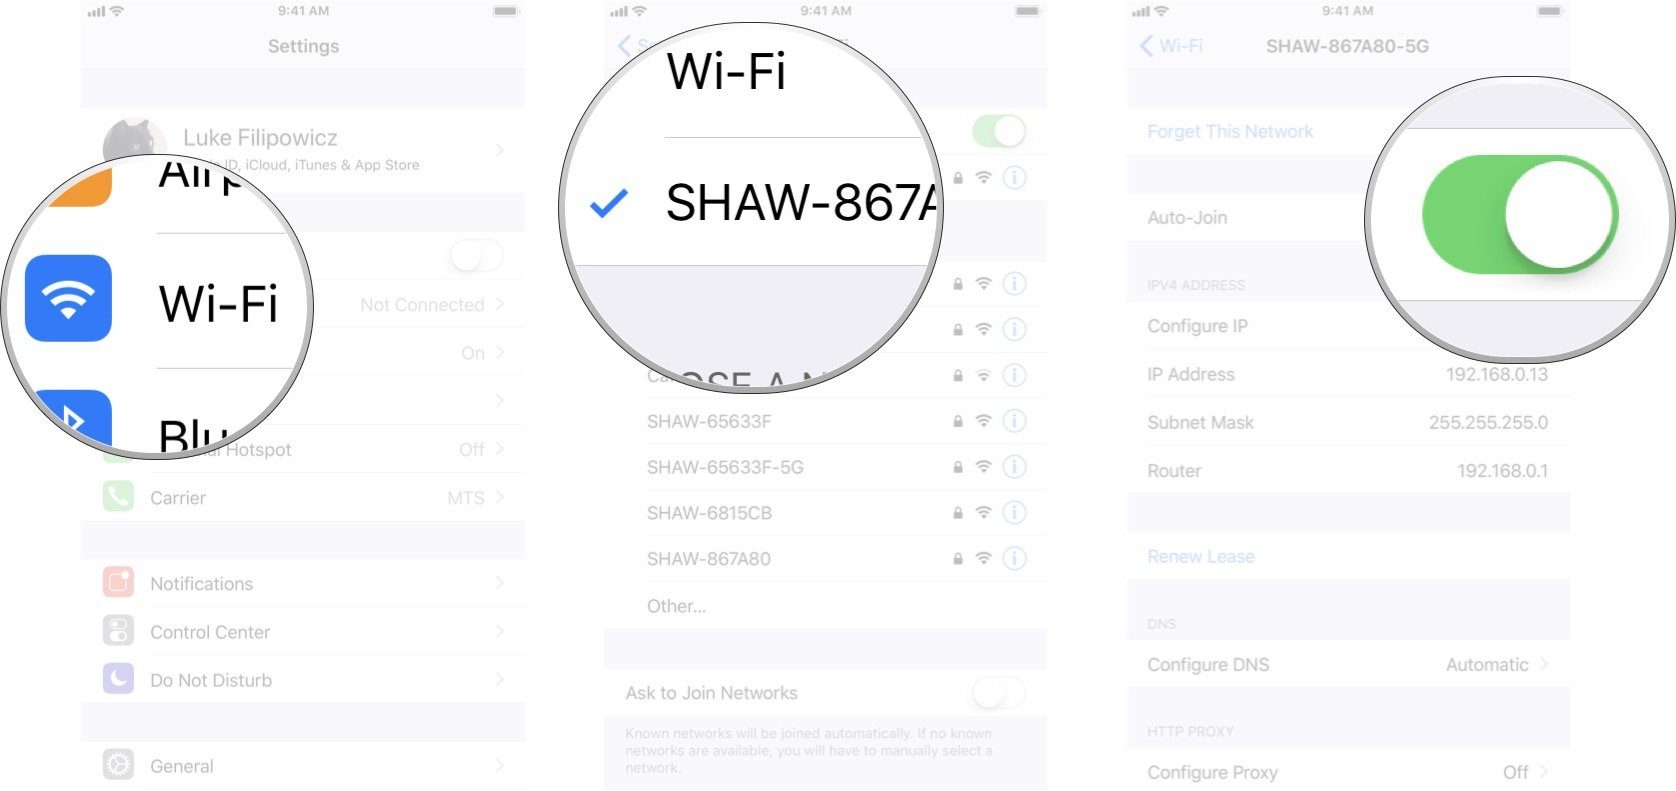
- Launch Settings from your Home screen.
- Tap Wi-Fi
- Tap on the network connected to your device.
- Tap the Auto-Join On/Off switch When the switch is gray, it means the feature is off.
Now every time you want to join that network, you'll need to select it from the Wi-Fi settings.
How to Renew Lease on a Wi-Fi network on iPhone and iPad
If you're on a public or time-limited network and you want to ask for more time, you can renew your lease from the Wi-Fi settings menu. Also, renewing your lease on a Wi-Fi network can sometimes be useful when troubleshooting Wi-Fi connections.
- Launch Settings from your Home screen.
- Tap Wi-Fi
- Tap on the network connected to your device.
- Tap Renew Lease.
- Tap Renew Lease again.
How to use an HTTP Proxy on iPhone and iPad
If you prefer using an HTTP Proxy server for security and privacy, you can set one up in the Wi-Fi settings.
- Launch Settings from your Home screen.
- Tap Wi-Fi
- Tap on the network connected to your device.
- Tap Configure Proxy.
- Tap Manual or Automatic to choose which setup you want.
- Enter all the relevant information for your selected method.
- Tap Save.
If you use a VPN service to ensure your privacy on the net you can also set that up on your iPhone or iPad.
Read:How to configure VPN access on your iPhone or iPad
Any questions?
Let us know in the comments down below.

Luke Filipowicz has been a writer at iMore, covering Apple for nearly a decade now. He writes a lot about Apple Watch and iPad but covers the iPhone and Mac as well. He often describes himself as an "Apple user on a budget" and firmly believes that great technology can be affordable if you know where to look. Luke also heads up the iMore Show — a weekly podcast focusing on Apple news, rumors, and products but likes to have some fun along the way.
Luke knows he spends more time on Twitter than he probably should, so feel free to follow him or give him a shout on social media @LukeFilipowicz.
