
Take better photos with the camera in your pocket. iMore's iPhone Photography Week 2024 is filled with great content that will take your iPhone camera-snapping ability to the next level.
- Check out more iPhone Photography Week 2024
#iMorePhotographyWeek
Landscape photography is one of the most accessible genres of all. Even if you barely know your iPhone photography basics, you'll have almost certainly captured a landscape photo. And it will have probably looked pretty darn good too. The trick is turning a good landscape photo into a great one.
You might think that picking up the latest and greatest iPhone 15 Pro Max or taking a deep dive into your iPhone camera will instantly make you a better landscape photographer and while great kit and technical knowledge can help, nothing trumps planning ahead. The best landscape photographers are meticulous researchers who visit the same locations again and again and again, chasing the very best lighting conditions.
I’m not suggesting you have to take it to that extreme. But something as simple as planning ahead, checking the weather, and learning about the magic hours can make all the difference.

I’m Deputy Editor of N-Photo: The Nikon Magazine, but moonlight as iMore’s go-to photography know-it-all. I’ve worked in the photo industry for over six years and have been an avid iPhone photographer since the iPhone 4. I’m a firm believer that iPhone photography is a great starting point for burgeoning photographers, which is why I’ve created a series of iPhone photography basics tutorials, so you can either firm up your existing iPhone Camera skills or embark on a whole new passion.
How to shoot the magic hours

You’ve heard the old adage: The early bird catches the worm. Well, the same applies to landscape photography. Early in the morning and late in the evening the sun sits lower on the horizon, so the light takes a less direct route through the atmosphere. This filters out blue light, resulting in a soft warm glow, which peaks during the hour after sunrise and the hour before sunset. Photographers call these phenomena the golden or magic hours.
But the photographic potential doesn’t stop there. Before sunrise and after sunset, the light briefly takes on a decidedly cooler quality. This period is known as blue hour – a spectacle in its own right. Most photographers head home once the sun has set, but those who stick around a little longer are sometimes rewarded with a second spectacular event. You can use apps to find out when the magic hours are on any given day. PhotoPills is particularly useful. It breaks down the day into an easy-to-follow timeline, which includes the golden hours, blue hours, twilights, and more.
- Use a photography planning app like PhotoPills to work out when the golden hour will start
- Arrive at your location with plenty of time to spare so you can set up before the golden hour begins
- If you’re shooting at sunrise, arrive even early for the chance to photograph the blue hour
- If you’re shooting at sunset, stick around a while longer to experience the blue hour
How to control your exposure
A photograph is captured when a camera’s sensor (or film) is exposed to light. More light makes the image brighter and less light makes it darker. How much light reaches the sensor is controlled via aperture, shutter speed, and ISO. iPhone lenses have fixed apertures – they cannot be changed – and shutter speed and ISO is determined automatically. However, you do have some control over your iPhone’s exposure.
The simplest way to do this is to tap on the screen to focus and then drag up/down over the sun icon to increase/decrease the exposure. If you refocus, the exposure will reset, but you can override this by tapping and holding your finger on your intended point of focus until the AE/AF LOCK icon appears at the top of the screen. Both your point of focus and exposure will now remain constant, even if you recompose the image.
The most effective way of changing your exposure is by flicking your finger up on the Camera app’s live view screen to reveal icons including Exposure. A slider allows you to decrease/increase the exposure by two stops of light and a light meter appears in the top-left corner of the screen. This is a great way to keep tabs on your exposure. If the meter is centered, the exposure is technically correct. However, some photographers like to underexpose images by keeping the light meter slightly to the left. This is because highlights are harder to recover than shadows when editing.
- Open the Camera app
- Tap the screen to focus and drag sun icon up/down to increase/decrease exposure
- Hold your finger down on the focus point to lock exposure
- Flick your finger up on the live view screen and select the exposure icon
- Decrease/increase the exposure using the slider
How to shoot Apple ProRAW
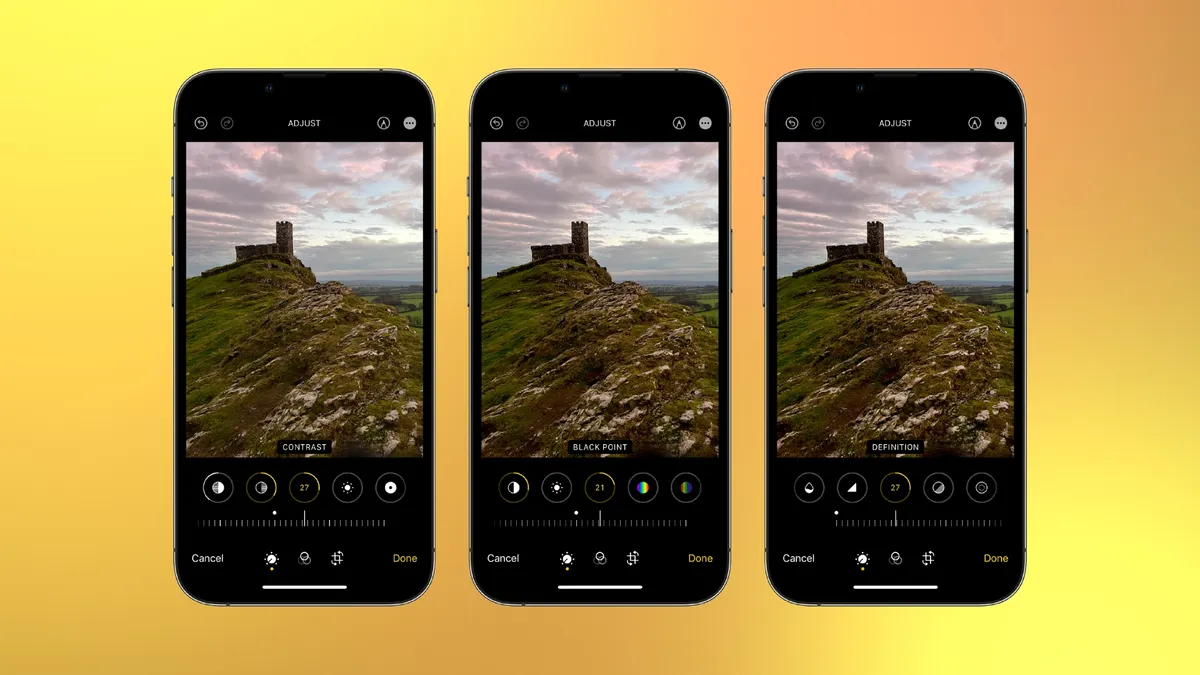
When you shoot a landscape you’re often capturing a huge disparity between the bright sky and darker land. This is a challenge for any camera. If the sky is correctly exposed the land will appear very dark and if the land is correctly exposed the bright sky will likely ‘clip’. This means the highlights or shadows are so bright/dark the data (or details) cannot be recovered when editing. iPhone’s computational photography is very adept at balancing the exposures of your landscapes for you, but if you want images that are as pliable as possible when editing, you must shoot Apple ProRAW.
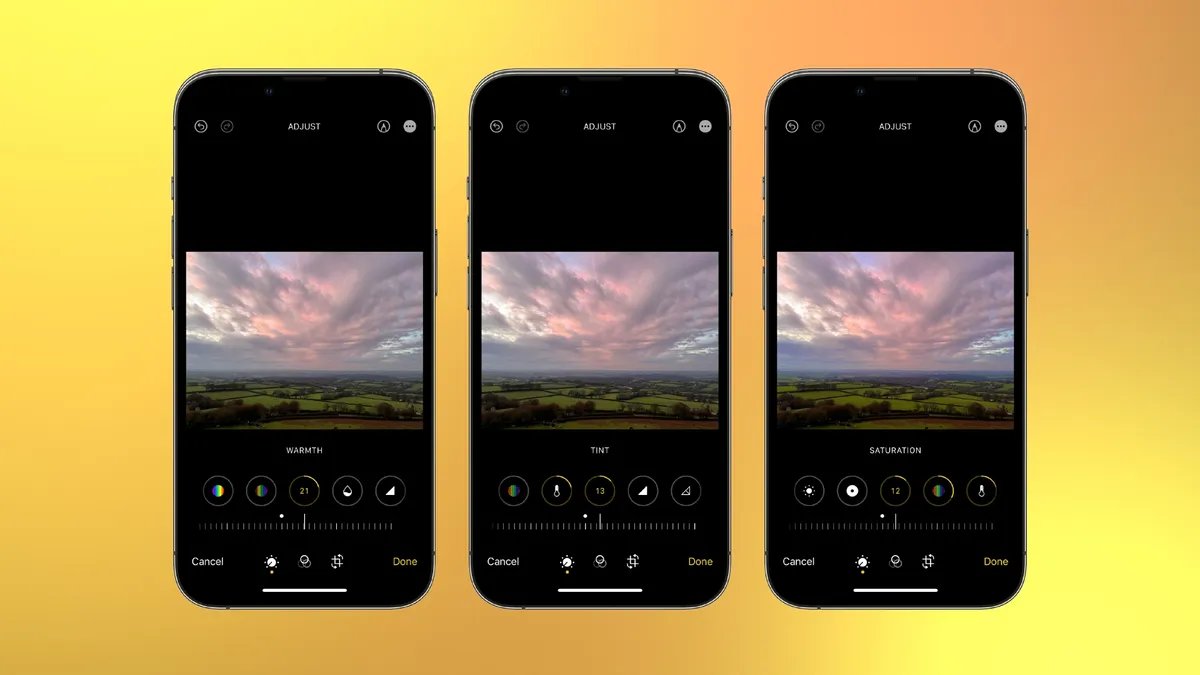
If you're using an iPhone 12 Pro or later Pro models, you can enable ProRAW in your iPhone Camera’s settings. RAW files contain more image data than HEIC or JPEGs, enabling you to recover more detail when bringing down highlights and lifting shadows. In fact, you’ll find them to be more pliable when editing in general. This means you can tweak colors, exposure, and color temperatures (white balance) to a greater degree.
- Tap Settings, scroll down and select Camera > Format
- Under Photo Capture, check Apple ProRAW
- Tap ProRAW Resolution to choose between 12 and 48MP, if using an iPhone 14 or 15 Pro model
How to compose a landscape

Landscapes allow you plenty of freedom to stretch your creative muscles and compose a scene as you see fit. But this freedom can feel daunting unless you’re armed with a few tried-and-tested compositional techniques. The rule of thirds is the first port of call for most newbie landscape photographers, and your iPhone is already prompting you to follow it, thanks to the Camera app’s rule of thirds grid.
Simply line the horizon up with either of the two horizontal lines (in either portrait or landscape orientation) and position your focal point on one or more of the ‘intersection points,’ where the horizontal and vertical lines intersect. Another great technique that can be used in conjunction with the rule of thirds is foreground interest. You simply frame an interesting element, such as a tree, rock, or gate, in the lower portion of the frame to break up the monotony of a blank space. And finally, search for leading lines within your scene. These natural elements lead toward your subject, such as roads, hedges, and avenues of trees. Check out our beginner’s guide to composition to find out more.
- Select Settings > Camera and ensure Grid is checked
- Line up the horizon with one of the two horizontal lines
- Place your focal point on one or more of the intersection points
How to predict the direction of the sun
Beginner landscape photographers are often told to shoot away from the sun, but as is often the case, this really shouldn’t be considered a hard and fast rule. That’s not to say there aren’t any advantages when heeding this advice. With the sun behind you, you’ll be able to capture softer light dappling the land. It’s also much easier to expose an image that doesn’t have the sun in the frame. Because the fiery orb is much brighter than anything else around it, cameras can struggle to balance the exposure needed for the bright sun.
Once again, your iPhone’s computational photography can come to the rescue, but even Apple’s latest tech has its limits. You may also have to contend with the prospect of direct sunlight causing your chosen lens to flare. This can work if you’re going for a stylized shot, but if you want a conventional landscape with a balanced exposure, keeping the sun out of the frame is recommended. It’s also worth noting that as the sun sets, it becomes less intense and easier to expose.
- Download a planning app like PhotoPills or The Photographer’s Ephemeris
- Set the date and location of your shoot
- A yellow line represents the direction of sunrise, and an orange line represents the direction of sunset
How to plan a landscape shoot
Great landscape photographers meticulously plan their landscape shoots. That’s not to say you can’t capture fantastic landscapes on an impromptu walk, but if you want to consistently photograph beautiful sunsets and golden light, planning is key. If you’re visiting somewhere where you know you’ll find beautiful vistas, a little bit of research goes a long way. Look at how other photographers have approached the same scene, so you can get an idea of what compositions and shooting positions work best.
Check the weather to ensure the conditions meet your needs. Find out what direction the sun will be positioned. Arrive ahead of time, so you’re not rushing to capture the best light. And if you’re shooting seascapes, ensure you research tide times. Tides can be the difference between accessing your location or it being completely inaccessible, but more importantly, researching tide times is essential for your own safety. Planning apps such as PhotoPills or The Photographer’s Ephemeris are designed for planning shoots and will make life easier.
- Get inspired by other photographers who have shot at your chosen location to work out the best shooting positions and compositions
- Check weather conditions and visibility. I recommend using the Clear Outside app
- Research the sun’s position and the timings of your chosen magic hour using a planning app like PhotoPills
- If you’re shooting by the sea, make sure you are aware of the location’s tide times
How to use a tripod

Using a tripod might seem like overkill. After all, it really does hamper the portable and accessible nature that makes iPhone photography so appealing. But if you can see yourself heading out to a location, specifically to capture sunrise or sunset, then a tripod might be worth the hassle.
Tripods allow you to precisely refine your composition so you’re less likely to crop when editing, allowing you to retain maximum image quality. Landscape photography is rarely a one-and-done process. Throughout golden hour, sunset, and blue hour, the sky can change dramatically and if you’re set up on a tripod you can kick back and simply tap the shutter button when needed. If you’re shooting handheld, you’ll need to recompose your shot every time and over the course of an hour or two, that’s going to become a chore. A common tripod feature is a bubble level so you can ensure your iPhone is level with the horizon. This, and a tripod’s ability to pan horizontally is very helpful if you’re using Pano mode.
And finally, tripods keep your camera completely still. So, if you’re using an iPhone 11 or later and need to use Night Mode to capture a long exposure, you can be sure to avoid motion blur. So long as your tripod uses a standard 1/4-20-inch thread, you can use a variety of specialist mounts to secure your iPhone, such as the Joby GripTight Mount for MagSafe.
- Secure your iPhone to your tripod in portrait orientation
- Use the rule of thirds grid or a bubble level (if your tripod has one) to ensure the horizon is perfectly straight
- Open the Camera app and select Pano
- Loosen your tripod’s panning base
- Fire the shutter and carefully pivot your tripod until the pano is complete
Do megapixels matter?
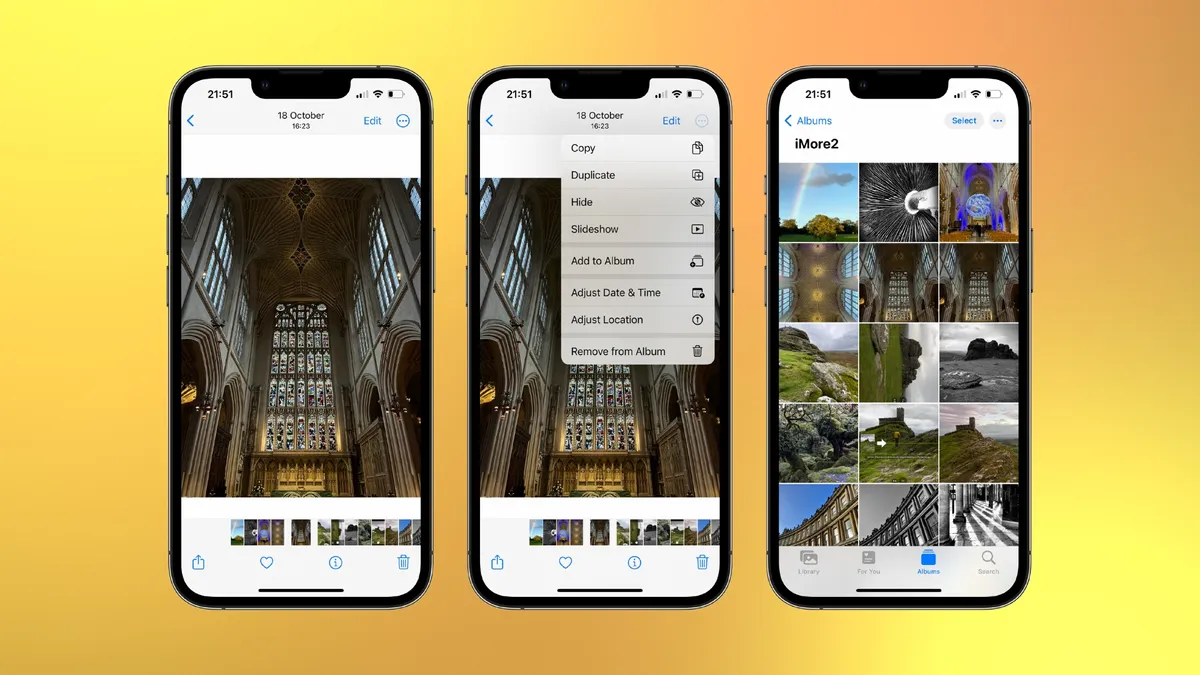
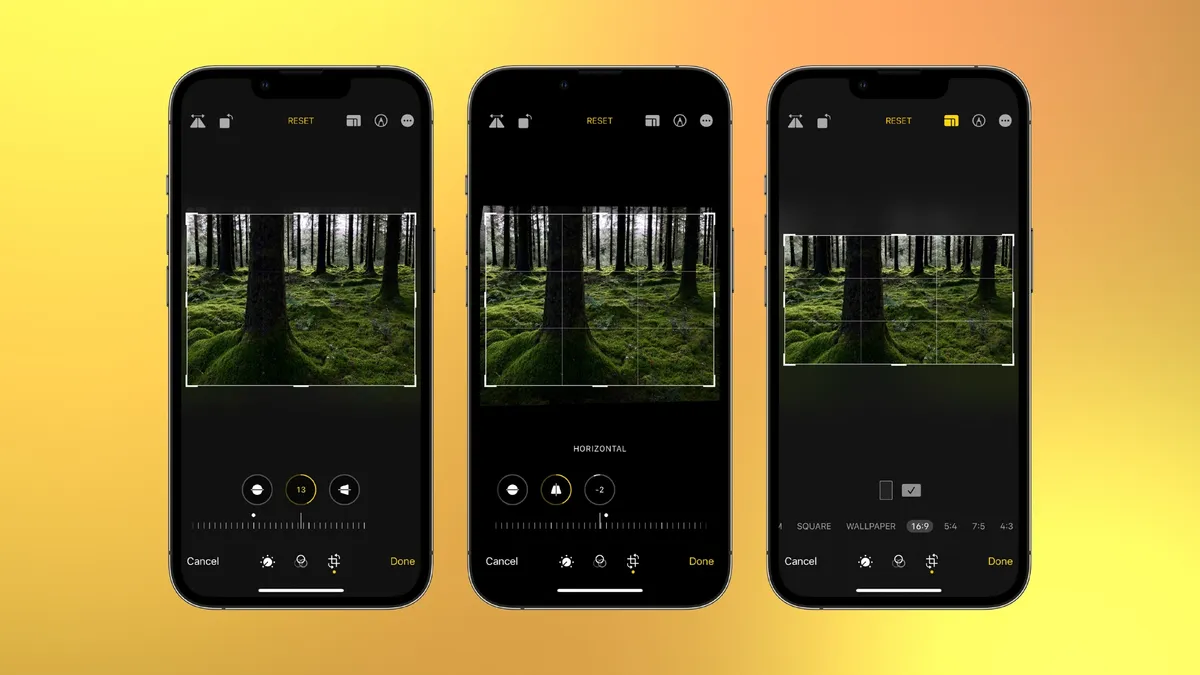
Image quality depends on a variety of factors and not just megapixels alone. But if you’re lucky enough to own one of the best iPhones: the iPhone 14 Pro or any iPhone 15, using the 48-MP sensor has a big advantage, cropping. When you crop into an image you lose pixels, so shooting at 48MP affords you more room to crop, while retaining an acceptable image resolution. This is particularly useful if you decide to turn a landscape-orientation scene into a vertical image for Instagram, or if you want to play around with a more creative aspect ratio such as 16:9.
This tutorial is part of iPhone Photography Week 2024. Expect new posts to appear daily, focused on making your photos shot with iPhone better than ever before.
Share your photos with iMore on X (Twitter) using #iMorePhotographyWeek
