
Did you just unwrap a HomeKit accessory for the holidays, but don't quite know where to start? Don't worry, we are here to answer some of your burning questions, and to help with some potential issues that may arise when setting it up. Here's our guide to everything that you need to know about that shiny new smart home accessory.
What is HomeKit?

If you are new to the awesome world of HomeKit, you are going to need to know a few things before you are ready to control your accessories. HomeKit is Apple's smart home platform that provides you with the ability to control accessories via a tap or a shout using Siri. There are tons of different accessories on the market, such as smart plugs or light bulbs, and HomeKit brings them all together, regardless of who made it, into the Home app that comes with your iPhone, iPad, or Mac.


As long as an accessory has the "Works with Apple HomeKit" badge on the box, it will play along nicely with other accessories that you have, or will add in the future.
This ensures that you will have a consistent experience with every HomeKit accessory, and in most cases, you do not have to download another app to set it up, or create yet another account. This also helps to keep your home and associated data private, away from a server in the cloud, unless it is absolutely required.
HomeKit FAQ: Everything you need to know
What do I need to get started?
To get things started, you will need to open up the Home app on your iOS device to add your accessory. If you are opening the Home app for the first time, you will see a quick explainer screen, followed by an option to give your Home a name. This gives you a place for all of your accessories to "live" in, and you can create rooms within your home to make things a little easier to locate if you plan to add more devices in the future.
After you create your home, it is time to add your shiny new accessory. For this process, you will need your iOS device, your accessory powered on, and the HomeKit pairing code.
Wait, what is a HomeKit pairing code?

The HomeKit pairing code is a unique identifier that pairs your accessory to HomeKit. There are three types of HomeKit codes, but they all work in pretty much the same way.
The code consists of a series of 8 random numbers either in a horizontal layout to the right of a house icon (sometimes the house isn't present), in a compact manner with both a picture of a house and a QR code, and finally, and one that has a house, the code, and a NFC wireless logo.
Once you have your code in hand, you will scan the code using the Home app. The Home app uses the camera in your iOS device to read the code, and it will display a matching accessory in the app for you to select. Accessories that use an NFC pairing code require that you tap or place your iOS device near it to proceed to the pairing process.
Where do I find the HomeKit pairing code?
In most cases, the HomeKit code can be found on the accessory itself, either on the back, sides, or underneath. If your accessory does not have the code on it, try looking on the packaging that it came in. Common spots on the packaging include on the back, or one of the inside walls. Some manufacturers also put a copy of the code in the user manuals for your accessory, either on the front or back page or in the setup steps portion.
What happens if I can't find the code?
The HomeKit pairing code is crucial to setting up your new accessory, without it, you will not be able to proceed. Since this code is unique to the accessory itself, not even the manufacturer will have a copy, unless it is one that is generated on screen or in an app. So in other words, you will be stuck with an accessory that you won't be able to use without it.
We strongly recommend keeping your packaging and manuals for your HomeKit accessories, as there may be times in the future where you will need to pair it again, or if you decide to sell it. If you absolutely must dispose of those items, then make sure that you take a picture or add the code to a note somewhere either on device (preferably with a cloud backup option) or in an easily accessible notebook.
How do I pair the accessory with the code?

Pairing your accessory to HomeKit couldn't be easier. Just open up the Home app, tap the "plus" icon near the top right corner, and scan your HomeKit code.
Depending on the accessory, you may see a prompt that asks if you want to allow access to your Wi-Fi network, don't worry though, all you have to do is approve it and that is it, no typing in that long nonsensical password.
How to set up your HomeKit accessories
If the Wi-Fi connection is successful, or if you have an accessory that uses Bluetooth for connectivity, the process will continue automatically (just make sure that Bluetooth is on), and in just a few moments, your accessory will be ready to go.
Once the pairing process completes, you will be able to rename it, assign it to a room, and add it as a favorite. That is it! You are ready to move on to controlling your accessory with the app or Siri.
Hold up, the pairing process failed, what do I do?
In some instances, the pairing process may come to a halt for a variety of reasons. One of the most common causes of pairing failure is an incompatibility with a Wi-Fi network. Almost all HomeKit accessories must connect to a 2.4ghz Wi-Fi network, so if your router is set to only broadcast 5ghz, then your accessory will not connect.
Proximity to your accessory can also cause failure during the pairing process for Bluetooth devices. Make sure that you keep your accessory within a few feet of your iOS device during the setup process, as it is not using your home network, and relies solely on that device to device connection.
It looks like everything is working, what's next?
Now that your accessory is ready to go with HomeKit, you can start living that sweet smart home life. In the Home app, you can tap on the icon for your accessory to toggle it on or off quickly, or for other actions such as jumping into a camera's live view. To see accessory settings and finer controls, such as brightness levels for light bulbs, just tap and hold on the same icon.
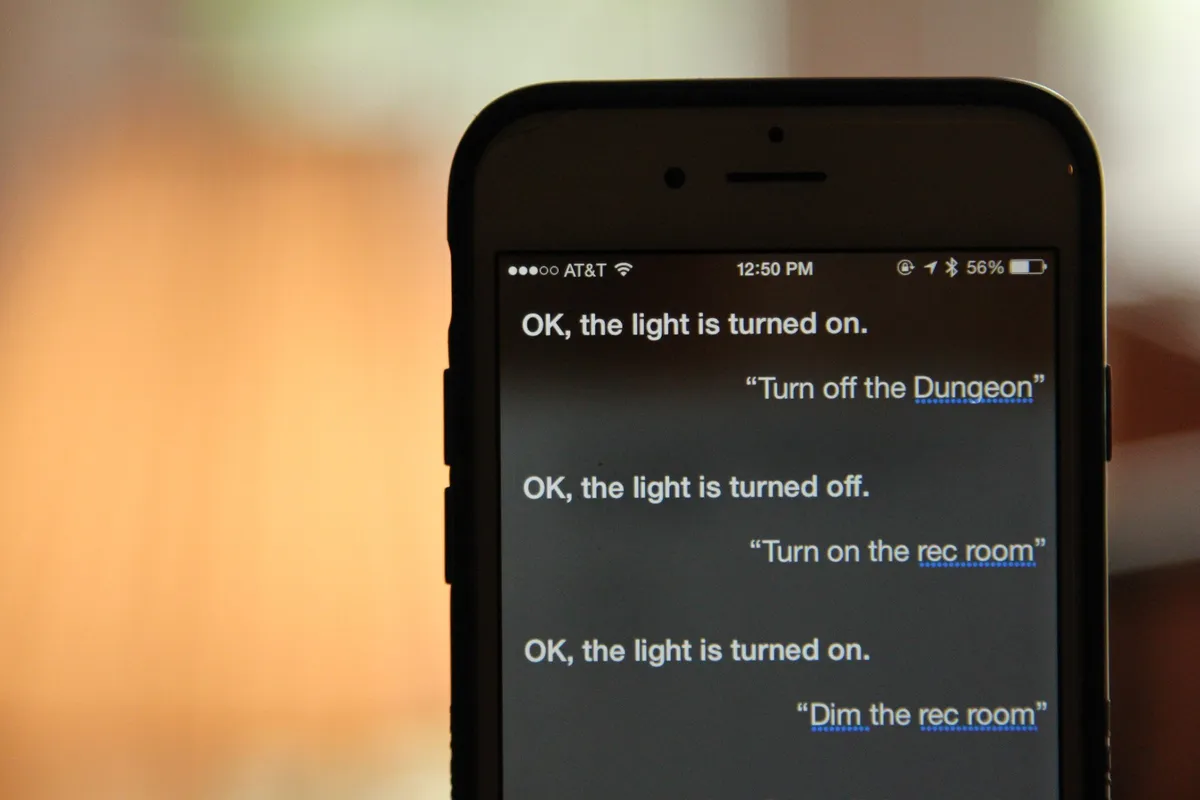
To control your accessory via Siri, all you need to do is give the command. If you gave your accessory a familiar name, such as "lamp", you can use the phrase, "Hey Siri, turn on the lamp", and you can bask in the magic that unfolds. If you have multiple accessories of the same type and want to address a specific one, you can either add the room name to the accessories name, or you can assign it to a room within your home.
How to use Siri with your HomeKit accessories
Using this method, you can say "Hey Siri, turn on the bedroom lamp", or "Hey Siri, turn on the lights in the bedroom". Of course, you can also do the opposite, and ask Siri to turn things off as well. You can also ask Siri to set brightness levels using a phrase such as "Hey Siri, set the living room lights to 50%", and change the color of your lighting by saying "Hey Siri, set the hallway lights to red".
What else can I do with HomeKit?

If you are ready to take things a little further, you can try creating a scene or an automation. A scene is a collection of actions that you assign to the devices in your home, and performs them all at once. Just imagine tapping on one button, and then watching all of the lights in your home suddenly turn off, your front door locks, and your security system turns on. That is a scene, and they are quite powerful.
How to create automations and scenes in the iOS Home app
Automations are like scenes in that they can incorporate different actions from the devices in your home, but they run completely autonomously, without you having to lift a finger. There is something quite magical about having a scenario where your bedside lamps turn on to the perfect level of brightness when the sun rises, and having your garage door close when you pull out of your driveway for your morning commute.
How to adjust notifications and status for your HomeKit accessories
You can also set up your accessories to send notifications to your iOS devices when certain actions occur. If you have a motion sensor or a camera, you can be instantly notified from the Home app, giving you time to assess the situation. For other devices, like a door or window sensor, you can receive a notification the moment it opens or closes.
Can I let others use my accessory with their own devices?
You certainly can! This process requires sending an invite to the person with whom you want to share access through the Home app. Once they accept your invite, you can set permissions, such as allowing them to only control accessories while they are in your home, or prevent them from adding or removing accessories. For more details, take a look at our guide below.
How to add users to your HomeKit home
My accessory stopped working, what now?

If your accessory suddenly starts showing a "No Response" status in the Home app, or if Siri says that your accessory didn't respond, then it's time for a little troubleshooting. All of the standard tips that apply to your other devices apply here, so try giving your accessory a reboot by unplugging it, or removing the batteries. Also, be sure to double-check your iOS device to ensure that Wi-Fi and Bluetooth are on, and if not, enable them again.
If you are outside of the home and you are trying to control an accessory over your cellular connection, then you will need a HomeKit hub set up in addition to your accessory. A HomeKit hub acts as a bridge of sorts, connecting your accessories to the internet, and relays commands from your iPhone or iPad to the appropriate accessory. HomeKit hubs include the HomePod, an Apple TV (4th generation or later), or an iPad that is on your home network.
How to make your Apple TV, iPad, or HomePod a HomeKit Hub
Other troubleshooting steps involve checking things such as your iCloud account settings, checking operability with the manufacturer's app, and resetting and re-pairing your accessory. Check out our handy guide below for some of the more advanced stuff.
How to troubleshoot your HomeKit accessories
Find any HomeKit gifts under the tree this year?
Get any HomeKit goodies for the holidays this year? Or have some favorites that you want to share for those new to HomeKit? Let us know in the comments below!

