
Pixelmator Photo, like many photo editing apps, lets you apply filters to your photos. Pixelmator Photo's filters are film-based, which is to say that they are designed to make your photos look like they were taken with actual photographic film. You can also create and save your own filters so you can apply your personalized settings without having to recreate them each time.
Setting Up for a Preset
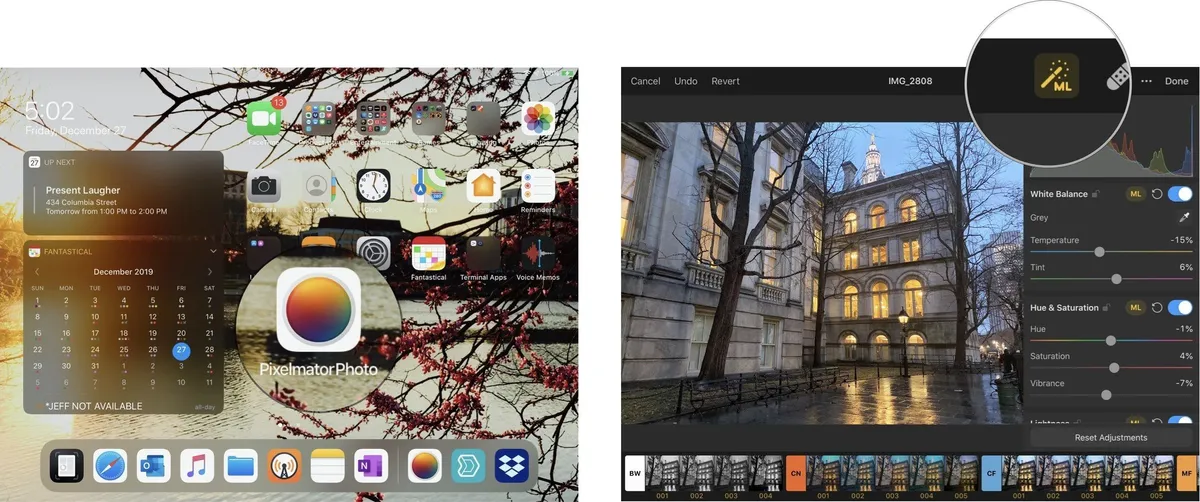
Pixelmator recommends, for the best results when applying any of their color adjustment presets, that you first apply the Machine Learning Presets. The app's Machine Learning Presets automatically adjust the color balance in your photos, making sure they're optimized for applying the Color Adjustment Presets. You'll find full details on Pixelmator Photo's Machine Learning Presets in that linked article, but we'll do a quick review here:

- Open Pixelmator Photo on your iPad.
- Select and open the photo you want to apply the color adjustment preset to.
- Tap the Edit button.
- Tap the ML Enhance button to automatically enhance your photo.
- Keep the photo open for editing.
Now you're ready to apply Pixelmator Photo's Color Adjustment Presets.
Understanding Color Adjustment Presets
Pixelmator Photo's Color Adjustment Presets are broken into ten different groups:
- Black & White
- Cinematic
- Classic Films
- Modern Films
- Landscape
- Vintage
- Urban
- Night
- Pixelmator Pro
- Custom
You can discover more about each of these preset groups by opening the Color Adjustments tool and tapping the tab in front of each preset group.
- With your image still open, tap the Color Adjustments tool at the top right of the screen
- Pixelmator Photo's presets appear at the bottom of your screen. Tap the tab that has BW on itYou should now see details about the Black & White color adjustment preset.
- Tap the Close button on the detail view.
- Open the detail tabs for all of the other presets to learn what they do.

Apply a Color Adjustment Preset
After you've determined which type of preset you'd like to apply:
- Tap the first preset in your selected color adjustment preset group. Note the color change.
- Tap the preset again to turn it off.

- Then tap each preset sequentially to see how they change your photo.
- Select the preset you like best.

- Tap Done.
- Tap Modify to allow Pixelmator to make changes to your photo in your photo library.
Create a Custom Preset
Pixelmator Photo's color adjustment presets are excellent, but that doesn't mean they're perfect for what you want to do to a photo. Fortunately, you can create your own custom presets either from scratch or by making adjustments to one of Pixelmator Photo's custom presets.
Let's adjust one of Pixelmator Photo's custom presets and make it your own:
- Open the photo you just made changes to.
- Tap the Edit button.
- Tap the Color Adjustments preset button.
Just below the photo's histogram, you should see a number of color adjustment tools. You can scroll up or down to view all of these presets, some of which we'll be looking at in a subsequent Beginner's Guide. For now, we're just going to look at:
- White Balance
- Hue & Saturation
- Lightness
These should be the first three-color adjustments in the list.
Note that, depending on which color adjustment preset you selected in the previous section, some of these presets may or may not be on.
- Choose one of the adjustment areas, White Balance, Hue & Saturation, or Lightness to make adjustments to.
- Make adjustments to that setting until you're satisfied with the way your picture looks.
- If you want, make adjustments to the other adjustment areas as well, until your filter looks perfect.
Once you're satisfied with what your new preset looks like, save it:
- Scroll Pixelmator Photo's Color Adjustment presets all the way to the left until you see the tab labeled with a C.
- Tap the + next to the C to create your custom preset.
- Tap Done.
- Tap Modify to save the changes to your photo.
- Open a different photo.
- Tap Edit.
- Tap ML Enhance.
- Tap the Color Adjustment tool.
- Scroll Pixelmator Photo's color adjustment presets to the left until you see your new preset.
- Tap your Custom Preset to apply it to your photo.
- Tap Done.
- Tap Modify to save the photo to your library with your custom preset.


