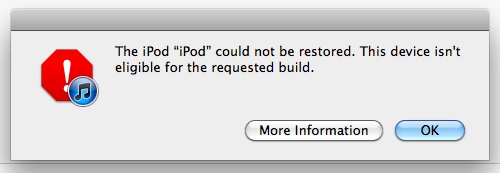
Getting the dreaded "This device isn't eligible for the requested build" error when trying to install an iOS 5 beta, and wondering how to edit your hosts file to get around the problem? Host files can often be used to resolve issues with an iTunes restore, even those that happen due to SHSH saves on jailbroken devices. Follow along for a quick walkthrough, and I'll show you how.
If you're getting an iTunes restore error message, first you'll want to make sure your host file is the problem. As a side note, I am only demonstrating this on a Mac as I don't have a PC but much of the same commands and edits can be done through command prompt on a PC as well.
- Open Terminal

- Type in ping gs.apple.com and hit Enter

- If you see something other than 17.112.176.11: bytes=32 as the reply, you'll need to edit your host file, so continue to the next section.
- If you do see the above, you may want to try forcing your device into DFU mode and then restoring. Or try restoring from a different computer as that seems to work sometimes. Your host file is not causing your restore to fail. Something else is causing it.
If you "do" need to edit your host file, follow the steps below to do so.
Article continues below<
ol>

- Right click on Finder in your dock and select Go to folder...

- In the prompt, type /private/etc and hit Ok
- You may be prompted to enter your password while editing or accessing some of these folders. Simply type in your admin password if asked.
- Drag the Hosts file from the /etc folder to your desktop and then open it with TextEdit or a simliar program

- You will need to add the following text to your host file: 74.208.10.249 gs.apple.com (refer to the screen above)
- Save the file and drag it back into the /etc folder where you originally pulled it from (choose to overwrite or replace if asked)

- Now we just need to flush the cache in order for the changes to take effect. Open Terminal again and type in dscacheutil -flushcache and hit enter. (The command prompt entry for Windows users is ipconfig /flushdns
- You should now be able to restore your device in iTunes without any issues.
- Tips of the day will range from beginner-level 101 to advanced-level ninjary. If you already know this tip, keep the link handy as a quick way to help a friend. If you have a tip of your own you’d like to suggest, add them to the comments or send them in to news@tipb.com. (If it’s especially awesome and previously unknown to us, we’ll even give ya a reward…)

