5 great shortcuts and automations for AirPods Pro
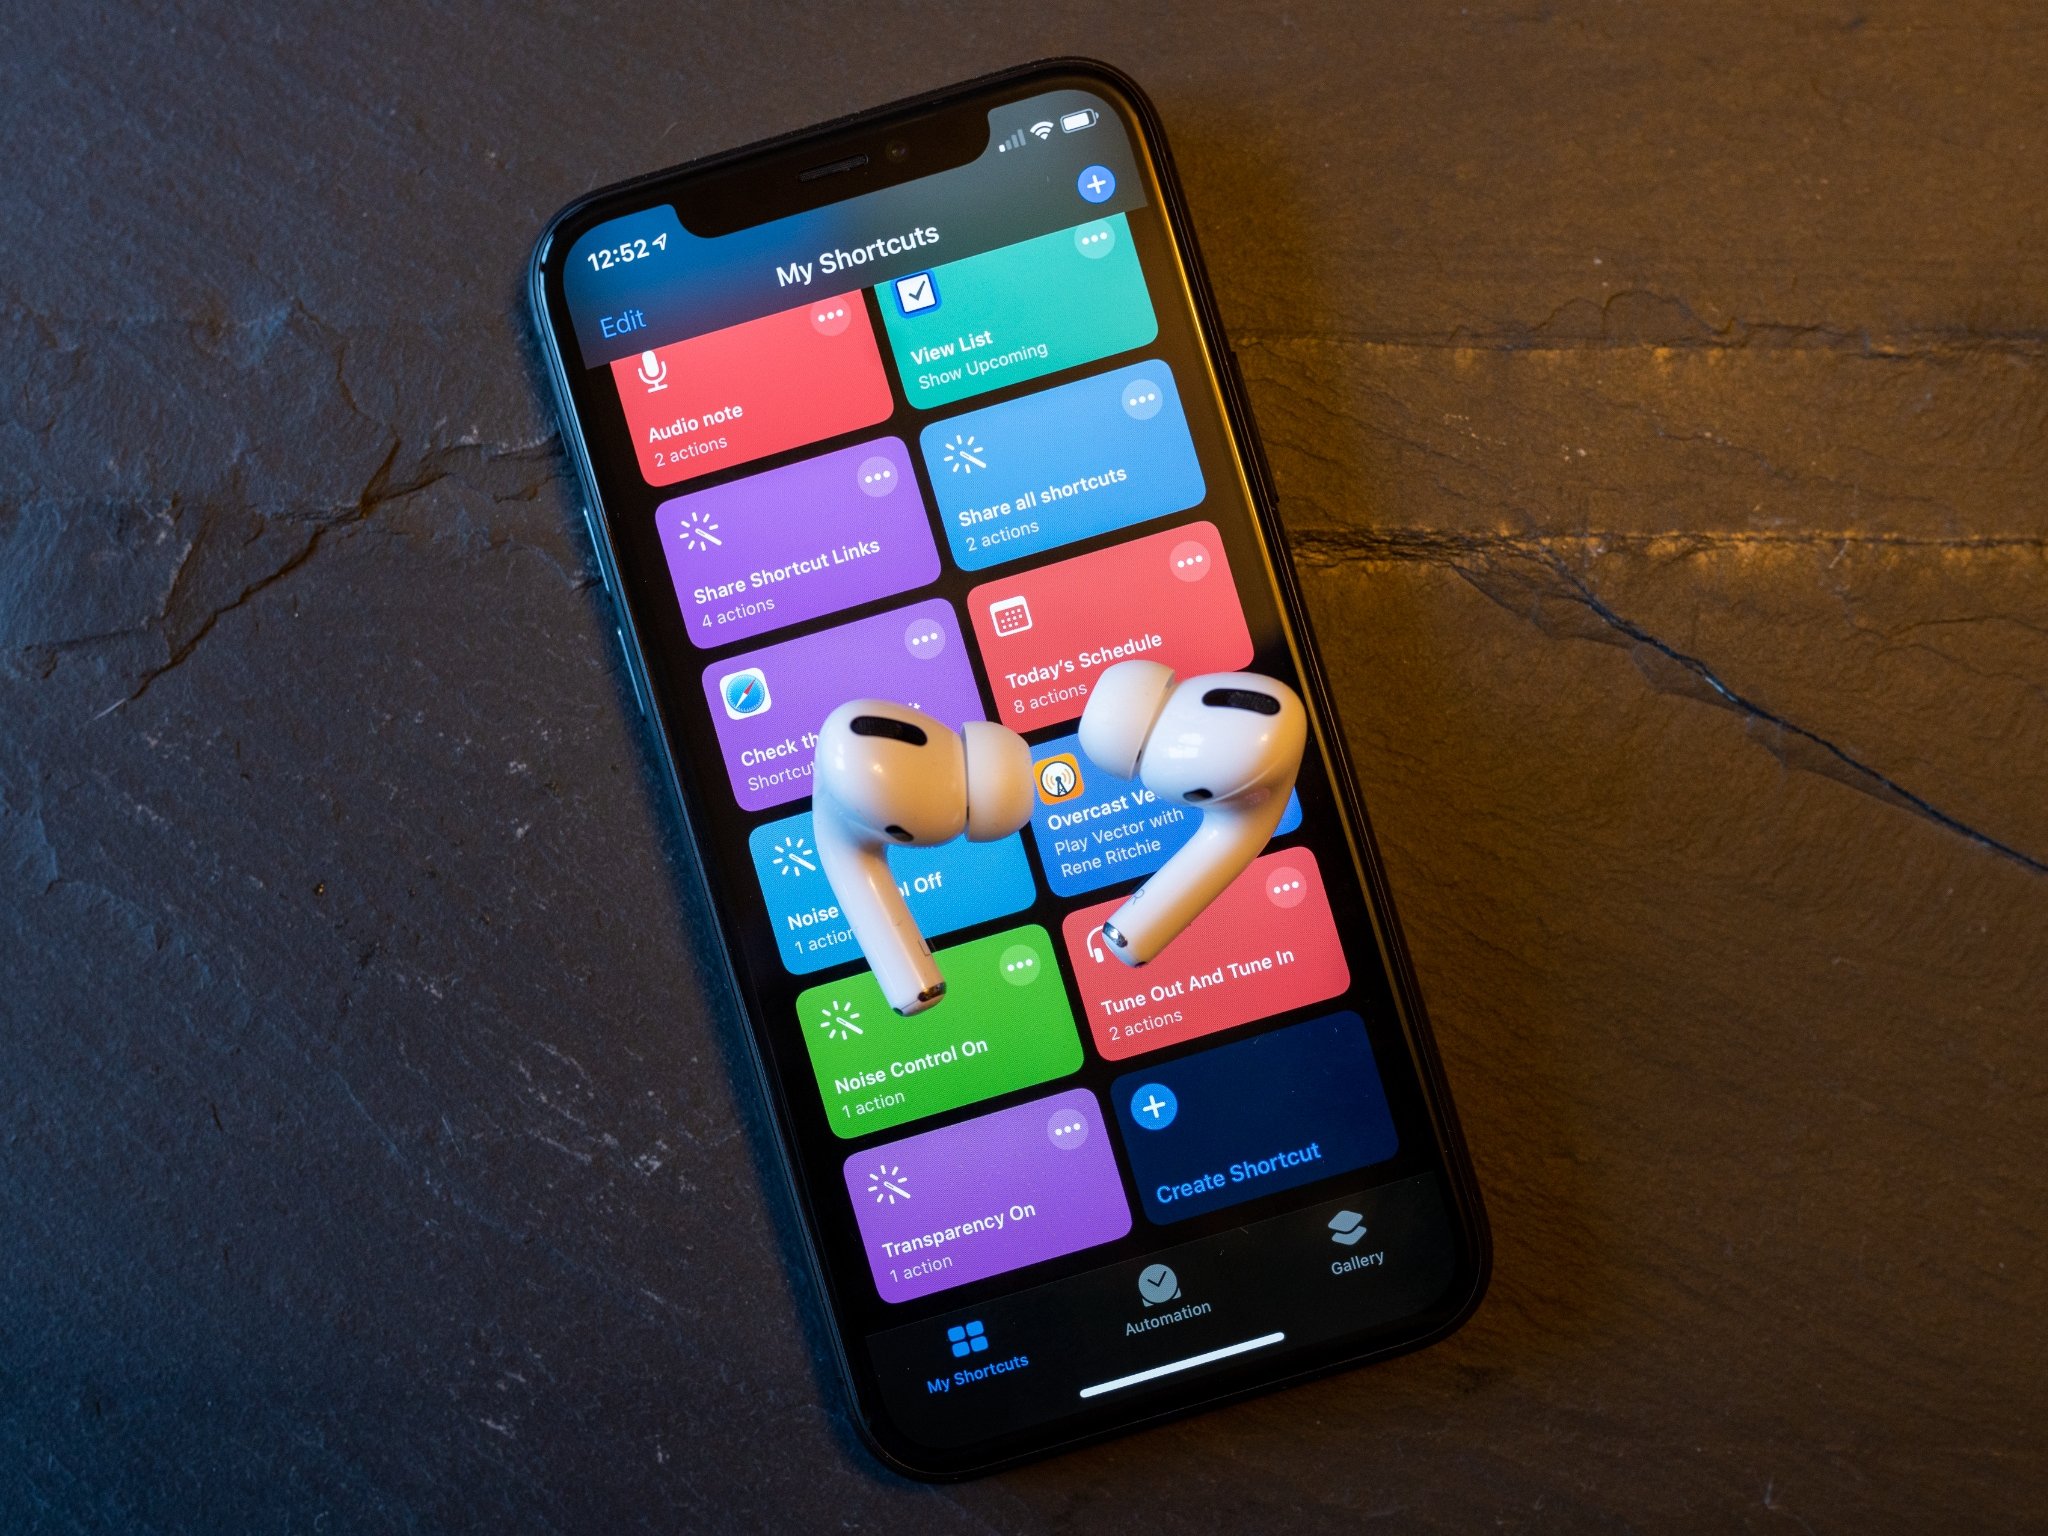
One of the more interesting aspects of Shortcuts in iOS 13 and iPadOS 13 is the ability to set up automations. Automations perform an action once a certain condition is met. For instance, when you scan a particular NFC (near-field communication) tag, that might start an automated sequence that turns off certain HomeKit accessories and turns others on.
One of the cooler automation triggers in the latest version of Shortcuts is Bluetooth, which allows you to set off a particular automation by connecting to a specific Bluetooth device. So for instance, if I connect to a particular Bluetooth speaker, that could activate an automation that checks the time of day then, based on the time, plays a particular playlist through the speaker.
This also presents certain opportunities when it comes to Apple's latest earphones, the AirPods Pro. You can set the AirPods Pro as the specific trigger for an automation or two, while a new shortcut action in iOS 13.2 also allows you to set the Noise Control mode on the AirPods. And because automations can do whatever shortcuts can, you can also add that Noise Control action as part of an automation should you so choose.
- How to use AirPods Pro as an automations trigger in Shortcuts
- Shortcuts and automations for your AirPods Pro
How to use AirPods Pro as an automation trigger in Shortcuts
If you want your automation to be based on AirPods Pro, the first thing you need to do when building any such automation is set AirPods Pro as your trigger. That way, you'll get a prompt to run your automation whenever you put your AirPods Pro in your ears and they connect to your iPhone or iPad.
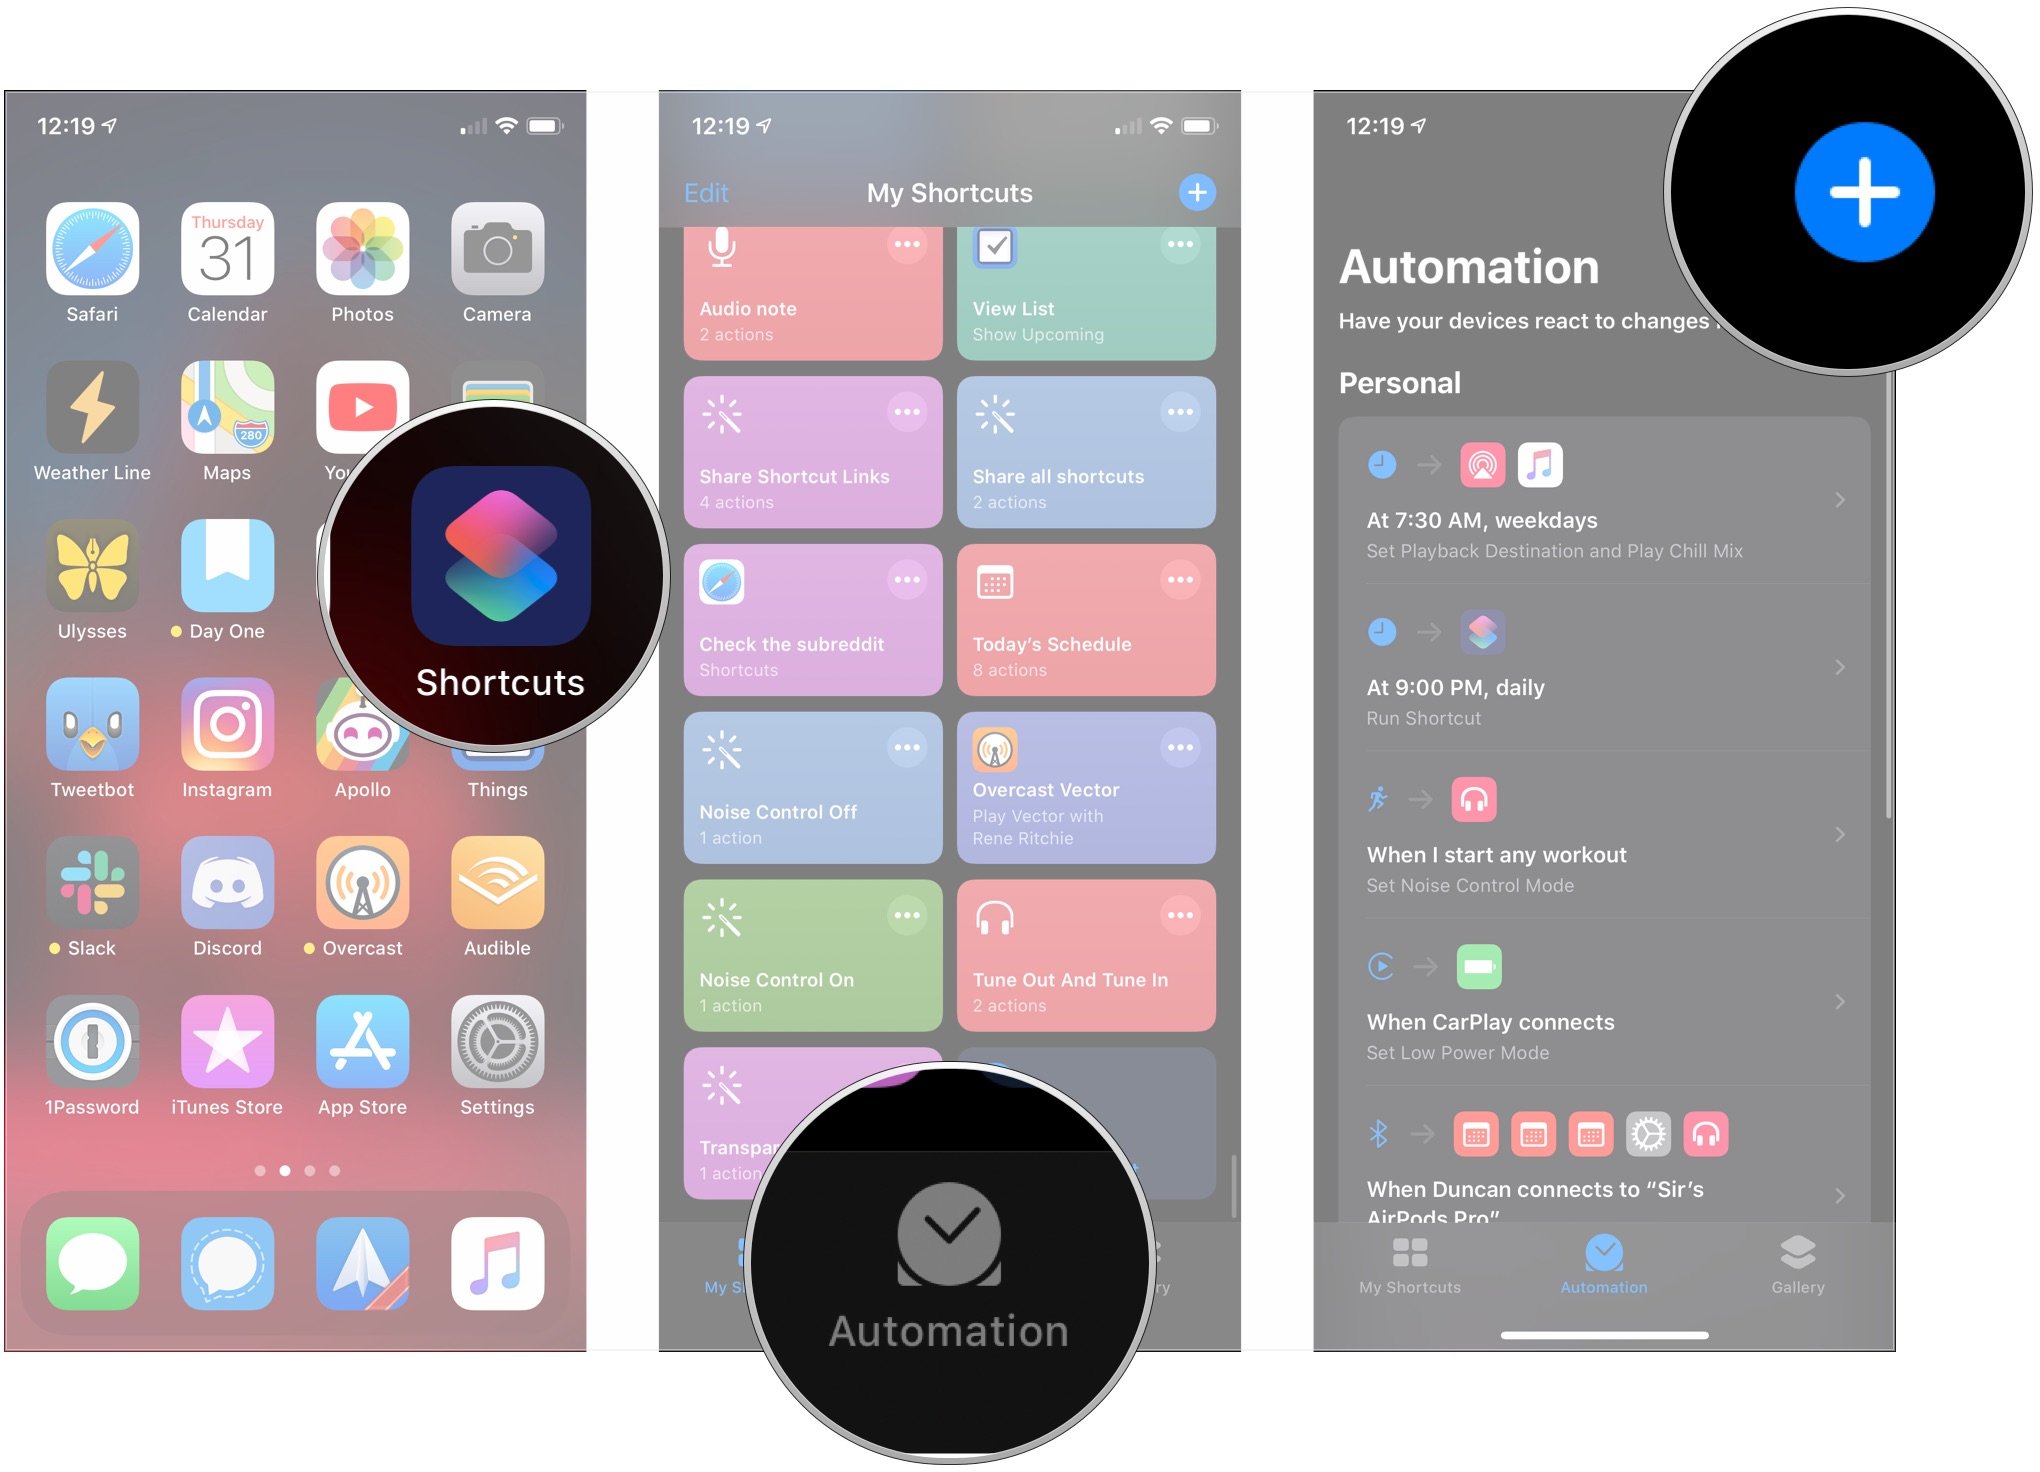
- Open Shortcuts on your iPhone or iPad.
- Tap Automations.
- Tap the + button.
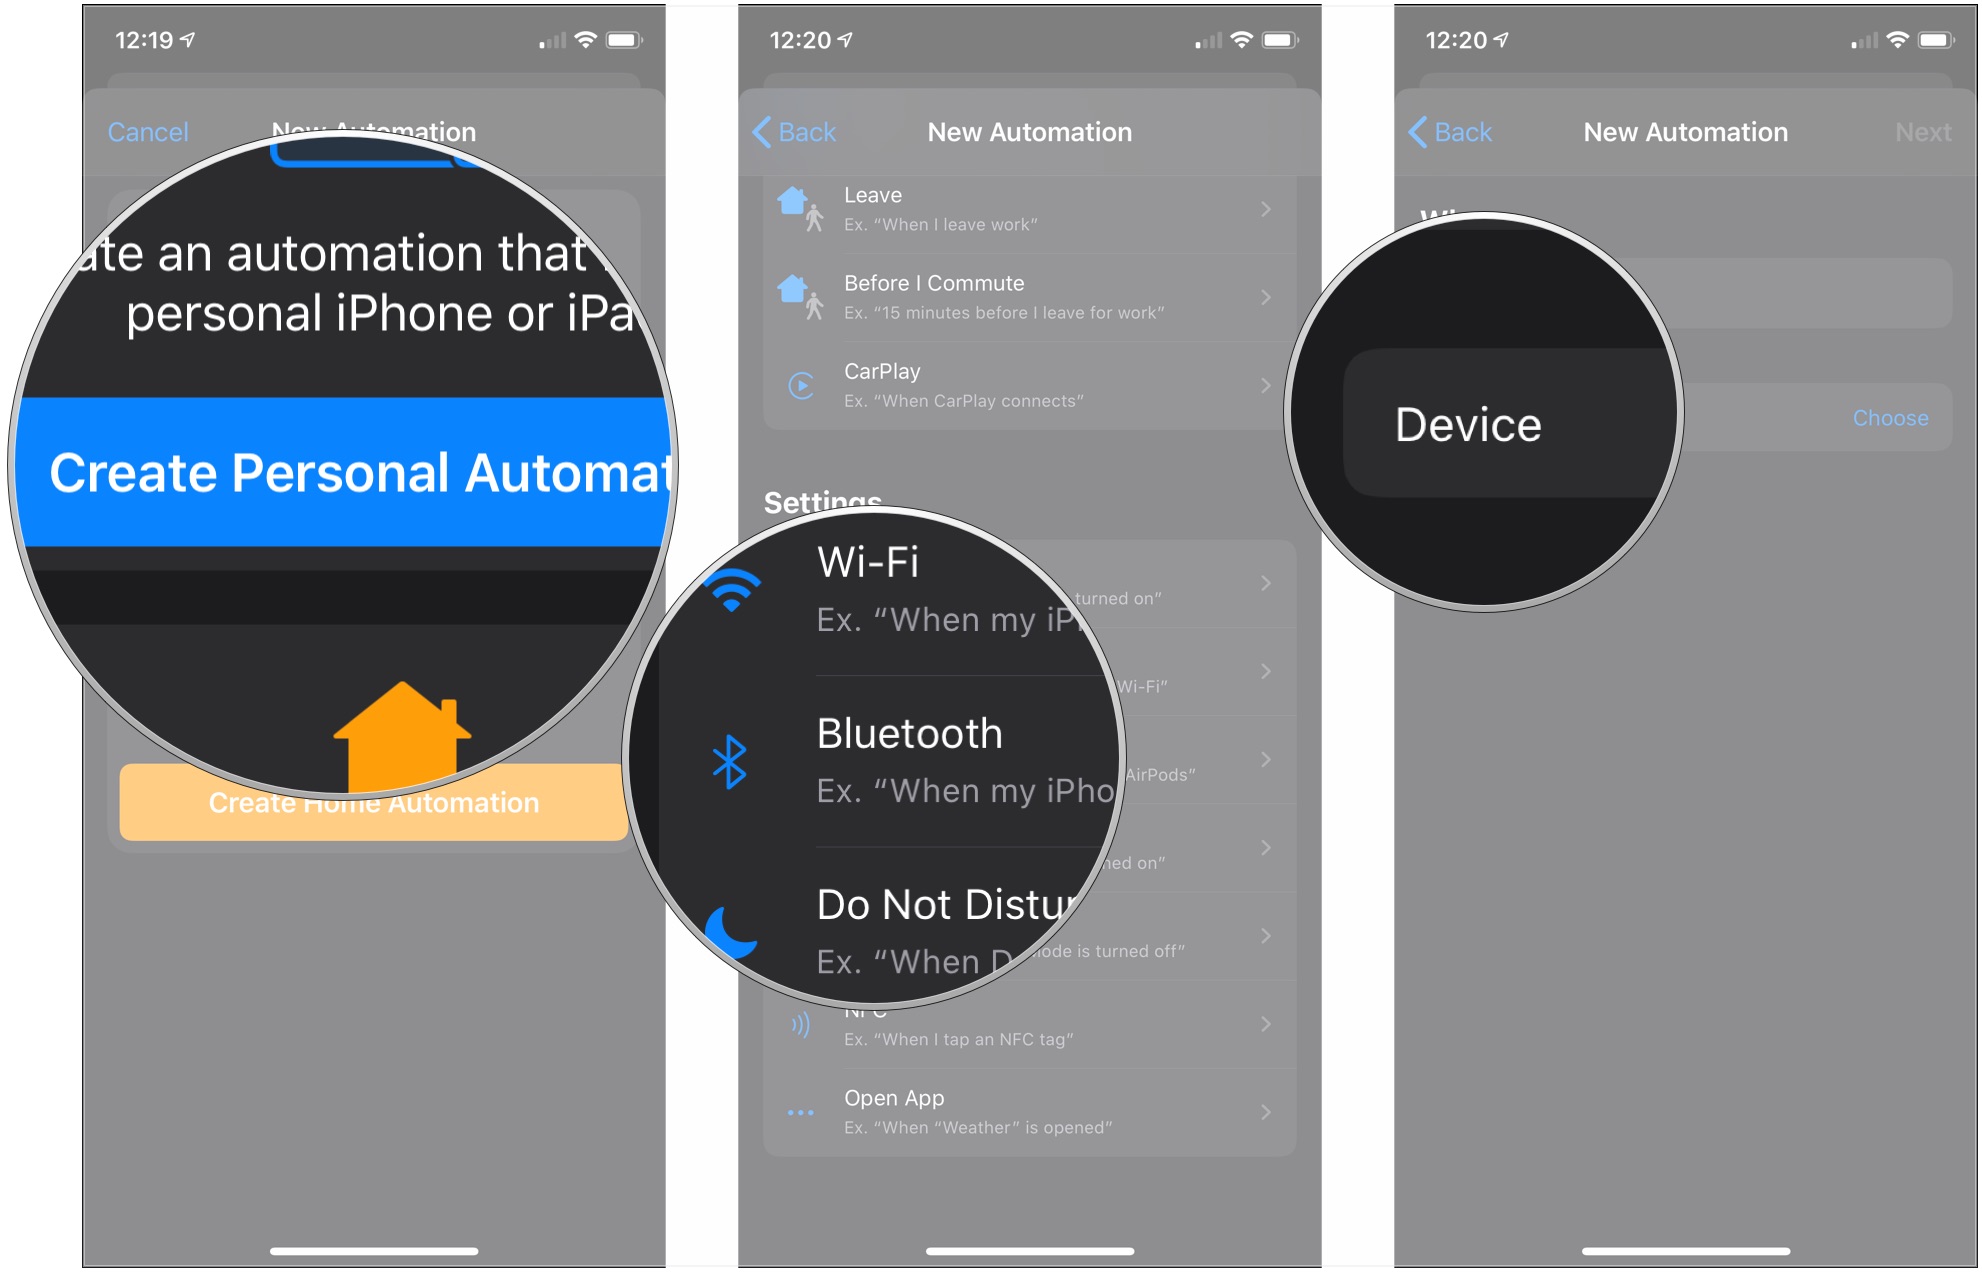
- Tap Create Personal Automation.
- Tap Bluetooth.
- Tap Device.
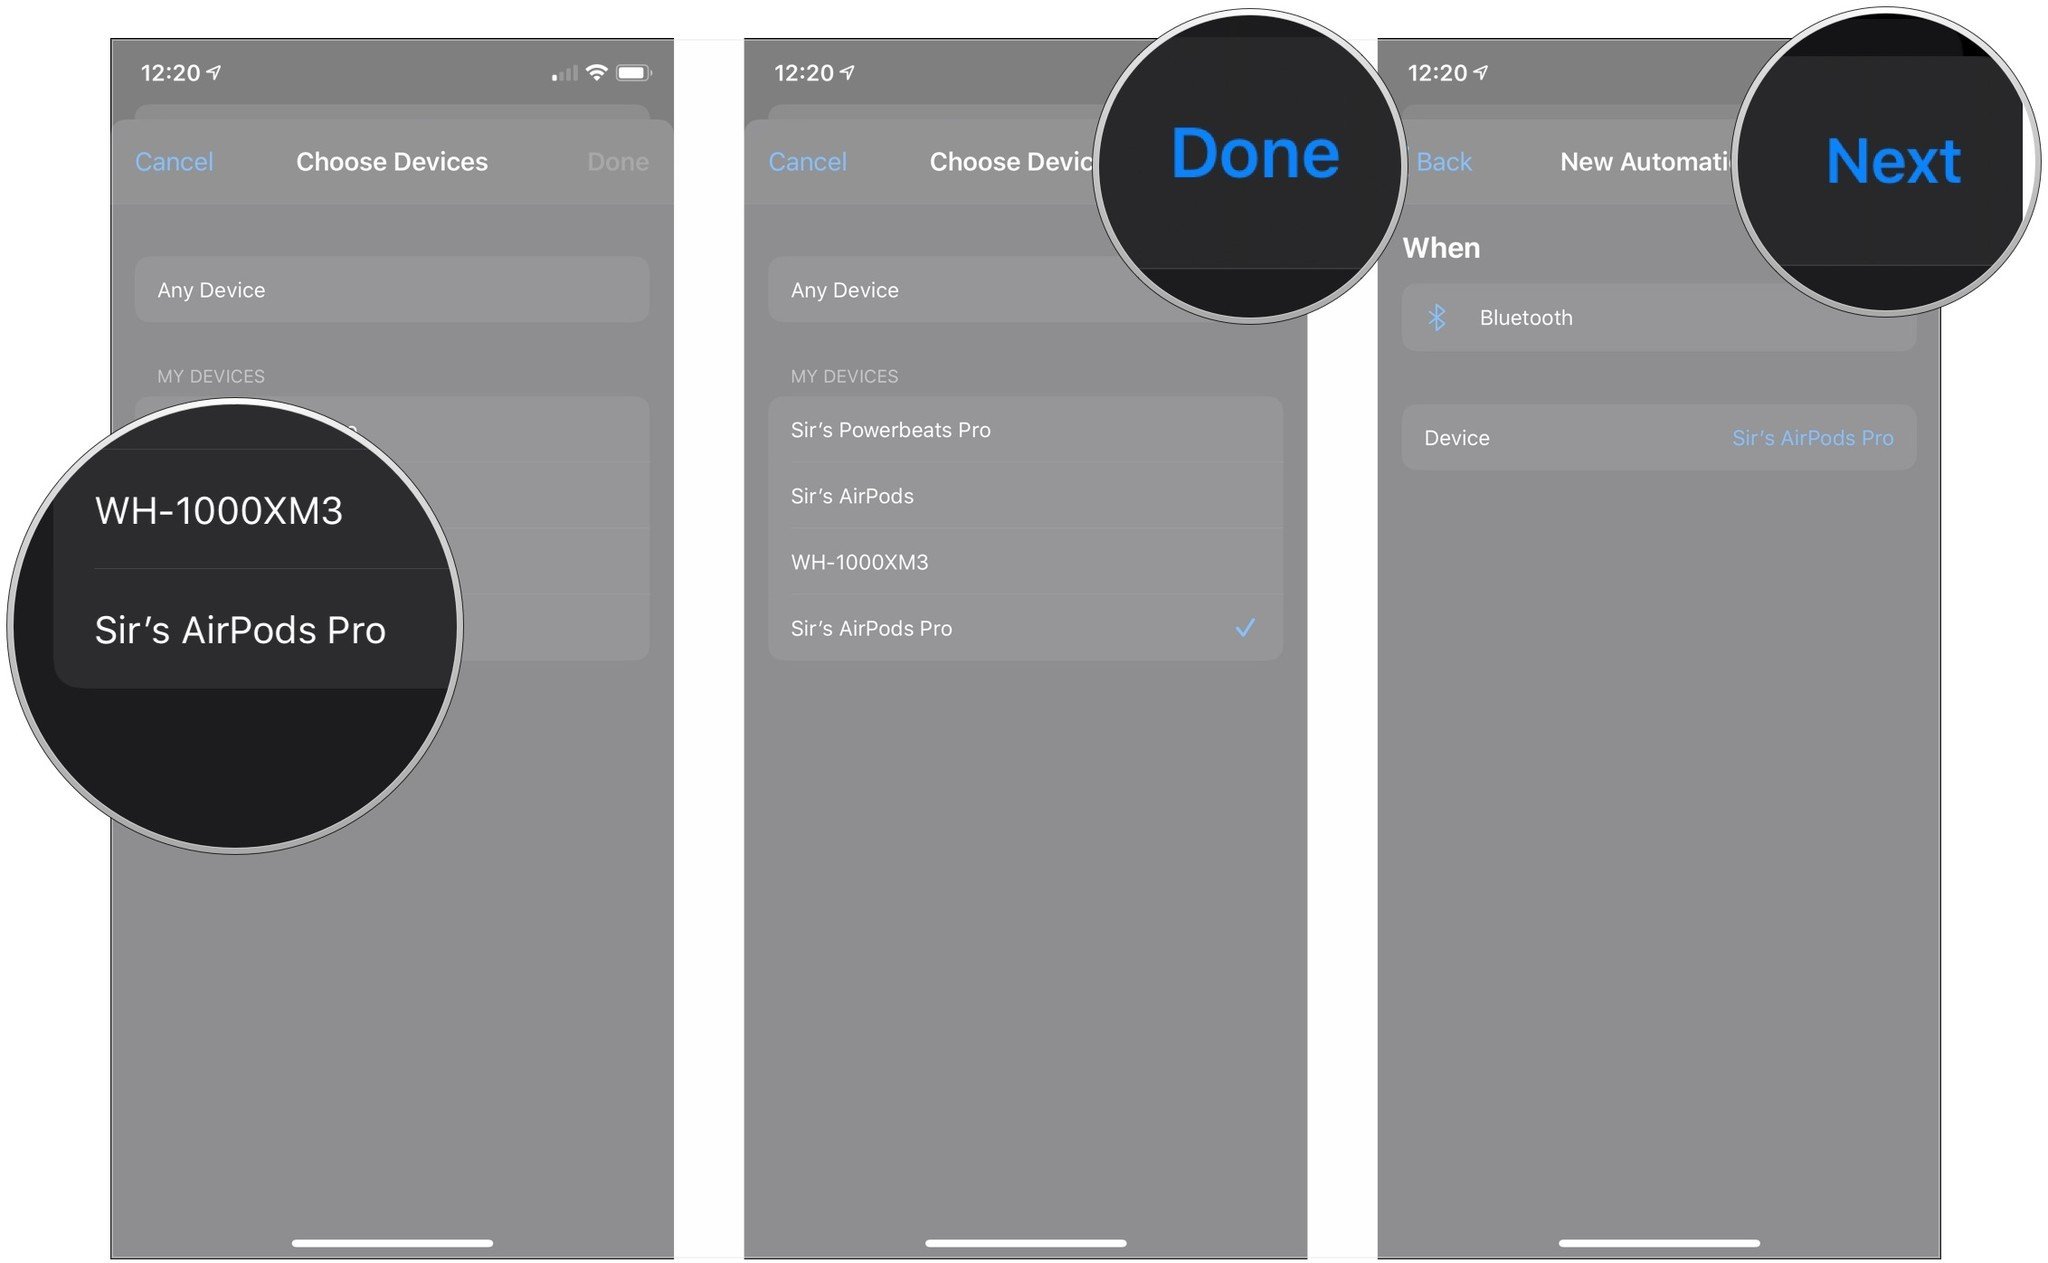
- Tap your AirPods Pro.
- Tap Done.
- Tap Next.
After this, you just build your automation like you would build any shortcut. Something to be aware of when it comes to building automations for Bluetooth devices: they're not actually automatic.
As I alluded to previously, connecting a Bluetooth device, including AirPods Pro, that trigger an automation will actually trigger a notification to appear on your lock screen. Tap that notification, then tap the Run button that appears, and your automation will run as built.
It's kind of disappointing, but it's understandable for Apple to have security concerns about something that would happen on your device with no user input whatsoever, just by connecting a Bluetooth device. My hope is that one day, Apple lets us take that risk, but for now, this is what we have.
iMore offers spot-on advice and guidance from our team of experts, with decades of Apple device experience to lean on. Learn more with iMore!
Shortcuts and automations for your AirPods Pro
Below is a set of great automations and shortcut ideas for you to use with your AirPods Pro. When it comes to automations, you might want to pick one or two, unless you're fine hitting run on a bunch of notifications at once.
If you've created shortcuts or automations before or added a shortcut from a link, you should have a handle on how to set all of these up or add the shortcuts from a link. If you haven't, you'll want to check out our guide to getting started with shortcuts.
- How to get started with Shortcuts on iPhone and iPad
- How to create and use automations in Shortcuts on iPhone and iPad
Important Note: You're going to need iOS 13.2 in order to use these shortcuts and automations with your AirPods Pro, as that's the version you need to even connect AirPods Pro. Additionally, if you add the shortcuts from the links below, you may need to replace an item called "Sir's AirPods Pro" (my name for my AirPods Pro) with the name of your own AirPods Pro.
Changeup Noise Control
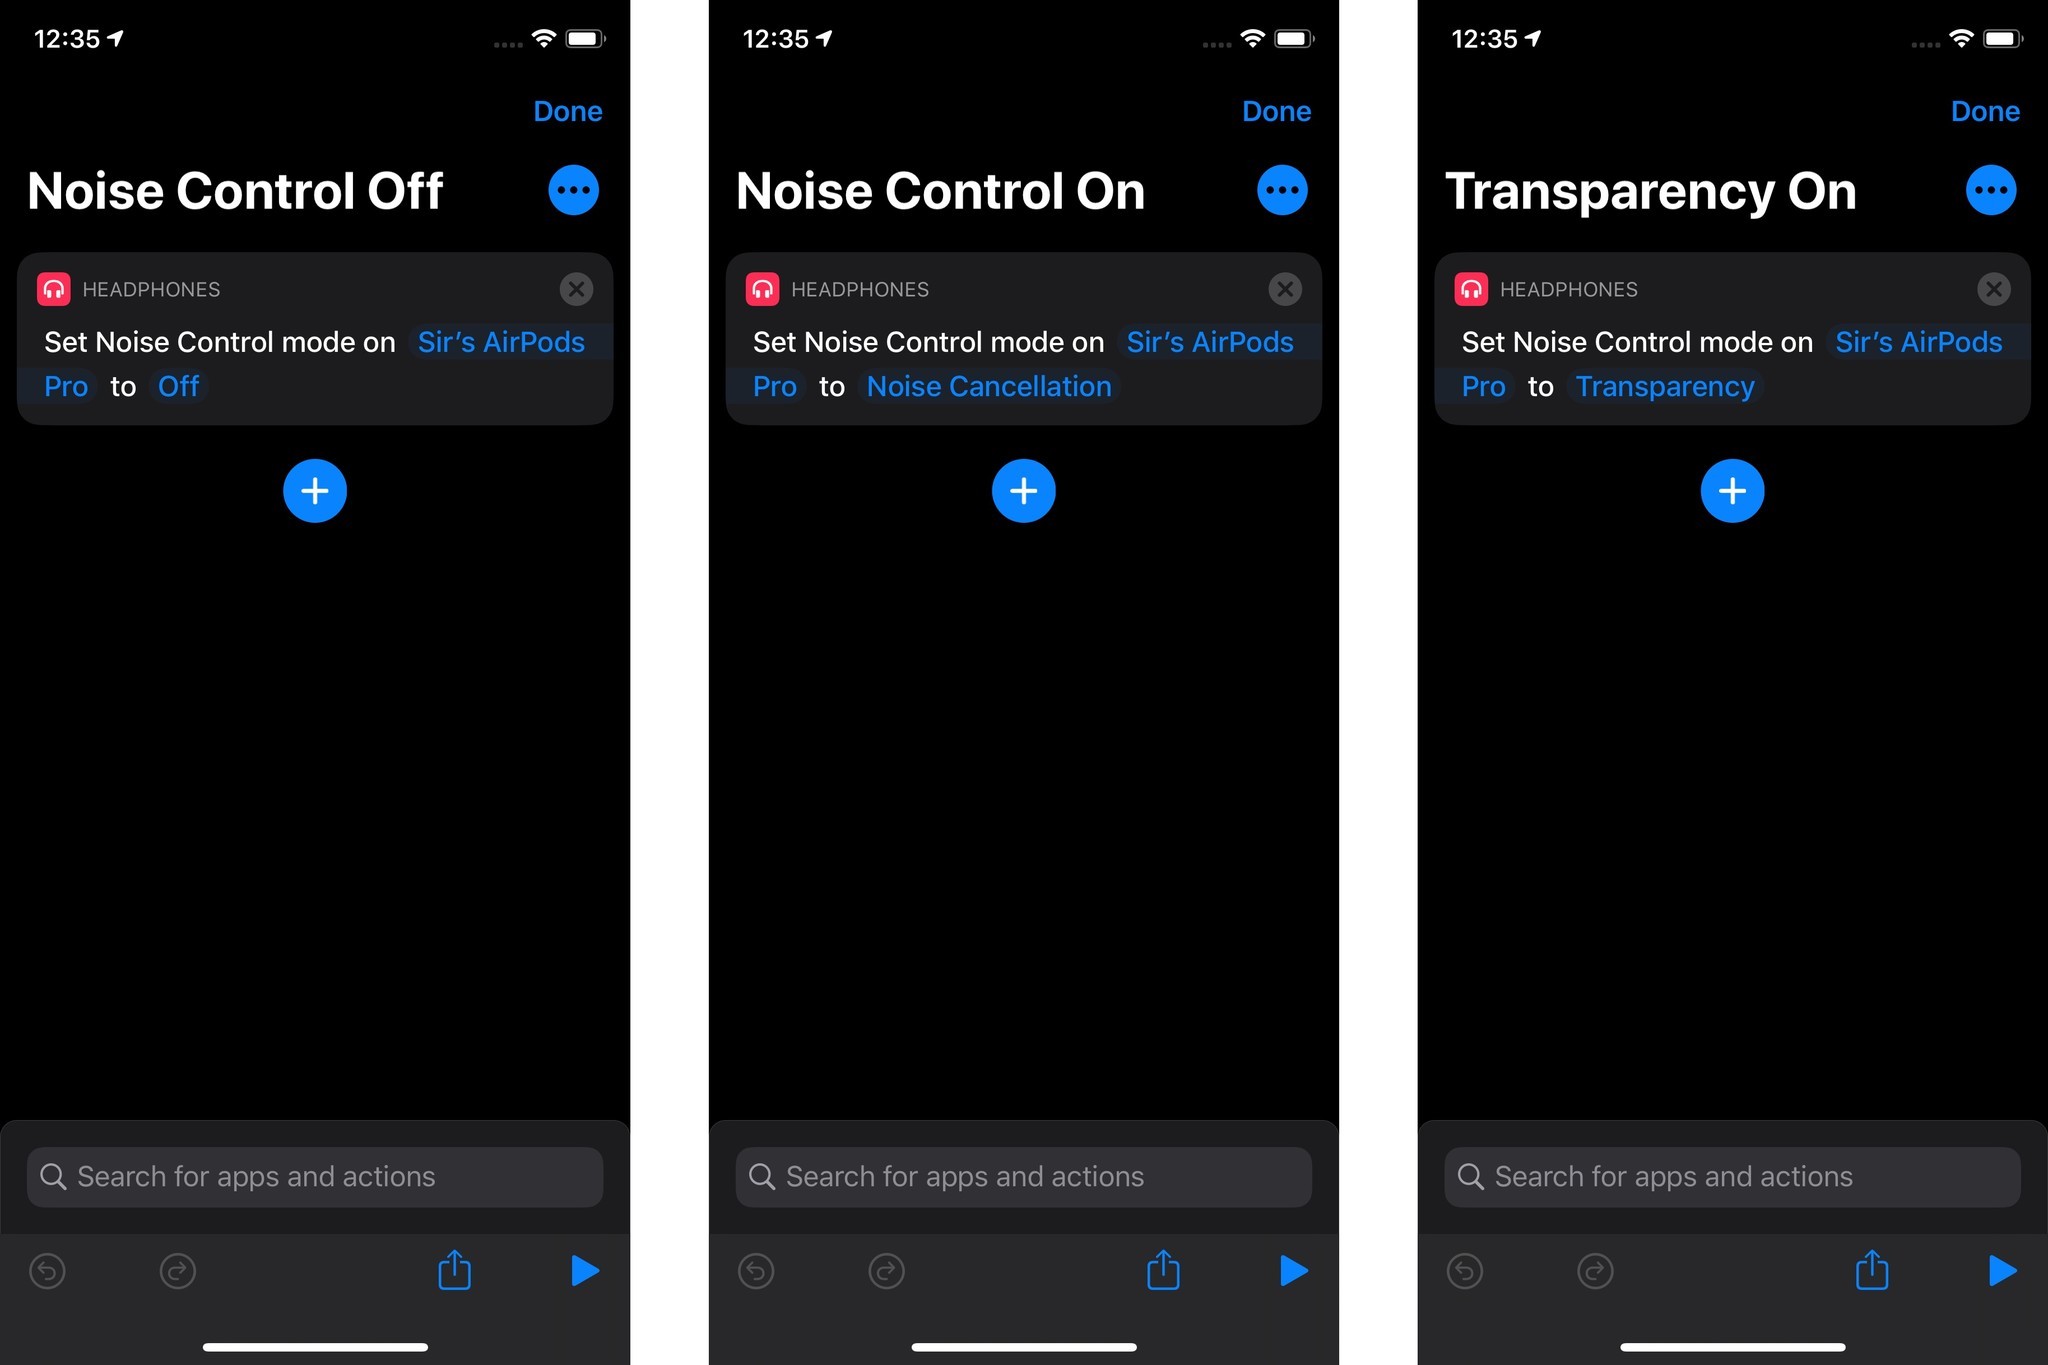
With iOS 13.2 and iPadOS 13.2, Apple added a shortcut that allows you to change the Noise Control mode on your AirPods Pro, that is, control the active noise cancellation (ANC). Using this shortcut, you can turn Noise Control on, turn on transparency, or turn either of those modes off.
You can use the Ask Each Time option if you want to determine which of these actions the shortcut takes each time you run it, but you'll need to unlock your iPhone each time. The better option, in my opinion, is to create two or three separate shortcuts: one for turning on noise cancellation, one for turning Noise Control off, and one for turning on transparency if you use it. If you do this instead, you'll be able to activate each shortcut using only Siri and without having to unlock your iPhone in order to get them to run.
Remember, because the name you use to invoke a Shortcut in Siri is the same as the shortcut's title, to title your shortcuts something simple like "Noise Control On" or "Noise Control Off" when you set them up.
Actions in this shortcut, in order of appearance:
- Set Noise Control Mode: This is the only action you'll absolutely need for this shortcut, as it lets you determine whether the shortcut turns on noise cancellation, transparency, or turns Noise Control off altogether.
Timing for Noise Control
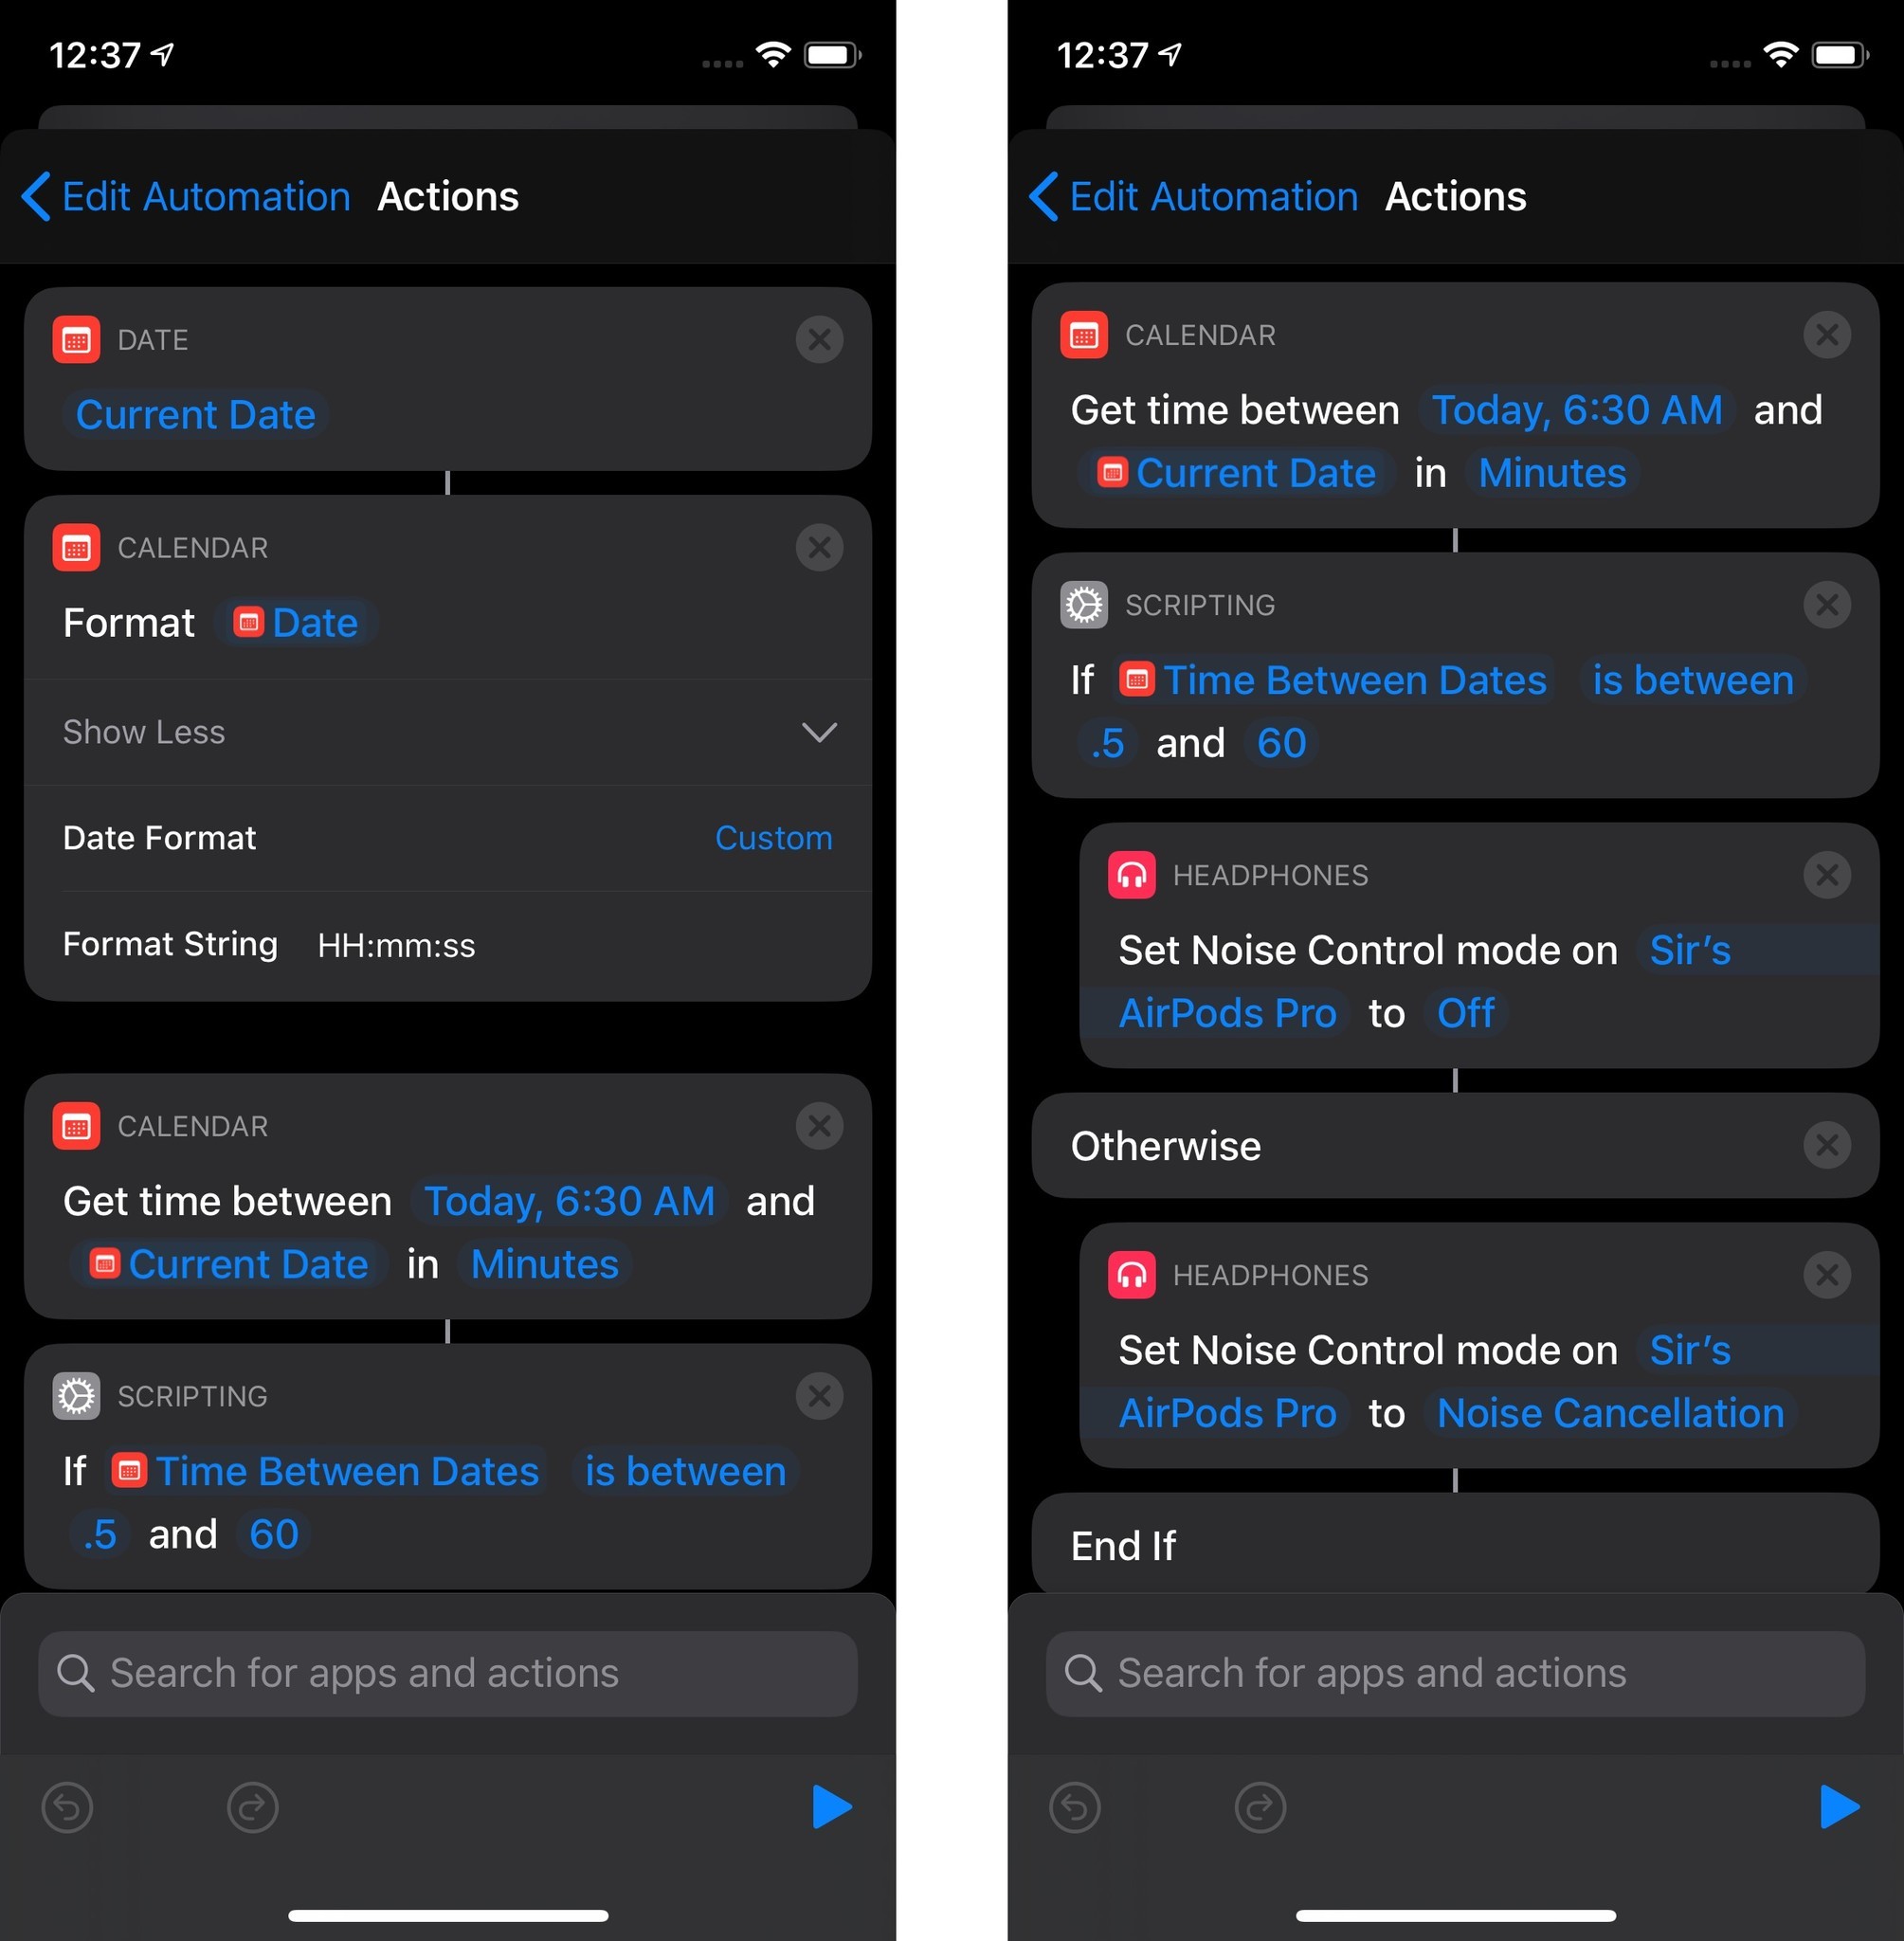
This is an automation that I use in the mornings as I prepare to work out. Because I run outside, I want to be able to hear things like car reasonably well, while also being able to hear my podcast of choice (I personally have trouble exercising with music). Because of this, I want to turn Noise Control off and just let the sounds of the world around me battle against the natural seal of the AirPods Pro, rather than also having to fight ANC.
Here's how this automation breaks down: Once I run it, it gets the current time using a custom date formatting that you can set up when you add the action to your automation. It then checks the time between today at 6:30 a.m. and the current time in minutes. If the current time is between 6:30 a.m. and 7:30 a.m. (the latest I leave my house for my workout), then Noise Control on the AirPods Pro is turned off. Otherwise, it's set to Noise Cancellation, where I want it for most of the rest of the day.
While complicated, this automation is great for a couple of reasons. First, while a triggering noise control with a workout action would be easier (more on that in a bit), that trigger is restricted to workouts started with the Apple Watch Workout app. This one is better to use if you use third-party apps like RunKeeper to record workouts on your Apple Watch. Second, it's just a great exercise for learning about working with time, dates, and some light scripting in Shortcuts.
Actions in the automation, in order of appearance:
- Trigger: Bluetooth device
- Date: Gets the current date.
- Format Date: Lets you format the date into hours, minutes, and seconds. Once added to your automation, tap the Show More button, set the Date Format to Custom, and the Format String to HH:mm:ss.
- Get time between: Gets the time between two points in time in your unit of choice, such as seconds, minutes, or hours.
- If: This scripting action sets up an If/Otherwise scenario that you can drag and drop other actions between.
- Set Noise Control Mode: You'll use this one twice, once for the command to turn off noise cancellation, and one to turn it on.
Tune out and work out
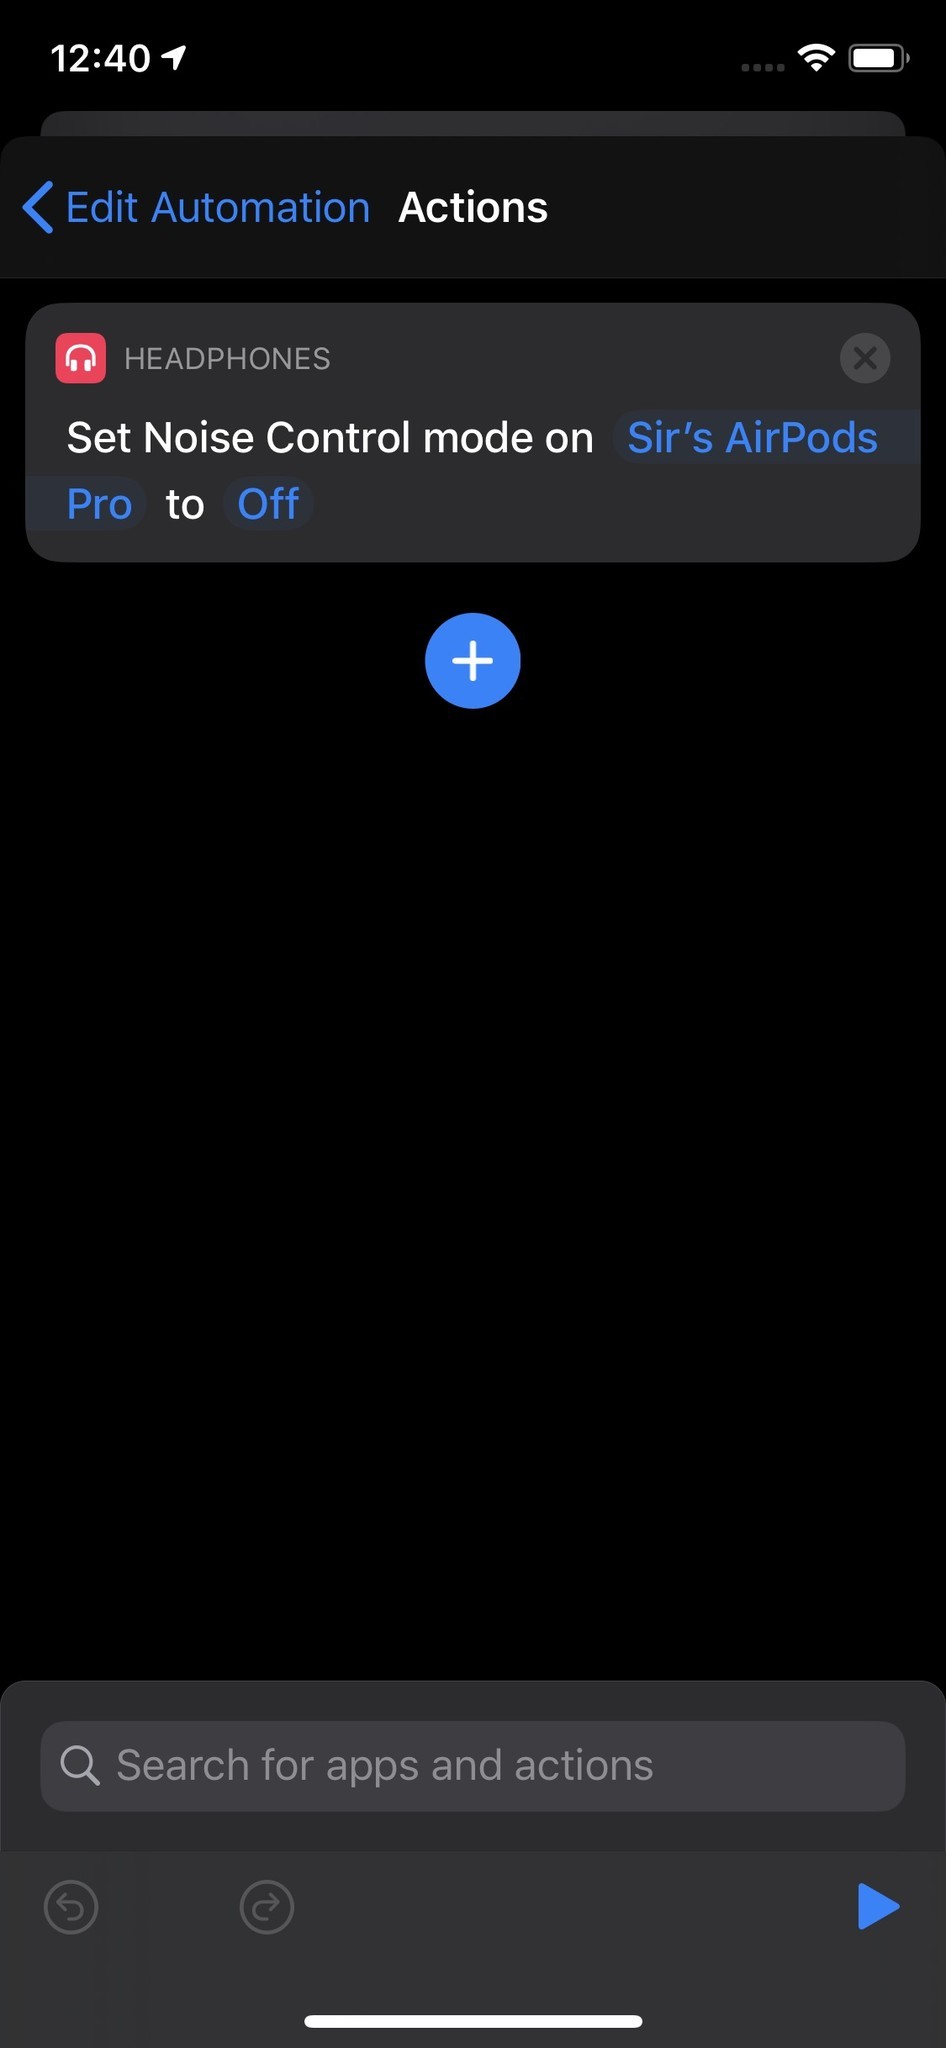
This is another automation to get your AirPods Pro ready for a workout, but this one is a lot easier to set up than the one above, and actually works automatically once you run the trigger. It achieves the same results as the previous automation in a lot fewer steps. If you primarily use the Workouts app built into the Apple Watch to record your physical activity sessions, then this automation will be a lot simpler.
With this automation, when you start an Apple Watch workout, AirPods Pro will immediately turn Noise Cancellation off. You don't need to worry about tapping a notification, you can keep your phone in your pocket.
I'd also suggest, if you like noise cancellation on generally, that you create a companion automation for this one that turns ANC back on when your Apple Watch workout ends.
Actions in the automation, in order of appearance:
- Trigger: Starting a workout on Apple Watch.
- Set Noise Control Mode: Use this to turn noise cancellation on or off when you start your workout.
Sit back and relax
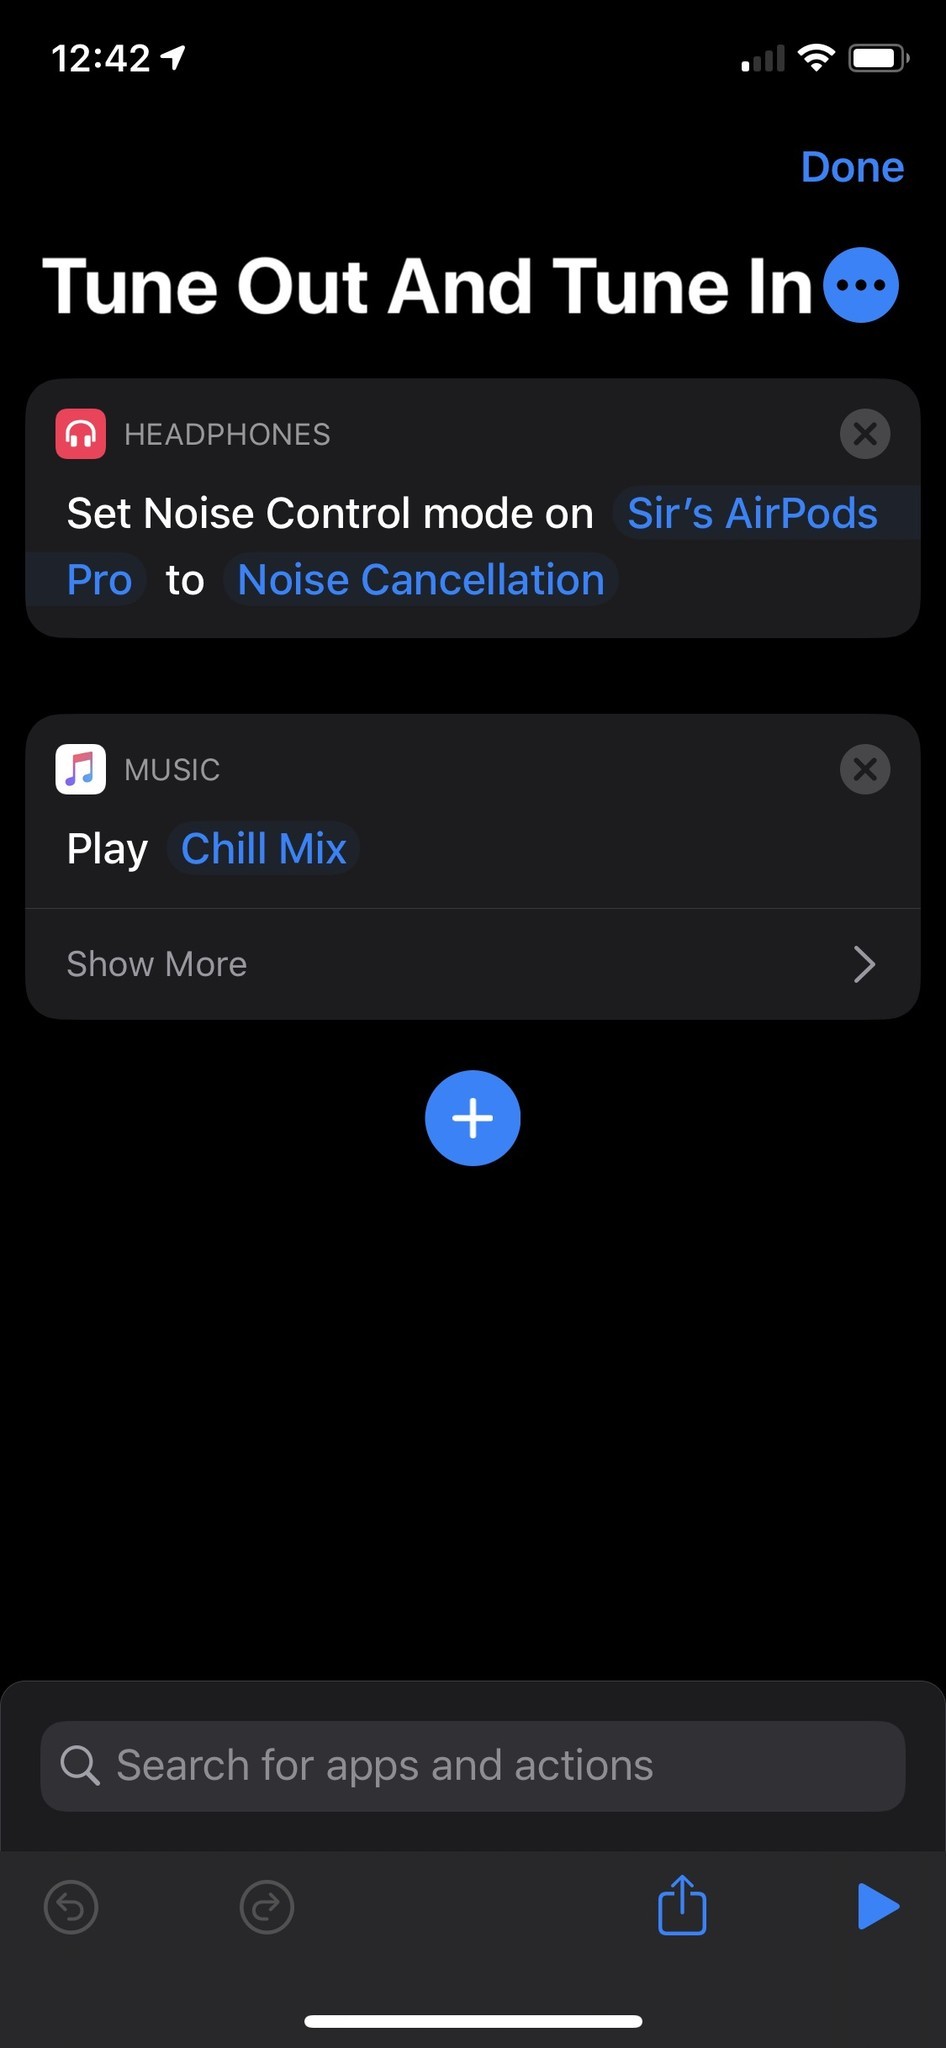
This is a shortcut meant to help you kick back and tune out for a bit. Once again, we turn to the Noise Control shortcut, as well as a shortcut for playing music.
As you can see, I call this one "Tune out and tune in." It turns on noise cancellation on my AirPods Pro, then starts playing My Chill Mix in Apple Music, though you can use any playlist or album that you'd like.
Actions in this shortcut, in order of appearance:
- Set Noise Control Mode: Use this to turn on noise cancellation when you activate the shortcut.
- Play music: Set up a favorite playlist, album, or song to play when you activate the shortcut. This shortcut is great for something relaxing.
Get a look ahead
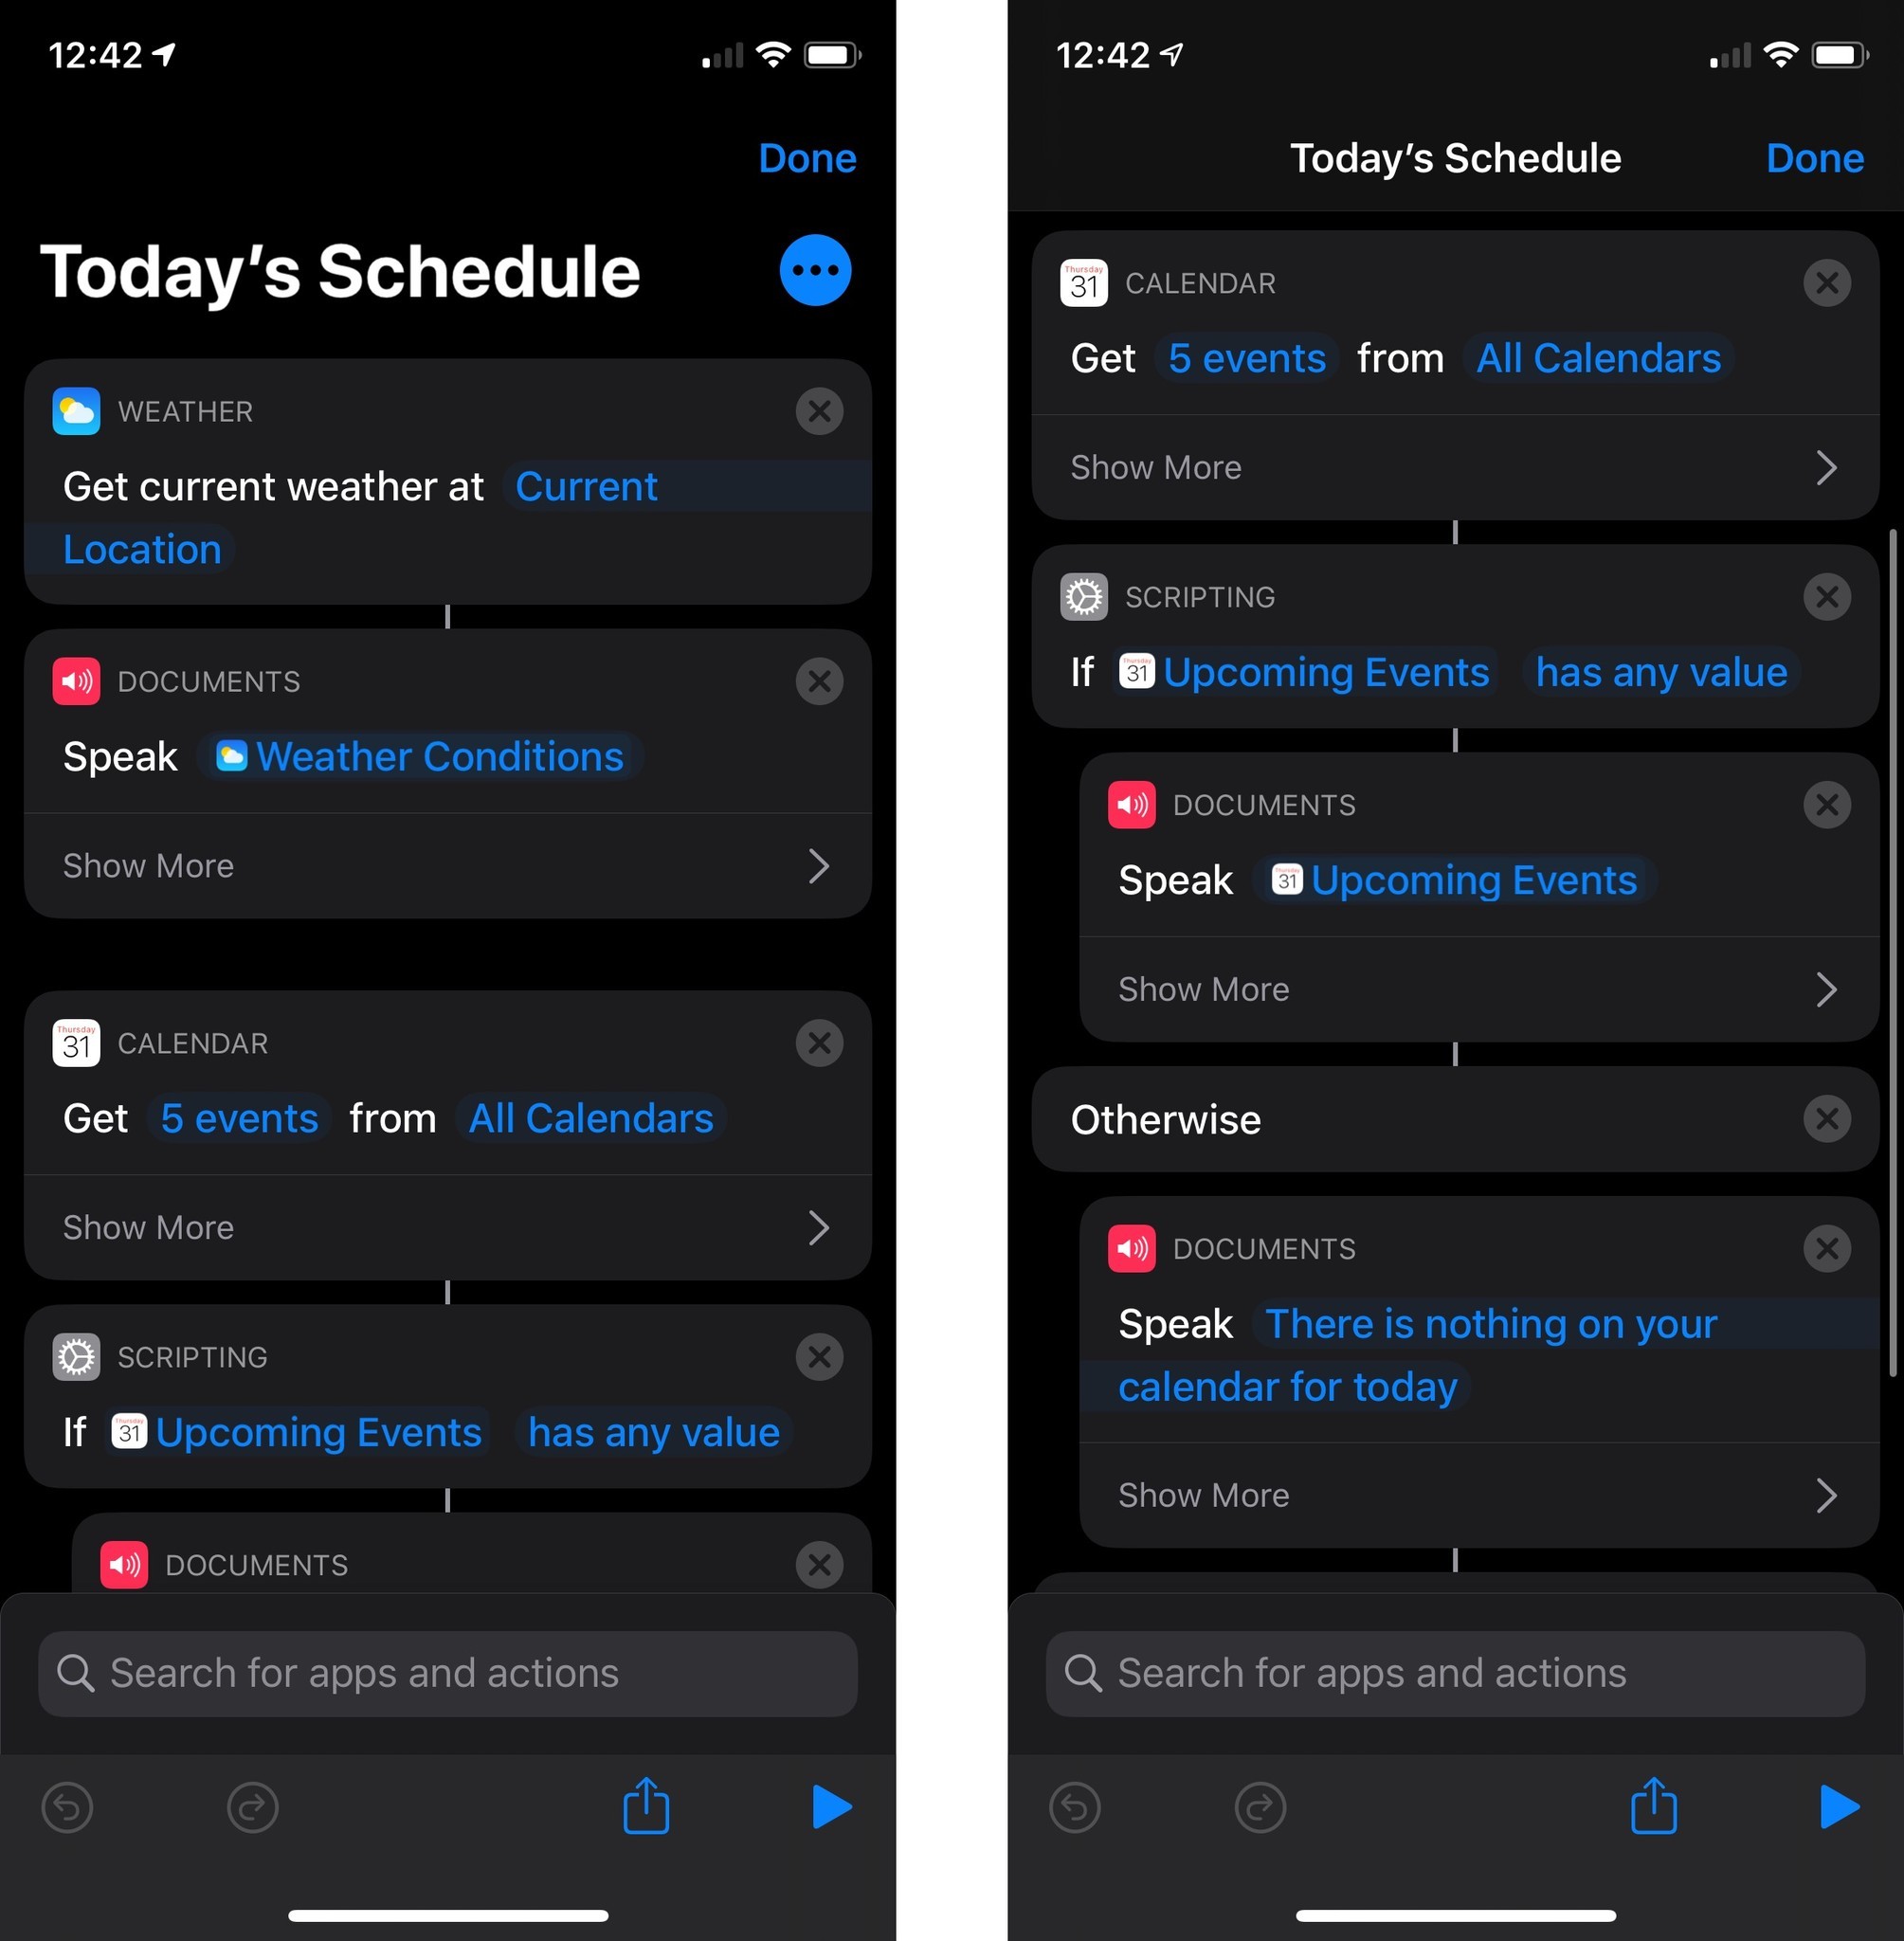
I use this shortcut to get a look at the current weather, as well as any upcoming events on my calendar for the day, without having to unlock my phone. By design, this shortcut is built to speak its results to me, making it great to use with Siri through AirPods Pro.
This shortcut makes heavy use of the Speak Text action. You can pass the results of an action such as Get Current Weather and Get Upcoming Events to Speak Text and Siri will read out what's been passed.
Actions in this shortcut, in order of appearance:
- Get Current Weather: Simply put, gets the current weather at the location of your choosing, including your current one.
- Speak Text: You'll use this action to have Siri read the results passed to it by both Get Current Weather and Get Upcoming Events. You'll also use it to speak a custom message if you don't have anything coming up on your calendar. Use the Show More section to adjust rate, pitch, language, and voice.
- Get Upcoming Events: Gets the number of upcoming events that you specify in chronological order from whichever calendars you choose. Use the Show More section to determine which day the action collects events from.
- If: Use this action to determine what Siri says when looking at your upcoming events. In my example, I use it to have Siri speak my upcoming events if there are any, or say a custom message if there aren't.
Your suggestions
Do you have any interesting or unique shortcuts or automations that you've already set up to use with your AirPods Pro? Tell us all about them in the comments.
Joseph Keller is the former Editor in Chief of iMore. An Apple user for almost 20 years, he spends his time learning the ins and outs of iOS and macOS, always finding ways of getting the most out of his iPhone, iPad, Apple Watch, and Mac.
