How to use the Translate app on iPhone and iPad
Language barriers begone!
Have you ever traveled to a different country and had no idea how to speak the native tongue? Don't worry, we've all been there. Thankfully, there are plenty of tools out there to help you communicate with the locals, especially if you have your iPhone with you.
Apple made life a little easier for everyone when it added a Translate app in iOS 14. This eliminates the need for a third-party translation app, though you can argue that some developers have a better alternative to Apple's native app. But if you don't want to bother downloading something else, then Apple's Translate app is pretty good, all things considered. Originally, the Translate app was only on the best iPhone, but iPadOS 15 brought Translate to your favorite iPad too. iOS 16 also brings in a brand new feature, allowing you to capture images with your device's camera and translate on-the-fly.
Here's everything you need to know about how to use the Translate app for iPhone and iPad.
Requirements for the Translate app on iPhone and iPad
In order to use the Translate app on your iPhone, you need to have at least iOS 14 or later running on it. The following is a list of iPhones that will have Translate, as long as you have the correct iOS version:
- iPhone 13 Pro Max
- iPhone 13 Pro
- iPhone 13
- iPhone 13 mini
- iPhone 12 Pro Max
- iPhone 12 Pro
- iPhone 12
- iPhone 12 mini
- iPhone SE (2nd generation)
- iPhone 11 Pro Max
- iPhone 11 Pro
- iPhone 11
- iPhone XS Max
- iPhone XS
- iPhone XR
- iPhone X
- iPhone 8 Plus
- iPhone 8
- iPhone 7 Plus
- iPhone 7
- iPhone 6s Plus
- iPhone 6s
- iPhone SE (1st generation)
To use Translate on your iPad, you need to have iPadOS 15 or later. Here are the following iPad models that are capable of running iPadOS 15:
- iPad Pro 12.9-inch (5th generation)
- iPad Pro 11-inch (3rd generation)
- iPad Pro 12.9-inch (4th generation)
- iPad Pro 11-inch (2nd generation)
- iPad Pro 12.9-inch (3rd generation)
- iPad Pro 11-inch (1st generation)
- iPad Pro 12.9-inch (2nd generation)
- iPad Pro 12.9-inch (1st generation)
- iPad Pro 10.5-inch
- iPad Pro 9.7-inch
- iPad (9th generation)
- iPad (8th generation)
- iPad (7th generation)
- iPad (6th generation)
- iPad (5th generation)
- iPad mini (6th generation)
- iPad mini (5th generation)
- iPad mini 4
- iPad Air (5th generation)
- iPad Air (4th generation)
- iPad Air (3rd generation)
- iPad Air 2
If you plan on using iOS 16, you will need to double-check that your current iPhone or iPad can run it first. Thankfully, we have a full device compatibility list for both iOS 16 and iPadOS 16 for your convenience.
But keep in mind that as long as you have at least iOS 14 or iPadOS 15, the Translate app will be there — you just won't have the iOS 16-specific feature of translating images in real-time.
iMore offers spot-on advice and guidance from our team of experts, with decades of Apple device experience to lean on. Learn more with iMore!
How to select your languages in the Translate app
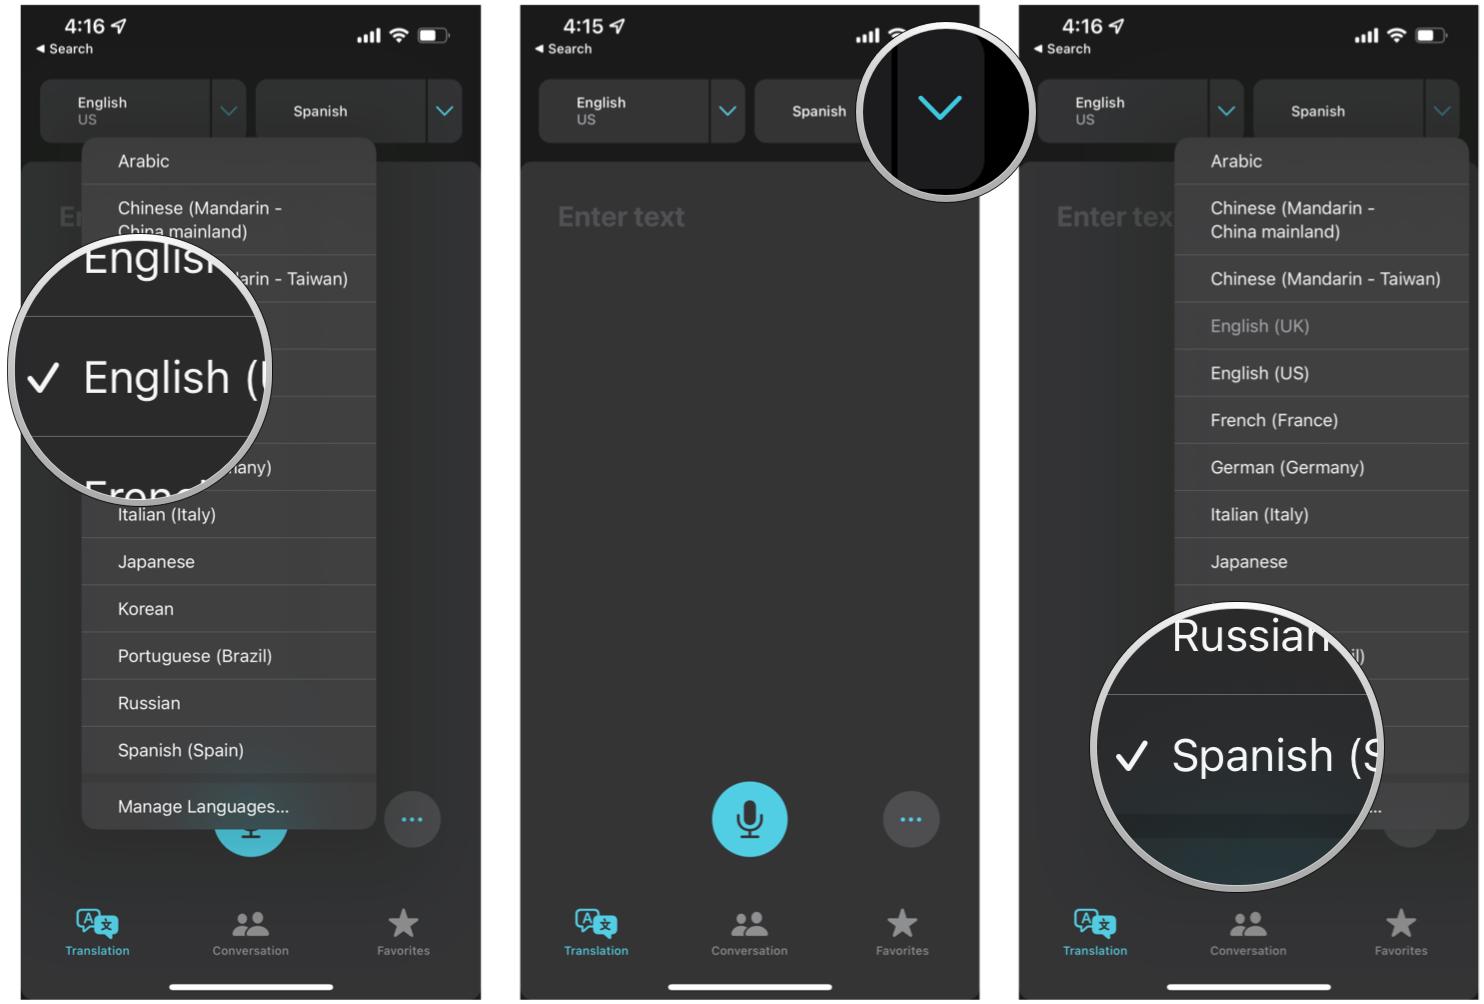
The Translate app for iPhone currently supports 11 languages: Arabic, Chinese (Mandarin — China mainland), English (United States and United Kingdom), French, German, Italian, Japanese, Korean, Portuguese, Russian, and Spanish. You can select which language you're speaking, and what you need it translated into.
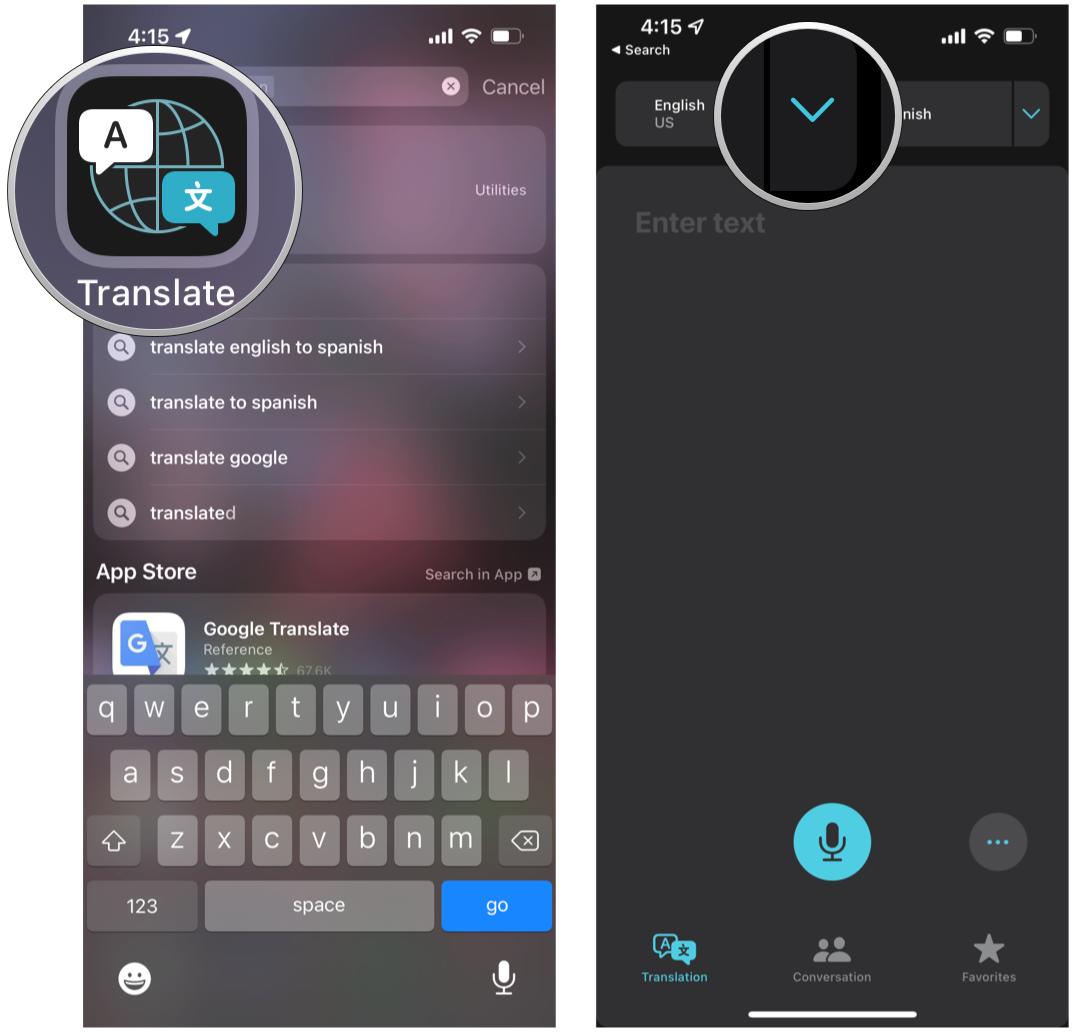
- Launch the Translate app on your iPhone.
- To select the first language, tap the blue arrow next to the language at the top left.
- Select your first language from the pop-up menu.
- To select the second language, tap the blue arrow next to the language at the top right.
- Select your second language from the pop-up menu.
How to translate phrases in the Translate app
Once you have chosen your preferred languages from the steps above, you are ready to start translating.
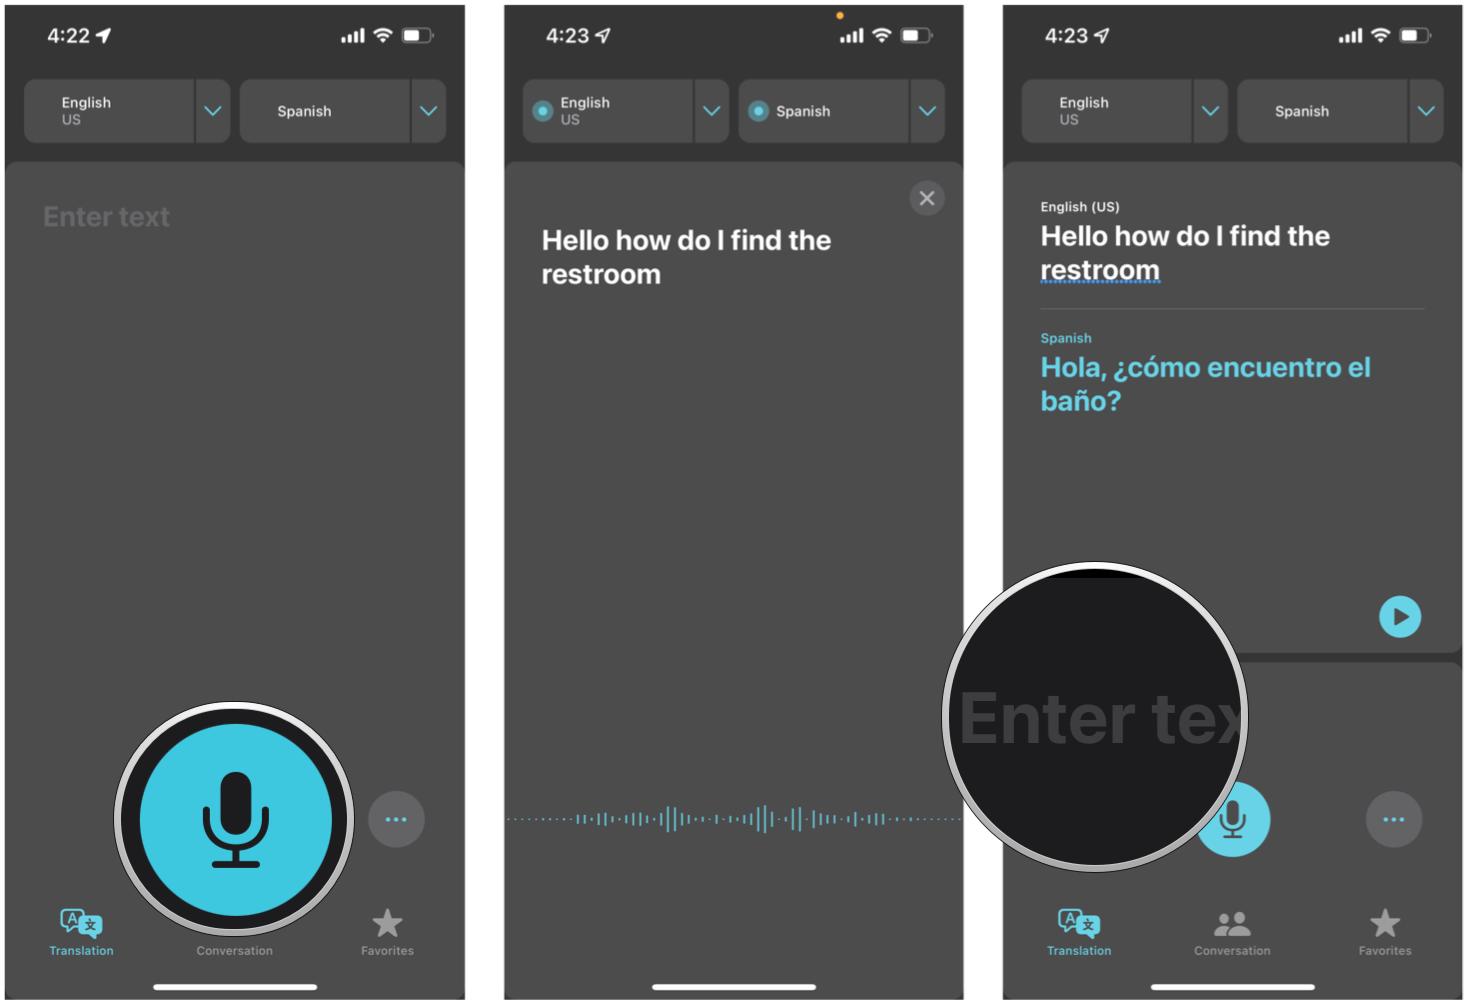
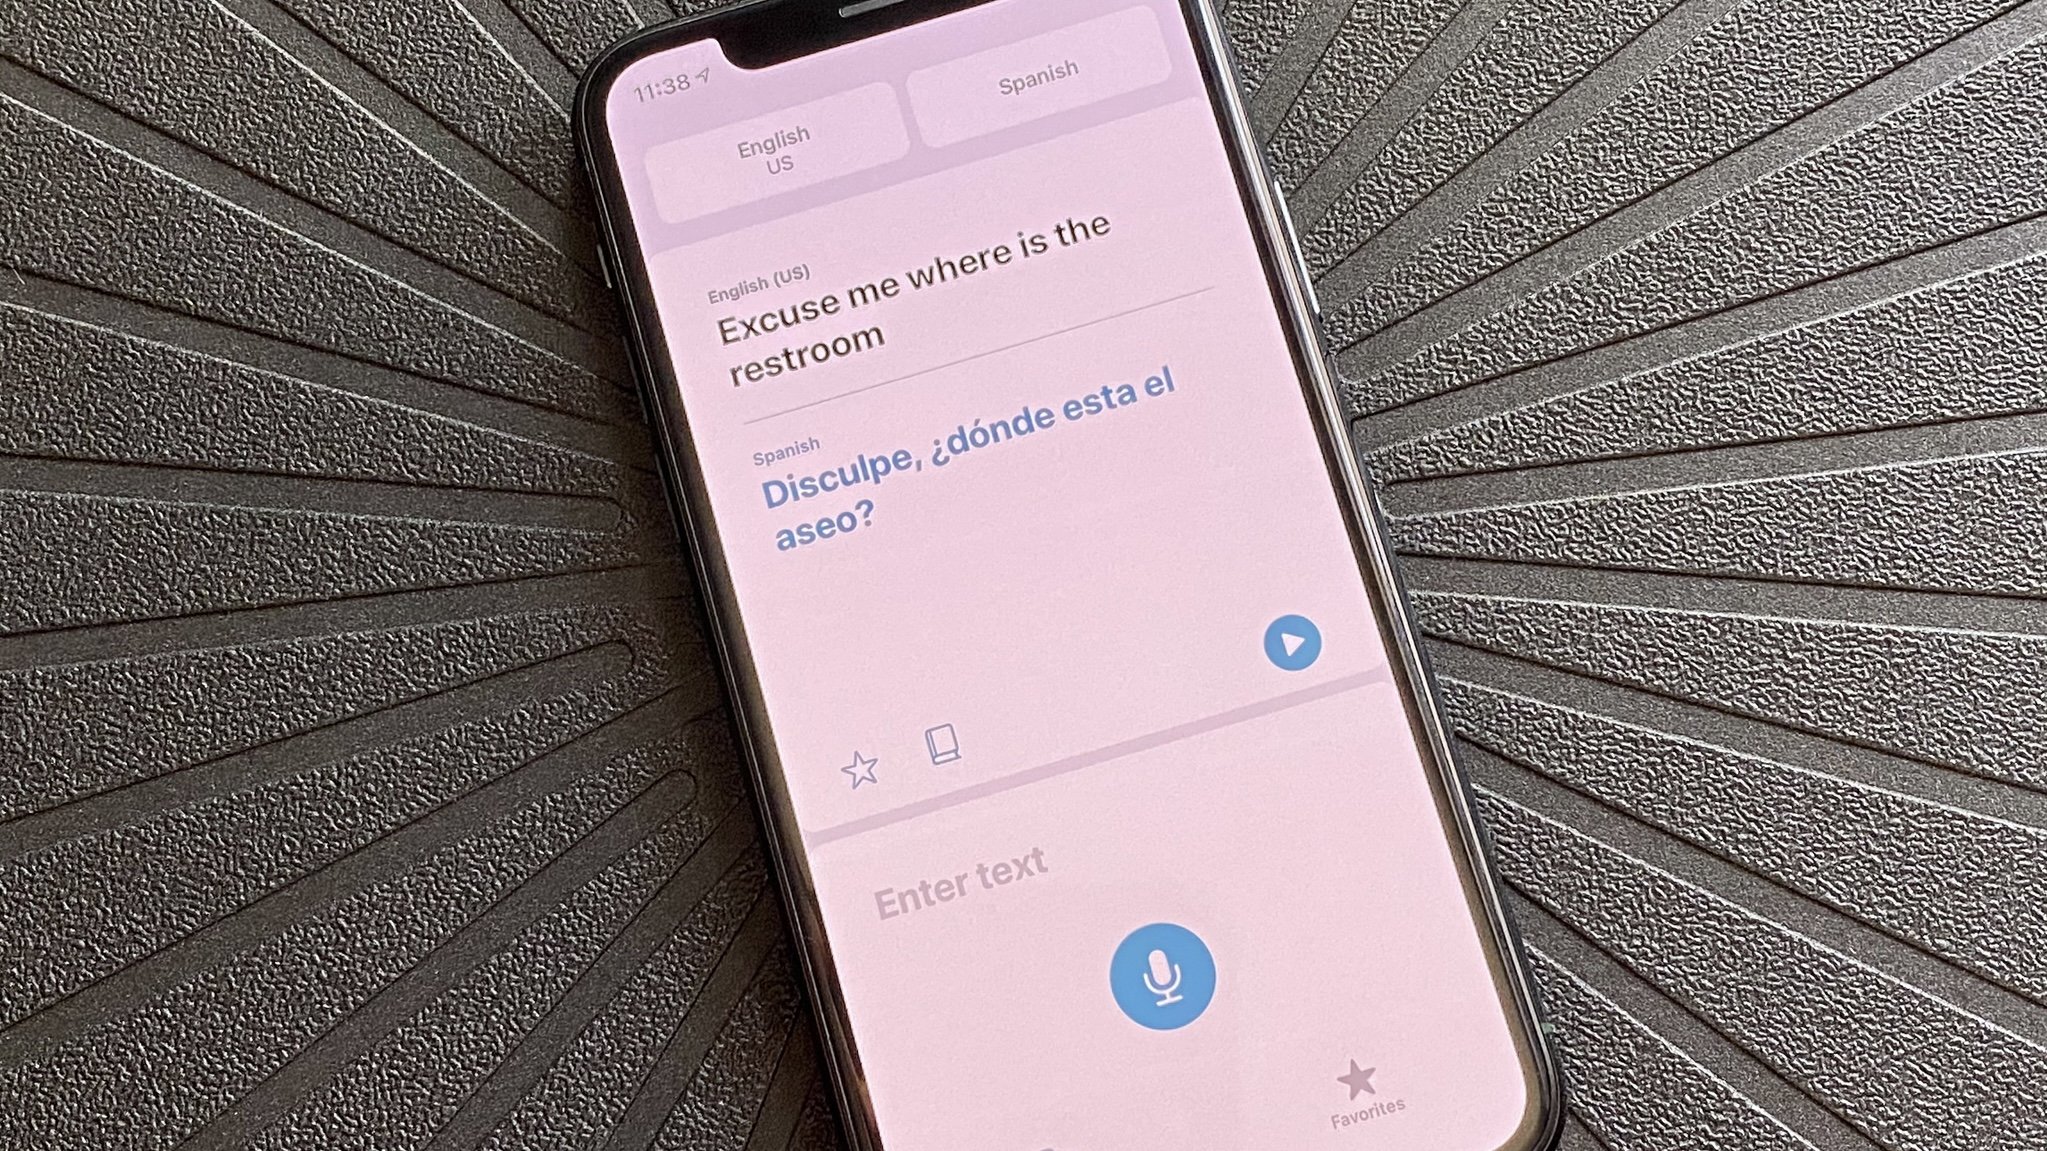
- Tap on the blue microphone button and say the phrase that you need to translate.
- The Translate app can automatically detect when someone stops speaking, and your translated phrase appears on the screen underneath the original phrase, along with an audio playback.
- You can also tap the bottom area to type the word or phrase you need to translate.
How to favorite or pull up the dictionary in the Translate app
Once you start translating, you can bookmark certain phrases for quick reference later, or even look up dictionary definitions.
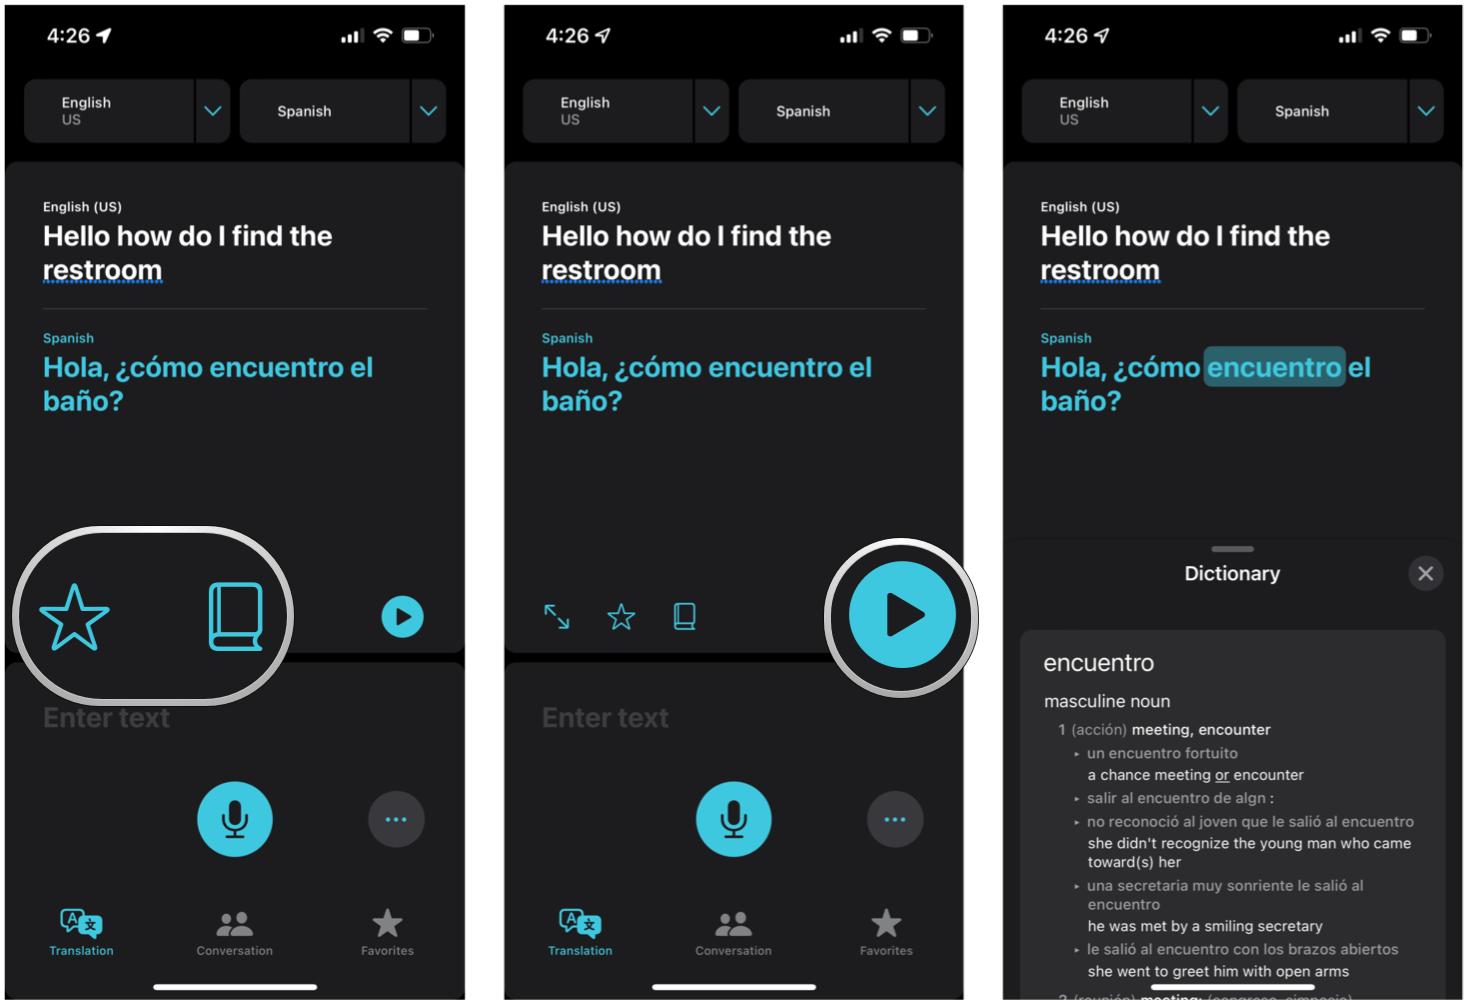
- To favorite a phrase for later, tap the star icon underneath the translation.
- To look up definitions, tap the book icon underneath the translation. You can also tap on the word itself.
- Tap Play to get an audio playback of the word or phrase.
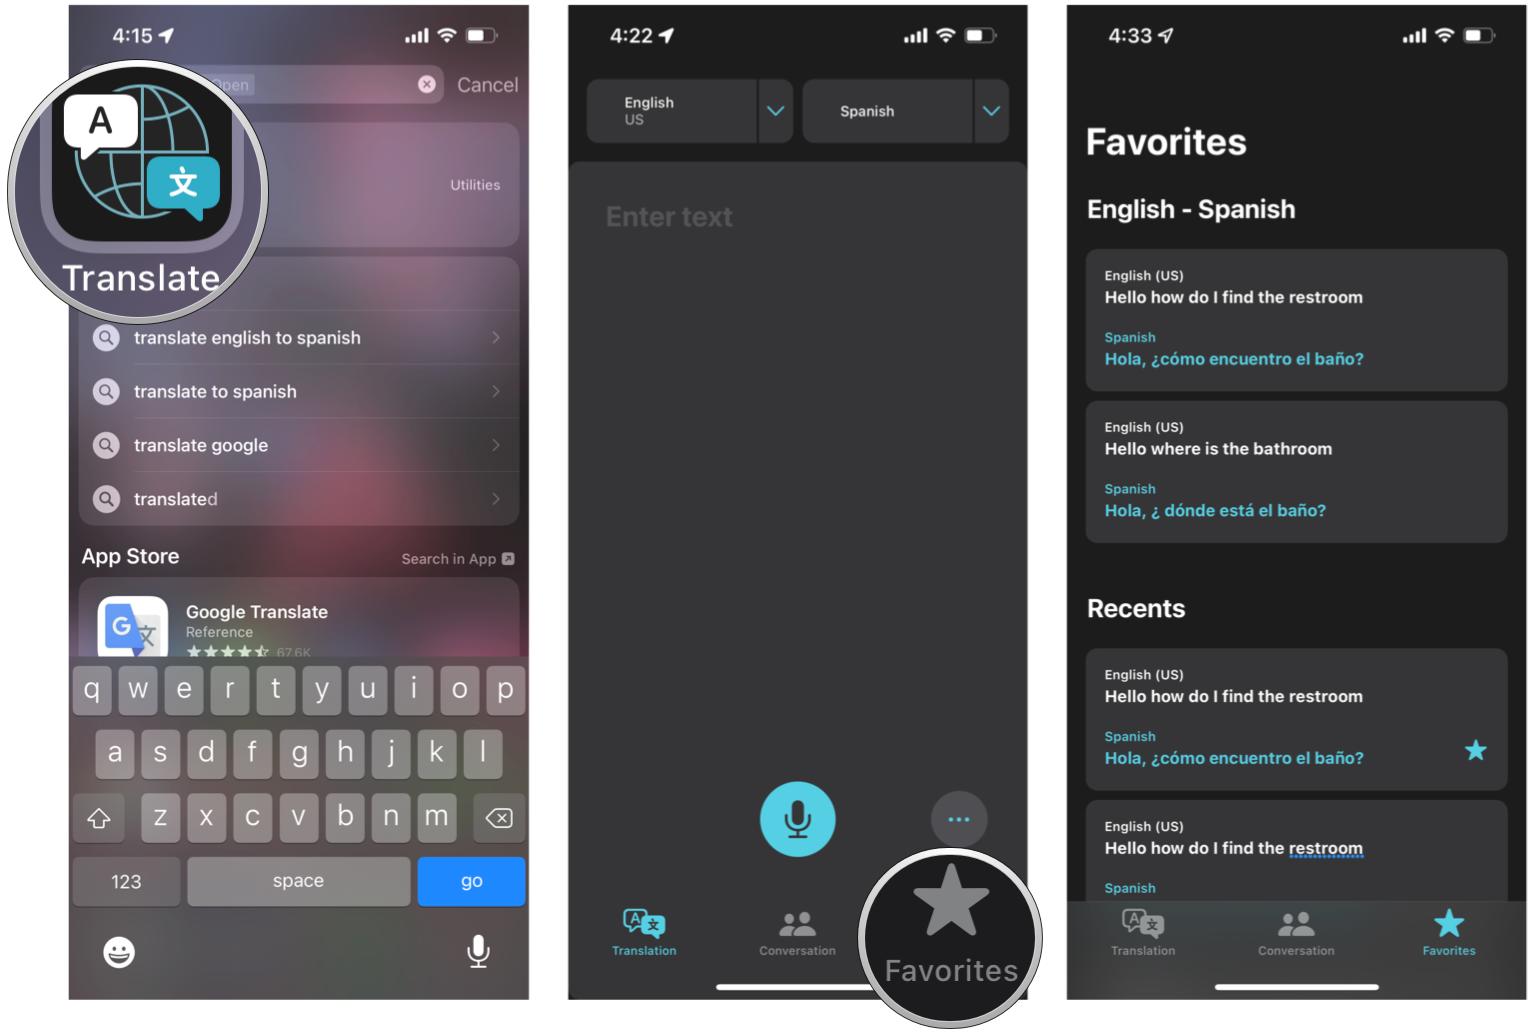
How to access your Favorite translations in the Translate app
When you have favorited a translated phrase, it makes it easier to pull up whenever you need it, rather than having to speak or type out that phrase over and over again. This is especially useful when frequently traveling to places where you don't know the native language.
- Launch Translate on your iPhone.
- Tap Favorites tab at the bottom.
- Favorited phrases appear at the top. Underneath is the Recents section, where you get a history of your translations so far.
If one of your favorite phrases has multiple options, you can tap on the specific phrase that you mean. This is especially helpful for things like "bathroom."
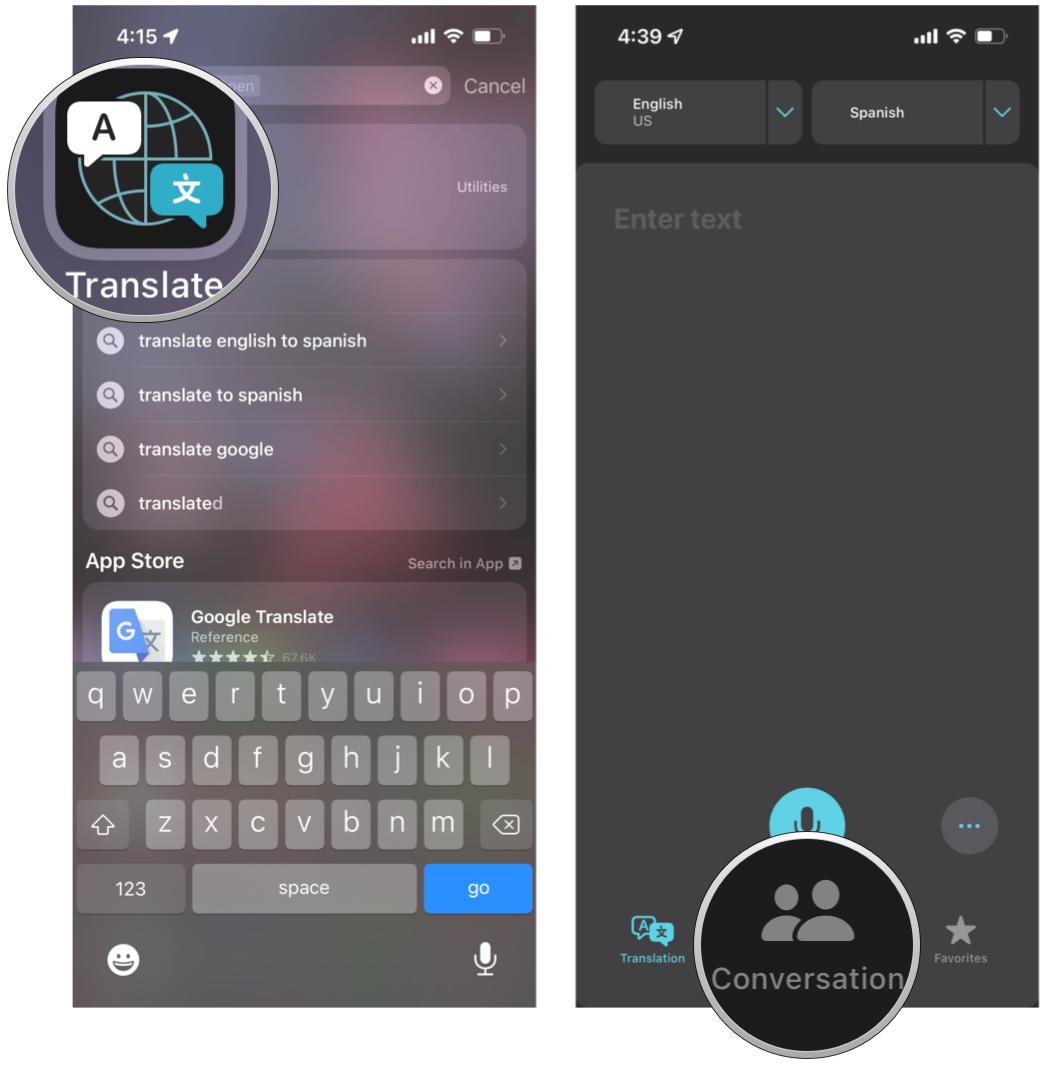
How to have a conversation translated in real-time in the Translate app
One of the coolest things about the Translate app for iPhone is that you can use it to hold conversations with someone in real-time. Here's how to do just that.
- Launch Translate on your iPhone.
- Tap the Conversation button at the bottom.
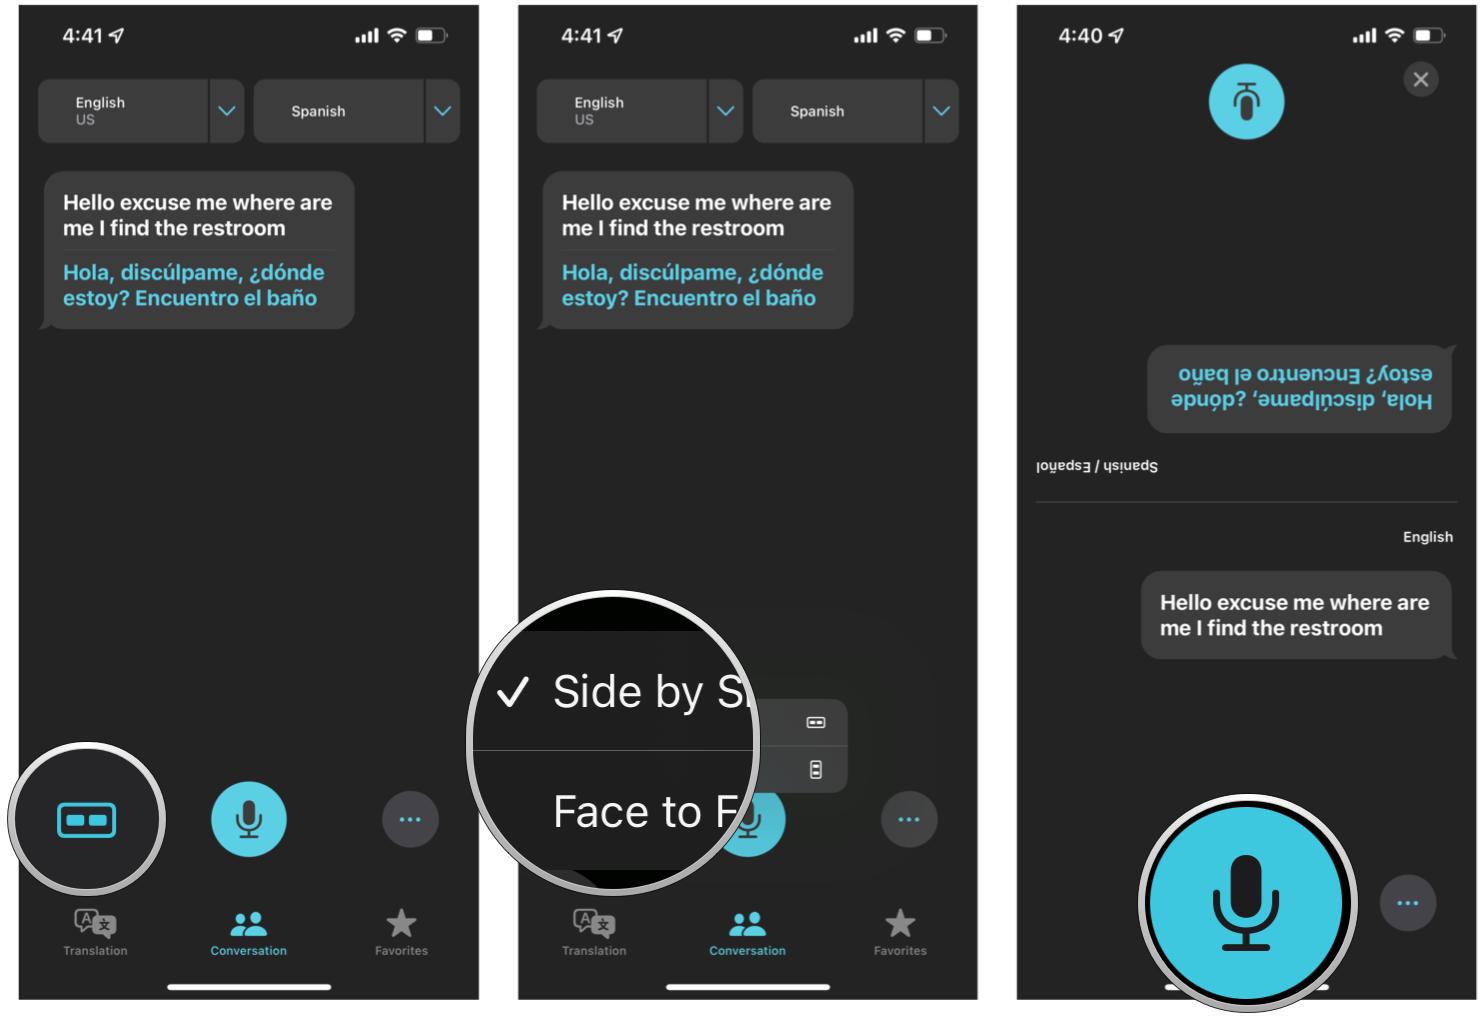
- Tap the orientation button to the left of the blue microphone. You have two options: Side by Side (default) or Face to Face.
- Tap the blue microphone and start speaking. Your speech will be translated in real-time for the other person and vice versa.
How to turn on Auto Translate in the Translate app
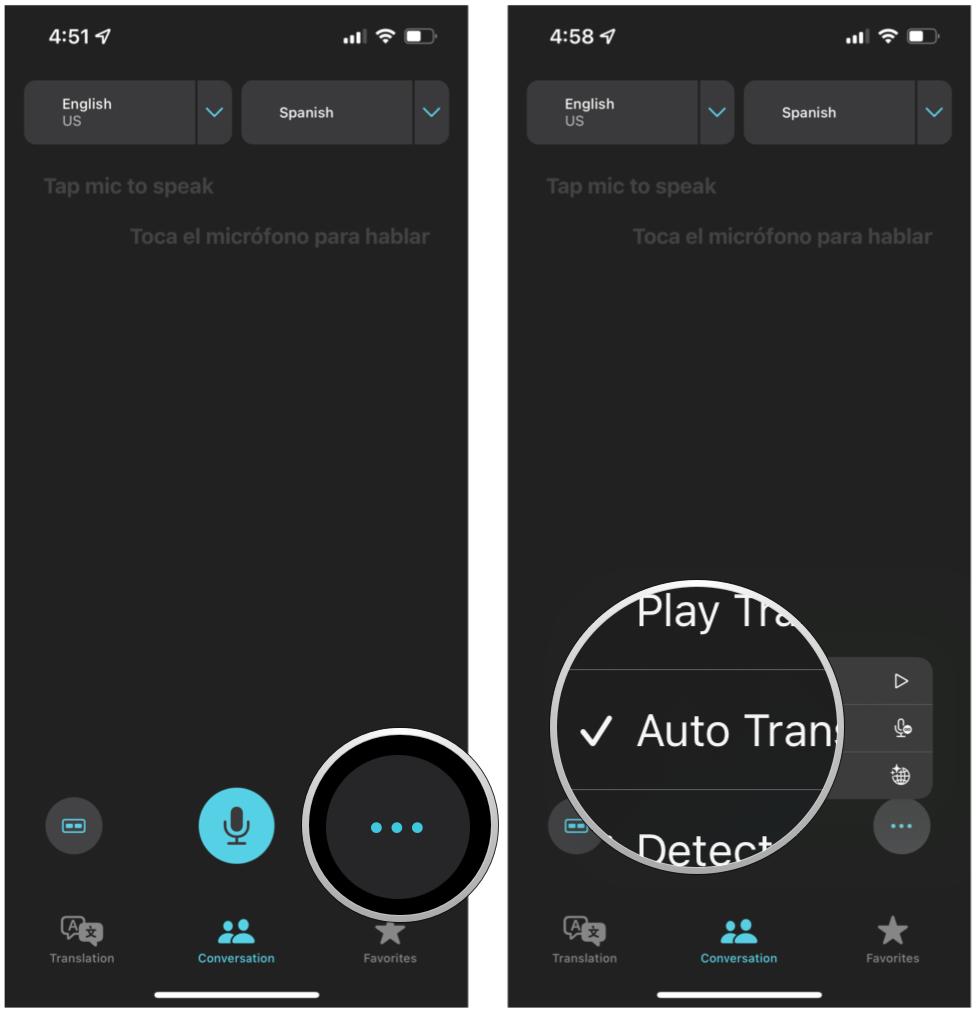
To make your life easier, there is an Auto Translate feature in the Translate app on both iPhone and iPad. This allows the app to automatically detect which language is being spoken, and it will translate accordingly, so you don't need to manually select the languages.
- Make sure that you're in the Conversation view.
- Tap the More button (it looks like three dots).
- Select Auto Translate.
- You can also choose to toggle Detect Language and Play Translations from here as well.
How to download languages to use offline in the Translate app
The Translate app for iPhone requires an internet connection to work. However, you can always download the languages you need so that translation always works, even if you don't have a data connection.
- Launch Translate on your iPhone.
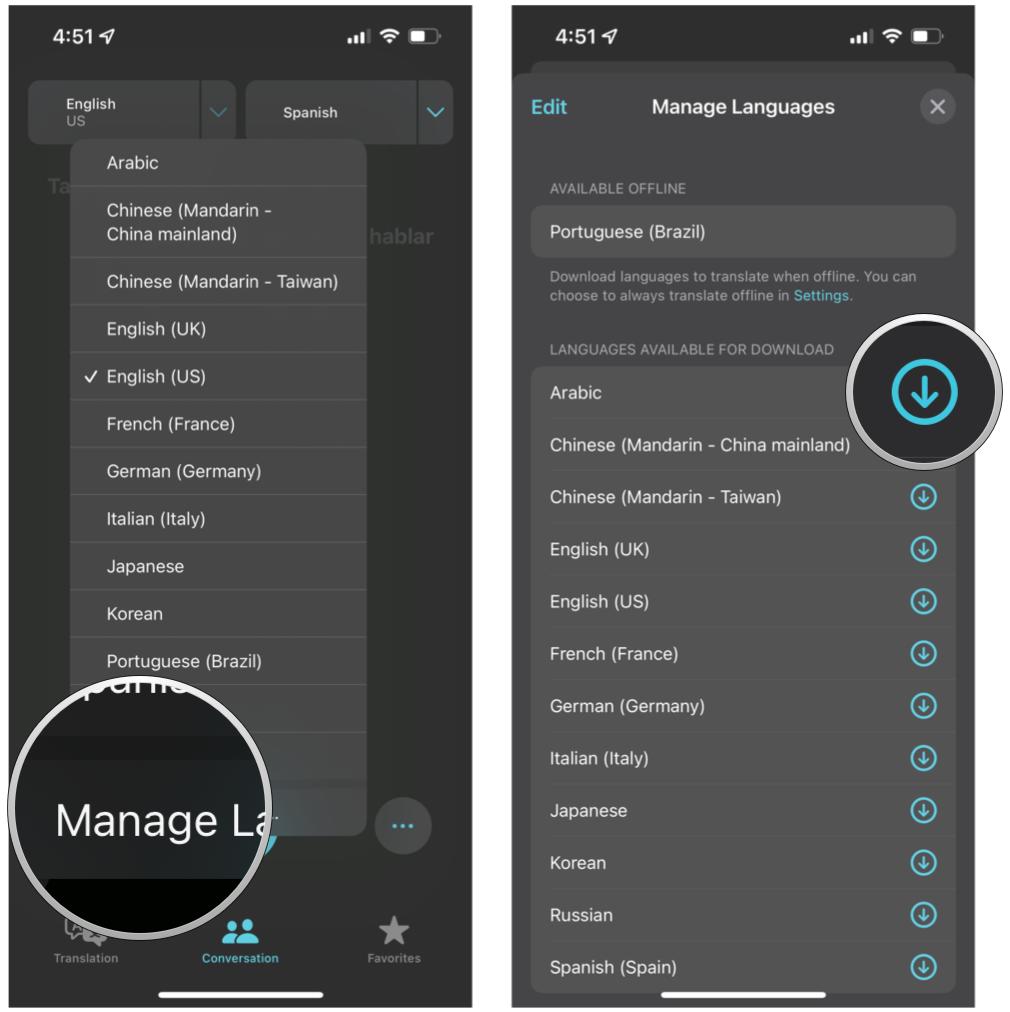
- Tap the blue arrow next to one of the language boxes at the top.
- Tap Manage Languages at the bottom of the pop-up menu.
- Tap the download icon on the language you want to download.
Apple occasionally offers updates to iOS, iPadOS, watchOS, tvOS, and macOS as closed developer previews or public betas. While the betas contain new features, they also contain pre-release bugs that can prevent the normal use of your iPhone, iPad, Apple Watch, Apple TV, or Mac, and are not intended for everyday use on a primary device. That's why we strongly recommend staying away from developer previews unless you need them for software development, and using the public betas with caution. If you depend on your devices, wait for the final release.
How to use the Translate app to translate an image in iOS 16
A new feature in iOS 16 allows you to use the device camera to capture an image and translate the text right in the Translate app. This applies to new images taken in the Translate app, or you can import an existing image in your Photo Library.
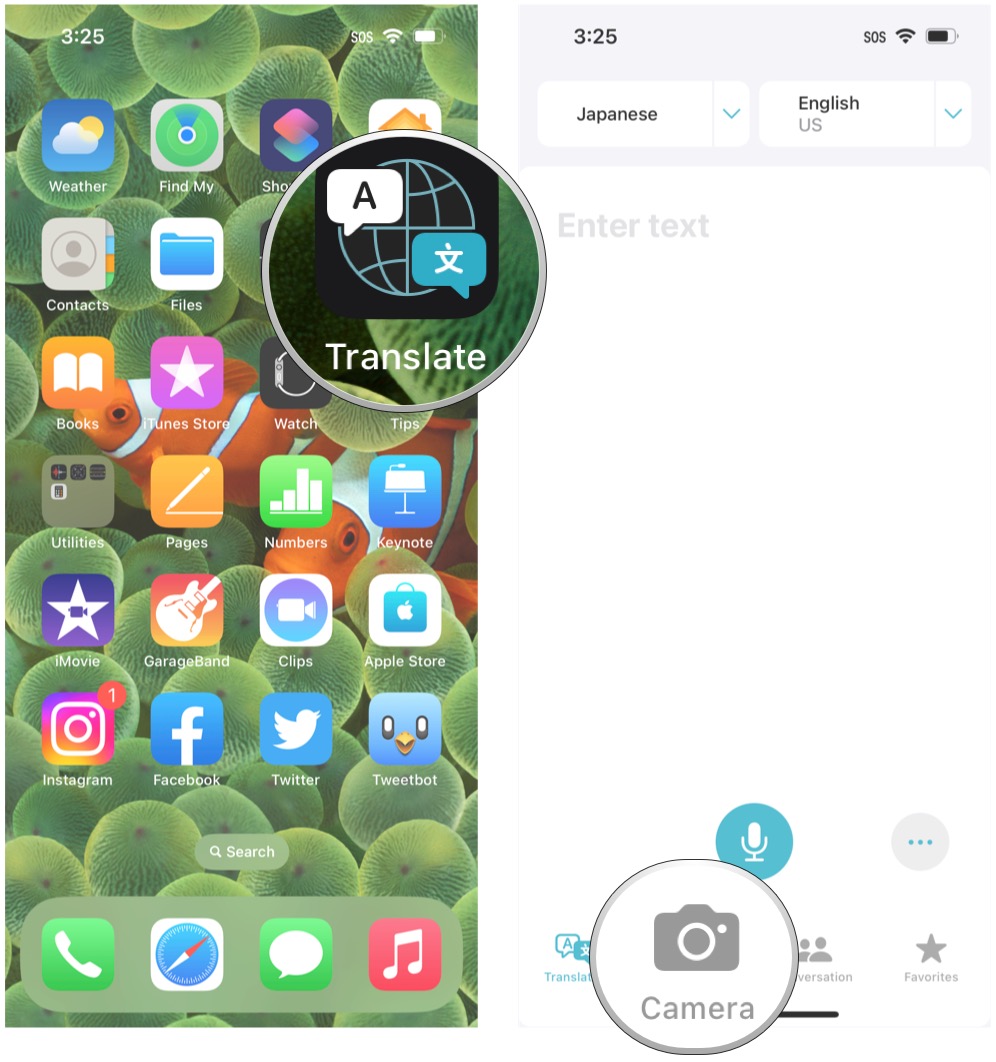
- Launch Translate on your iPhone or iPad.
- Tap the Camera button.
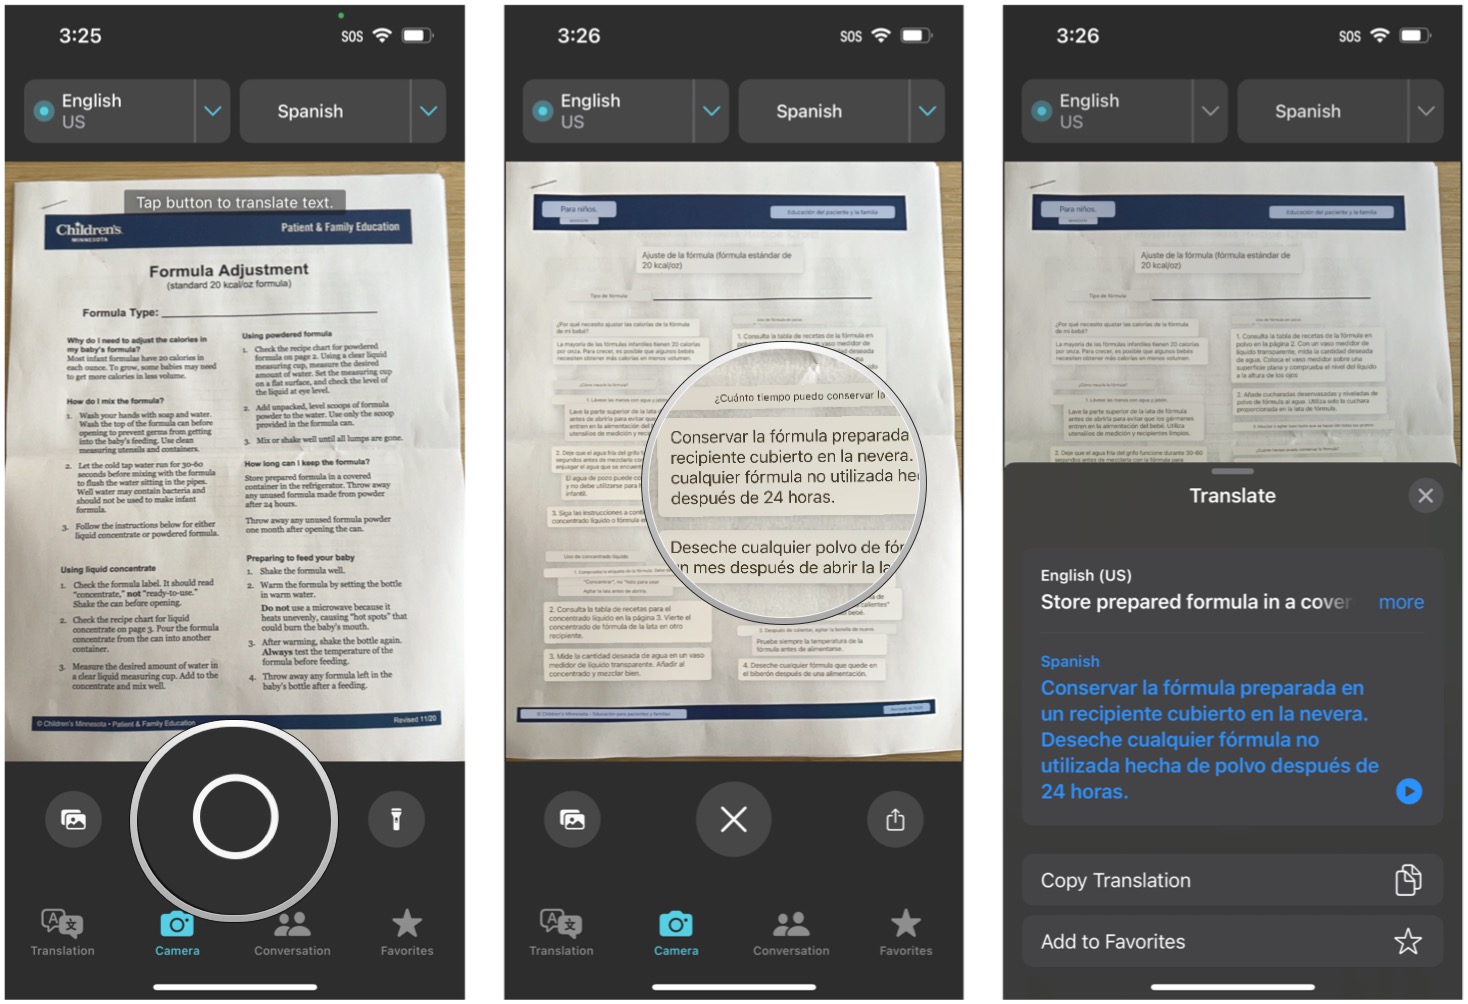
- Point your device camera at something that you need translated. You'll want to make sure that you have the correct languages selected to make life easier.
- Tap the Capture button at the bottom to get your image. It looks like a white circle outline.
- Optionally, tap the Photo Library icon in the bottom left of the viewfinder area to pull up an existing image.
- Once the Translate app has your image capture, and the correct languages are chosen for translation, you can tap highlighted areas on the image to view the original text and the translated text.
- From there, you can either Copy Translation or Add to Favorites.
Just make sure that your iPhone is compatible with iOS 16, as a few devices that could run iOS 15 have been cut off from the newest software.
Break through those language barriers with ease
Using the Translate app on the iPhone is pretty easy and straightforward. It's also fantastic that it is now built into iOS itself, and you don't have to rely on a third-party app. Translate is an incredibly handy tool to have on your iPhone, especially if you're going to a new country in the future.
Plus, with the new ability in iOS 16 to capture images and translate them directly, even from existing images, it's never been easier! You'll just need to make sure that you have a compatible device with iOS 16 or iPadOS 16 first, as it requires newer hardware. Still, this is only needed if you want to translate images directly — any device with at least iOS 14 or iPadOS 15 on it should handle everything else without a problem.
Updated August 2022: Added screenshots for the camera capture feature in iOS 16 public beta.

Christine Romero-Chan was formerly a Senior Editor for iMore. She has been writing about technology, specifically Apple, for over a decade at a variety of websites. She is currently part of the Digital Trends team, and has been using Apple’s smartphone since the original iPhone back in 2007. While her main speciality is the iPhone, she also covers Apple Watch, iPad, and Mac when needed.
When she isn’t writing about Apple, Christine can often be found at Disneyland in Anaheim, California, as she is a passholder and obsessed with all things Disney, especially Star Wars. Christine also enjoys coffee, food, photography, mechanical keyboards, and spending as much time with her new daughter as possible.
